Using ProDVX Devices
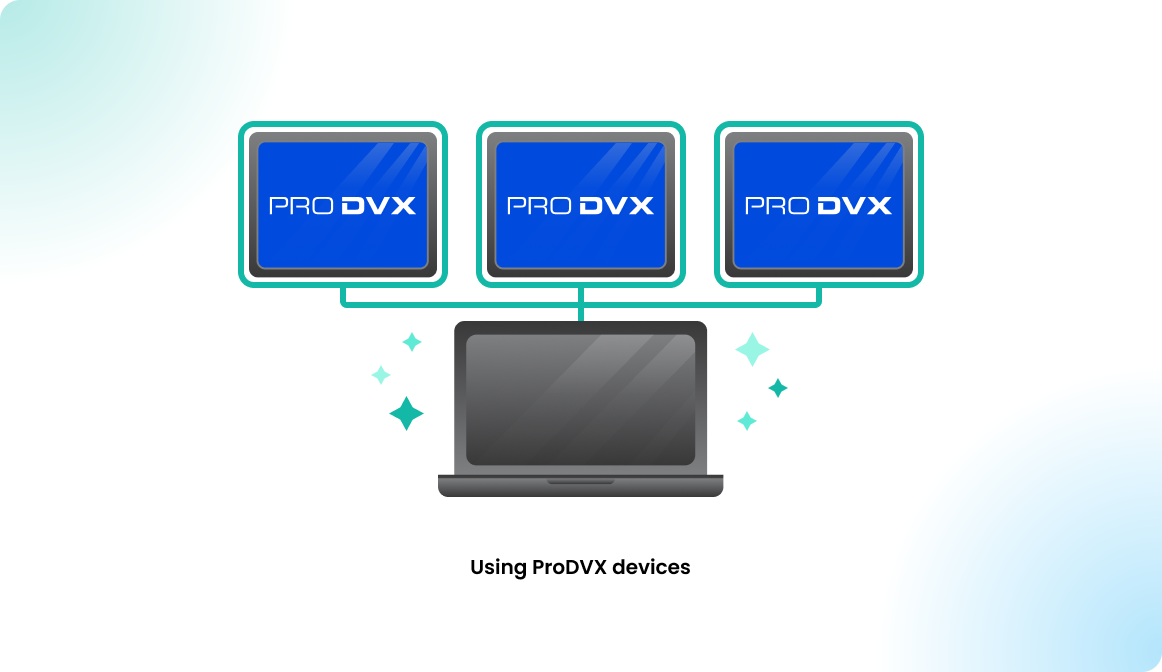
Our partner, ProDVX is a premium display manufacturer and our preferred choice of hardware for Flexopus displays. In this article, we are presenting deployment instructions to ProDVX devices using the ProMGR device management software and ProDVX API.
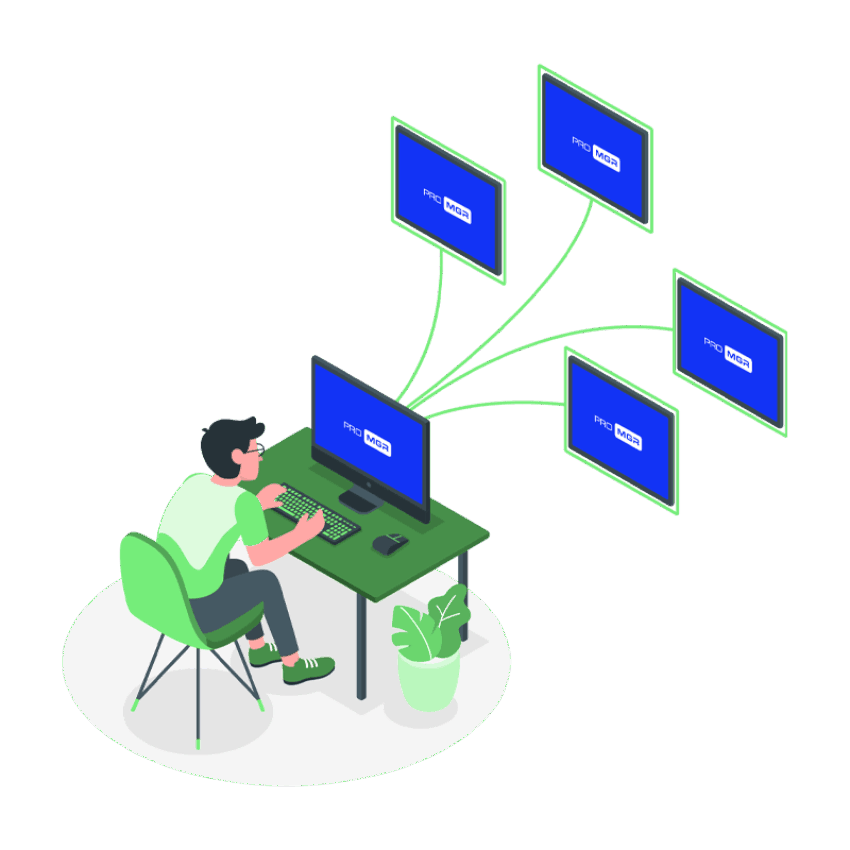
Remote Device Management with ProMGR
ProMGR is a remote device management software that enables provisioning and full remote control of ProDVX devices. It consists of two main components: the ProMGR application running on the device, and ProMGR Cloud, a remote management platform where you can access and control your fleet.
ProDVX API: A universal API for seamless integration
The ProDVX API offers a unified interface for controlling ProDVX devices, functioning as a service that provides a REST interface for communication with our application. We are using it to control the LED lights.

Provision devices with ProMGR
Kiosk license is enough to provision and use the device in kiosk mode, however, you will need the Cloud subscription for remote device management. For more information, contact ProDVX or your hardware distributor.To provision the device, you have to follow the following steps:
- Create a configuration in ProMGR Cloud
- Create a provisioning profile in ProMGR Cloud
- Prepare the device
- Provision the device
- Pair with Flexopus
STEP 1 - Create a configuration
ProMGR uses configurations to define the settings applied to the device. A configuration is a JSON file with key-value pairs. ProMGR provides a user-friendly editor for the most important settings, but for others, you will have to edit the JSON file directly.
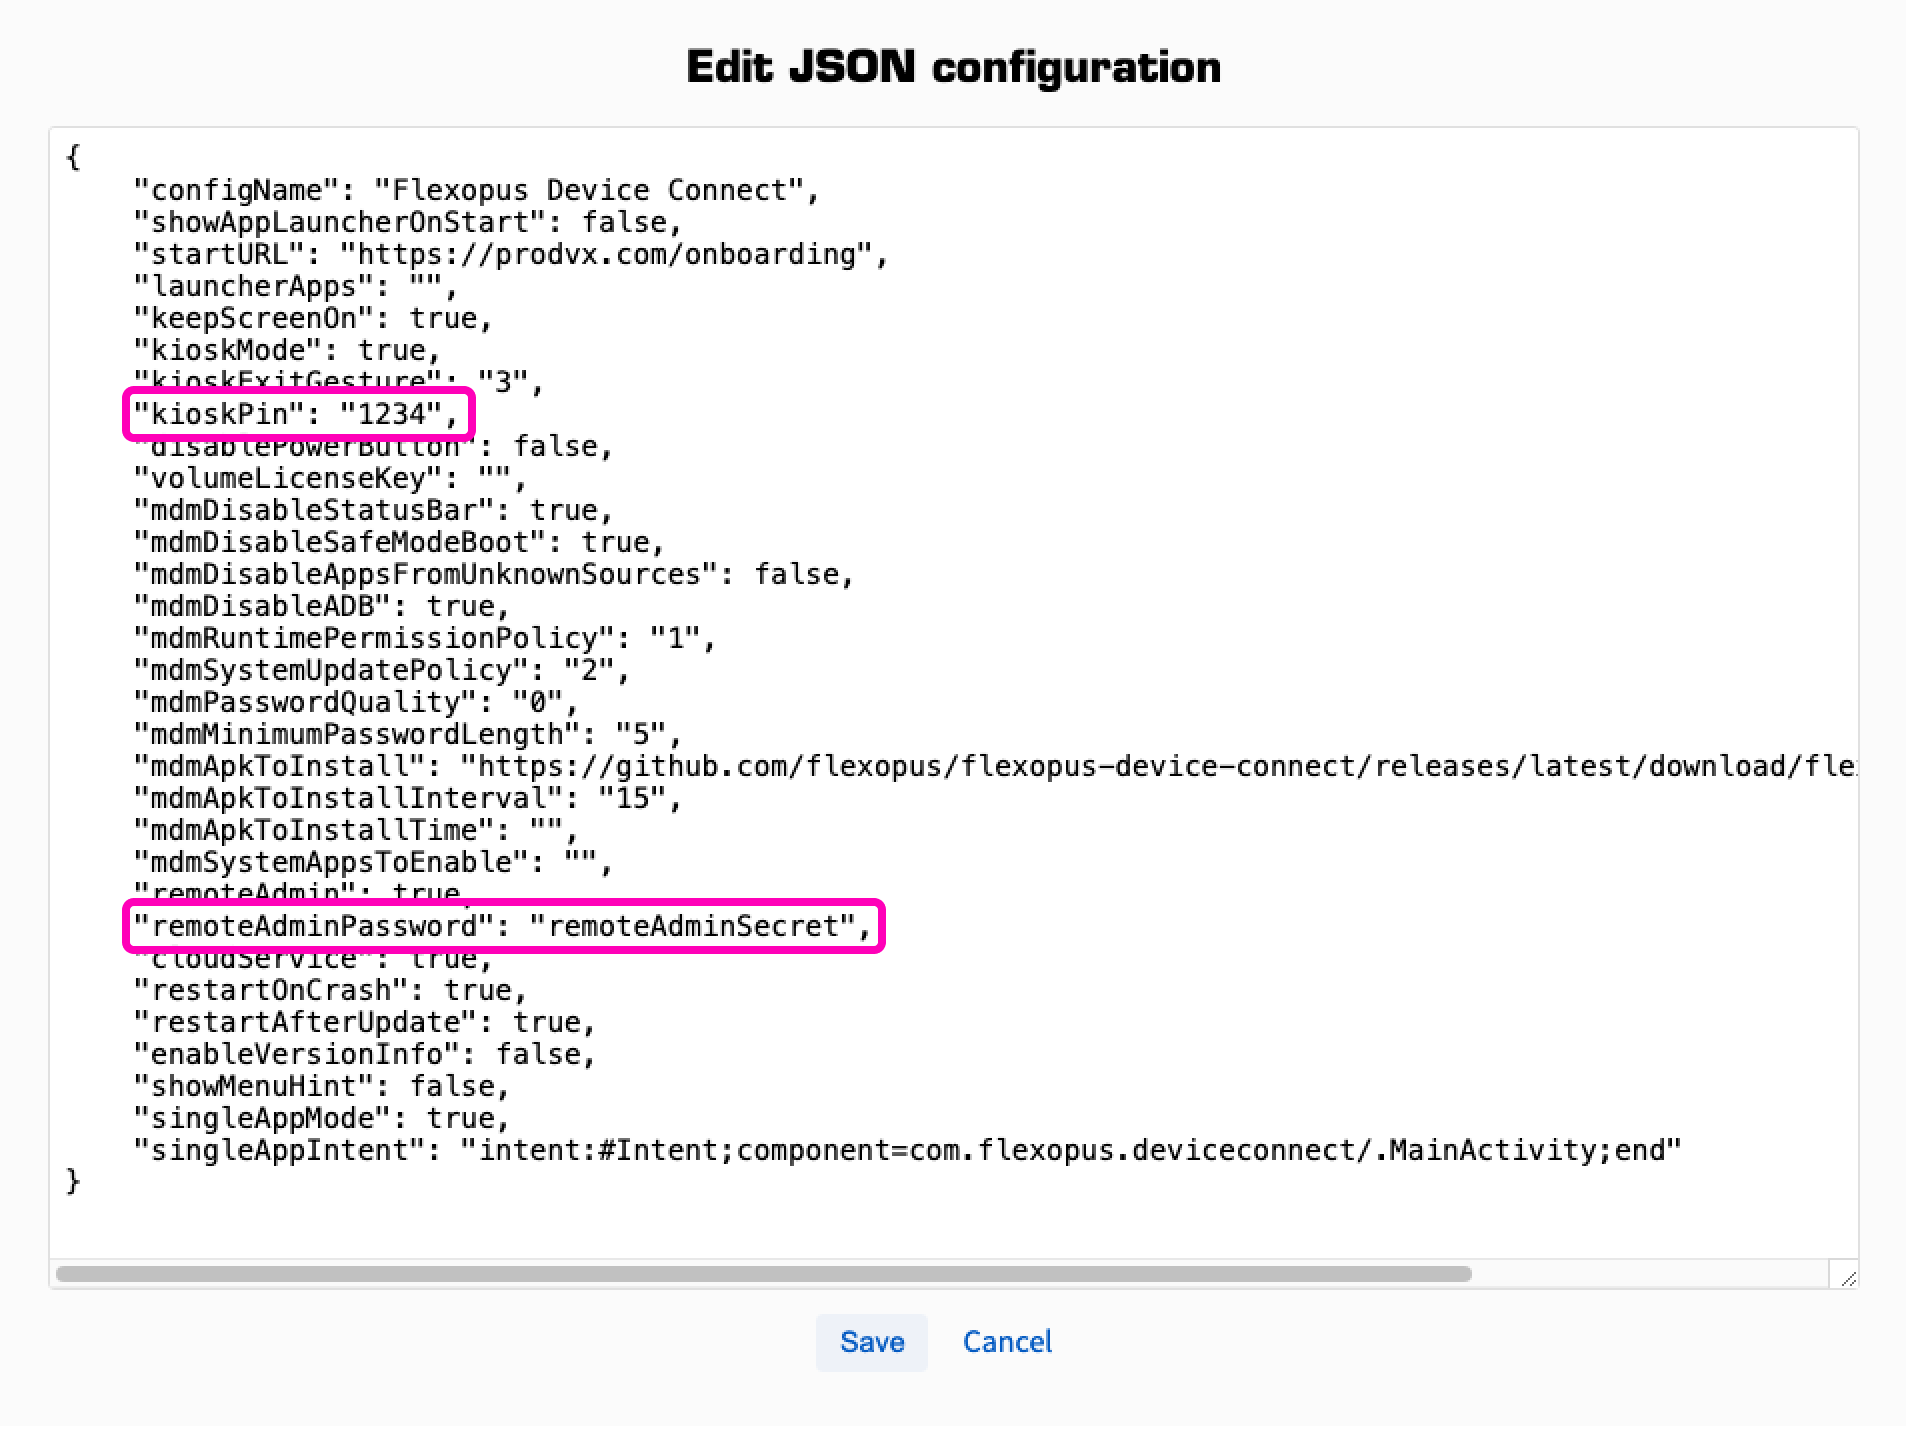
{
    "configName": "Flexopus Device Connect",
    "showAppLauncherOnStart": false,
    "startURL": "https://prodvx.com/onboarding",
    "launcherApps": "",
    "keepScreenOn": true,
    "kioskMode": true,
    "kioskExitGesture": "3",
    "kioskPin": "1234",
    "disablePowerButton": false,
    "volumeLicenseKey": "",
    "forceScreenUnlock": true,
    "forceSwipeUnlock": true,
    "mdmDisableKeyguard": true,
    "mdmDisableStatusBar": true,
    "mdmDisableSafeModeBoot": true,
    "mdmDisableAppsFromUnknownSources": false,
    "mdmDisableADB": true,
    "mdmRuntimePermissionPolicy": "1",
    "mdmSystemUpdatePolicy": "2",
    "mdmPasswordQuality": "0",
    "mdmMinimumPasswordLength": "5",
    "mdmApkToInstall": "https://github.com/flexopus/flexopus-device-connect/releases/latest/download/flexopus-device-connect.apk",
    "mdmApkToInstallInterval": "15",
    "mdmApkToInstallTime": "",
    "mdmSystemAppsToEnable": "",
    "remoteAdmin": true,
    "remoteAdminPassword": "remoteAdminSecret",
    "cloudService": true,
    "restartOnCrash": true,
    "restartAfterUpdate": true,
    "enableVersionInfo": false,
    "showMenuHint": false,
    "singleAppMode": true,
    "singleAppIntent": "intent:#Intent;component=com.flexopus.deviceconnect/.MainActivity;end"
}
Sample configuration file for the Flexopus Device Connect app
To start with our template, download the sample file from our GitHub repository (click on Download raw file in the file header):
Sample configuration file for Flexopus Device Connect
To create a configuration, sign in to ProMGR and navigate to Configurations. Click on Import From File and select the downloaded file. ProMGR will create a configuration based on the sample, click on Save to finish the importing.
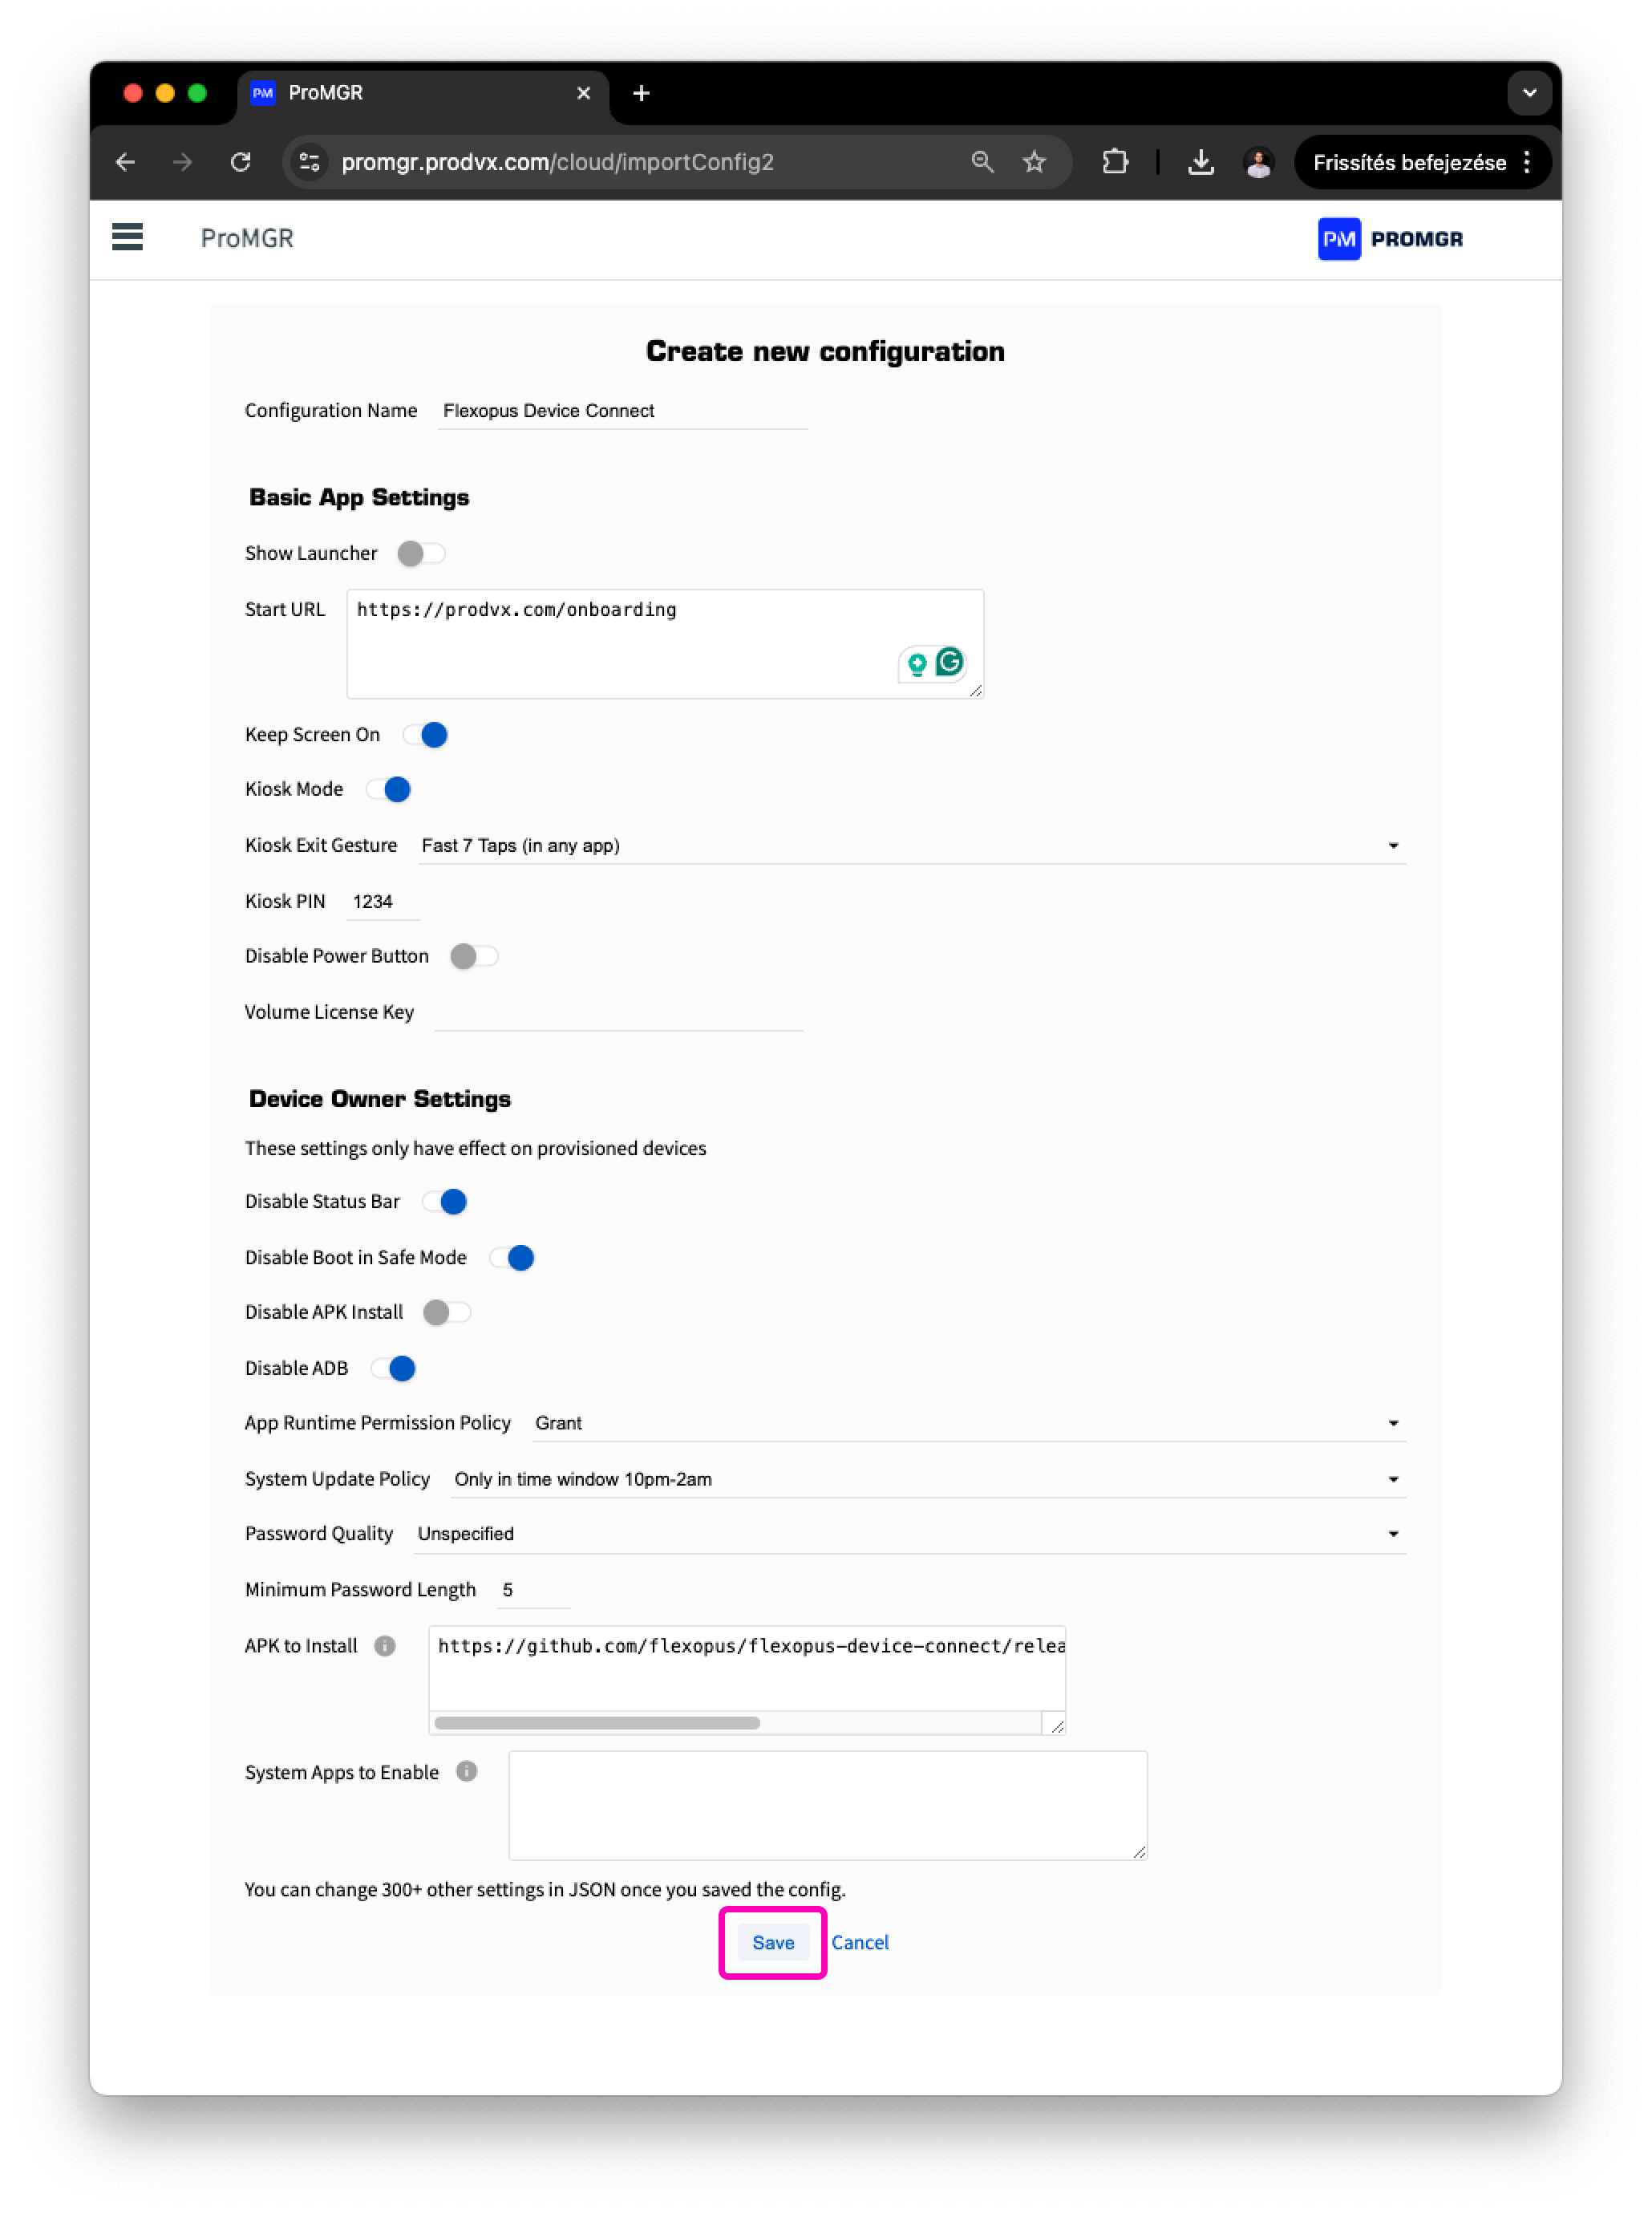
Once you have imported the configuration, click on the Configure gear icon in the list, then on Edit JSON in the bottom of the edit page.


In the JSON edit page, you can edit all the values of the configuration, even the ones that are hidden on the basic editor interface. For security reasons, we recommend changing the kiosk exit pin and the remote admin password.
There are a lot of other settings you can change here, but these options are sufficient to start with the Flexopus Device Connect.
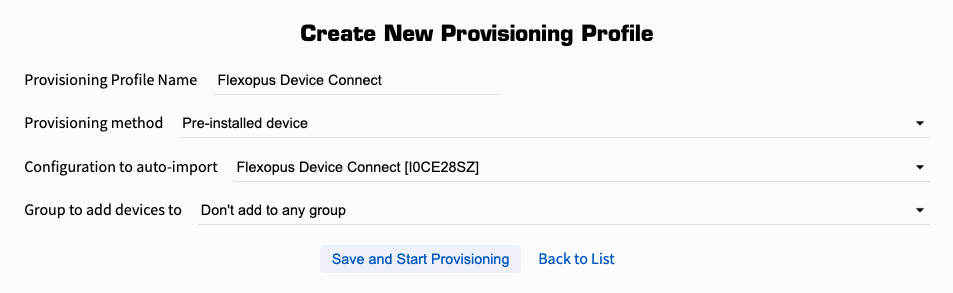
STEP 2 - Create provisioning profile
As a next step, navigate to Device Provisioning and click on Create New Profile. Name your profile Flexopus Device Connect. Select the created configuration from the list and decide how you want to group your devices.
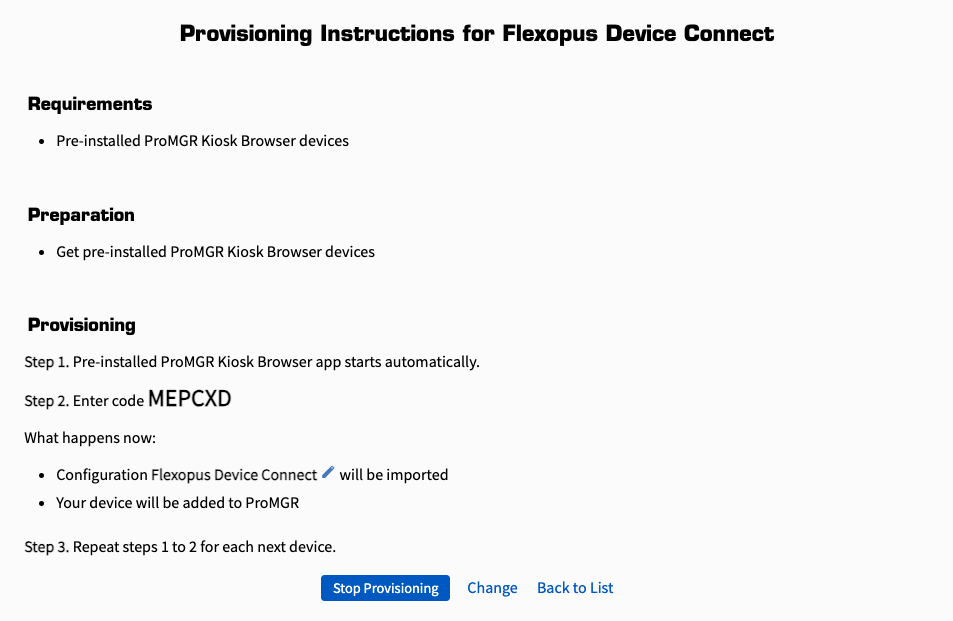
Option A: Provisioning a pre-installed device
If you have purchased a device with ProMGR pre-installed, select the Pre-installed device provisioning method.
Option B: Manual provisioning with ADB
If your device does not come with ProMGR pre-installed, choose the ADB (manual) provisioning method. Android Debug Bridge (ADB) is a tool to manage Android devices from a computer. If you are not familiar with using ADB from a command prompt, please take your time and read the documentation.
Select the latest version of the ProMGR Kiosk Browser app.
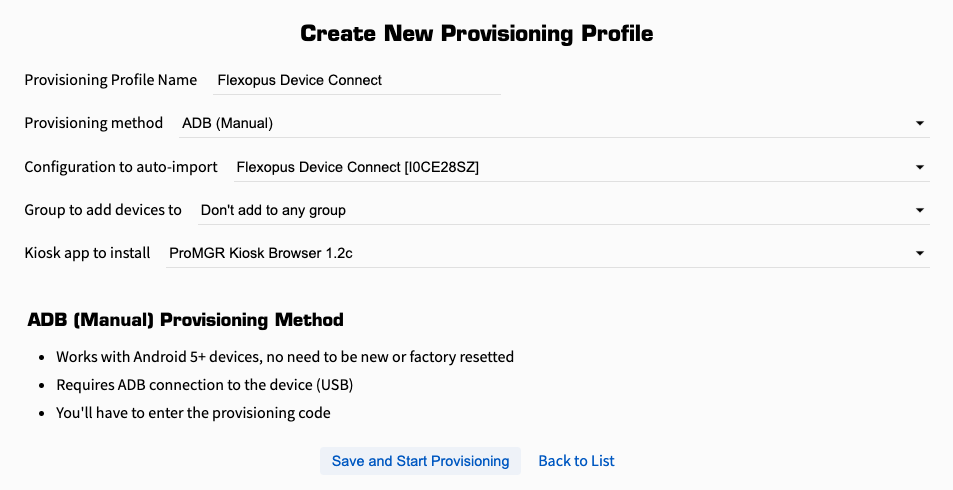
ADB (manual) option does not show up at first. If this happens, submit the empty form. You will receive errors, but the option will appear, and you can save your profile.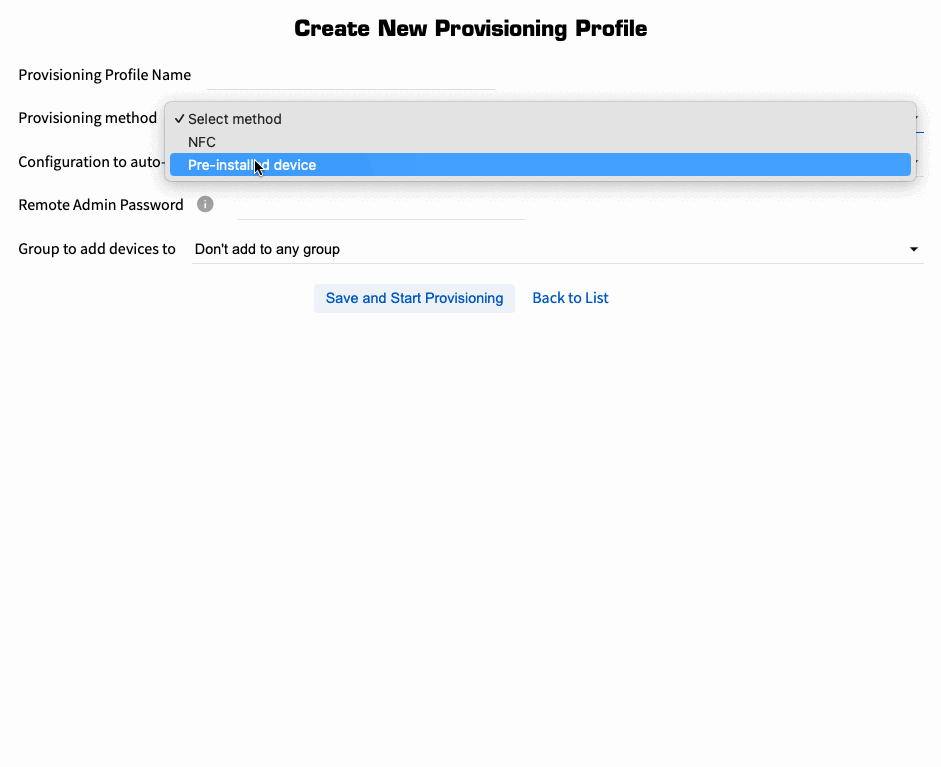
STEP 3 - Prepare the device
Factory reset device: To provision with ProMGR we recommend you start with a factory-reset device. If you have just received your device, then it should be reset. Otherwise, you will have to open the Settings app, and navigate to System -> Reset options -> Erase all data (factory reset) and confirm the action. The naming and location of this action can slightly vary based on your device's os version.
Follow the device's setup wizard: The wizard will ask you to select the language, and connect to a Wi-Fi network (if not using PoE). When asked in the following screens, decline to copy apps and data, skip the Google sign-in, accept Google services, and decline to set a screen lock.
Verify ProDVX API: It is important to have the API running before going on with the provisioning. When the API is running, a permanent notification is displayed in the notifications panel showing the status. If you cannot find the API, you can download and install it using the Quick Start Guide (make sure to choose the right version EDLA vs AOSP).
Enable ADB: If you are using the manual provisioning method, you will have to enable ADB debugging on the device. You can find this option under Developer Settings in the Settings app. Choose USB debugging or Wireless debugging based on your setup. Read more on enabling debugging here.
STEP 4 - Provision device
On the Device Provisioning page, choose your profile in the list, and click on Start & show instructions.

Option A: Provisioning a pre-installed device
Follow the instructions on the provisioning page, and enter the code provided once requested.
Option B: Manual provisioning with ADB
Follow the instructions on the provisioning page.
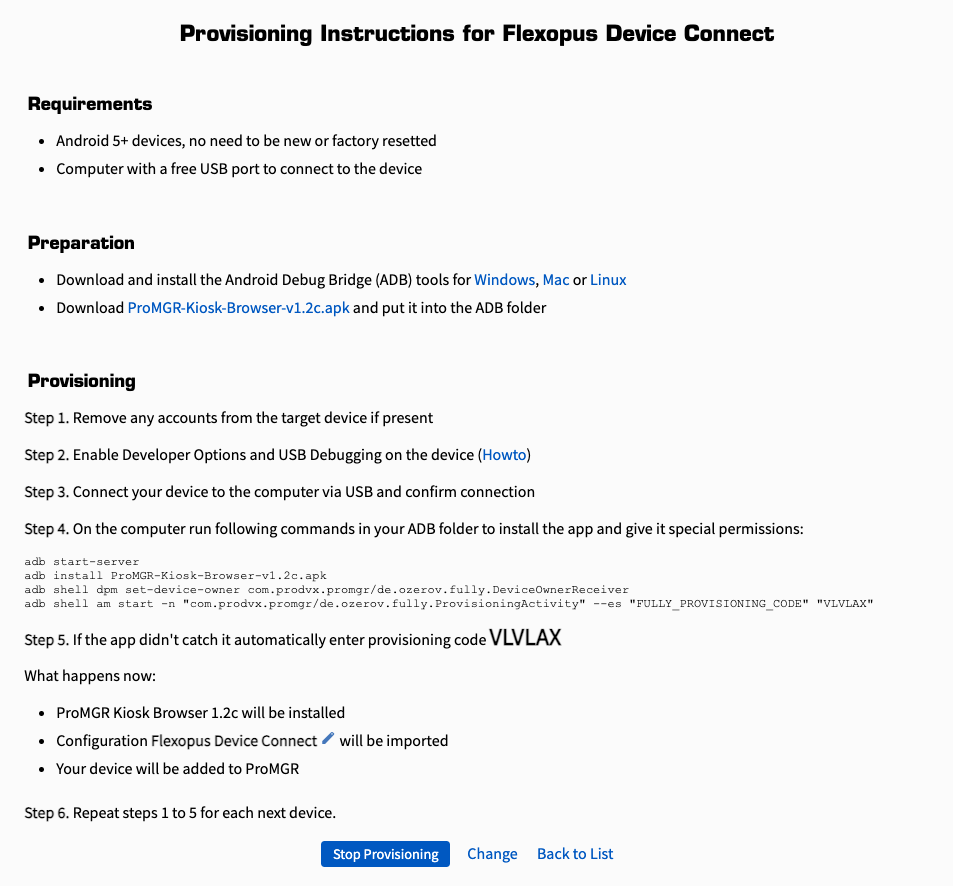
Connect to your device through ADB, and install the ProMGR Kiosk Browser from the provided link. Once you start it with the ADB command, the application will guide you through the provisioning process. You must grant ProMGR all requested permissions.
STEP 5 - Pair with Flexopus
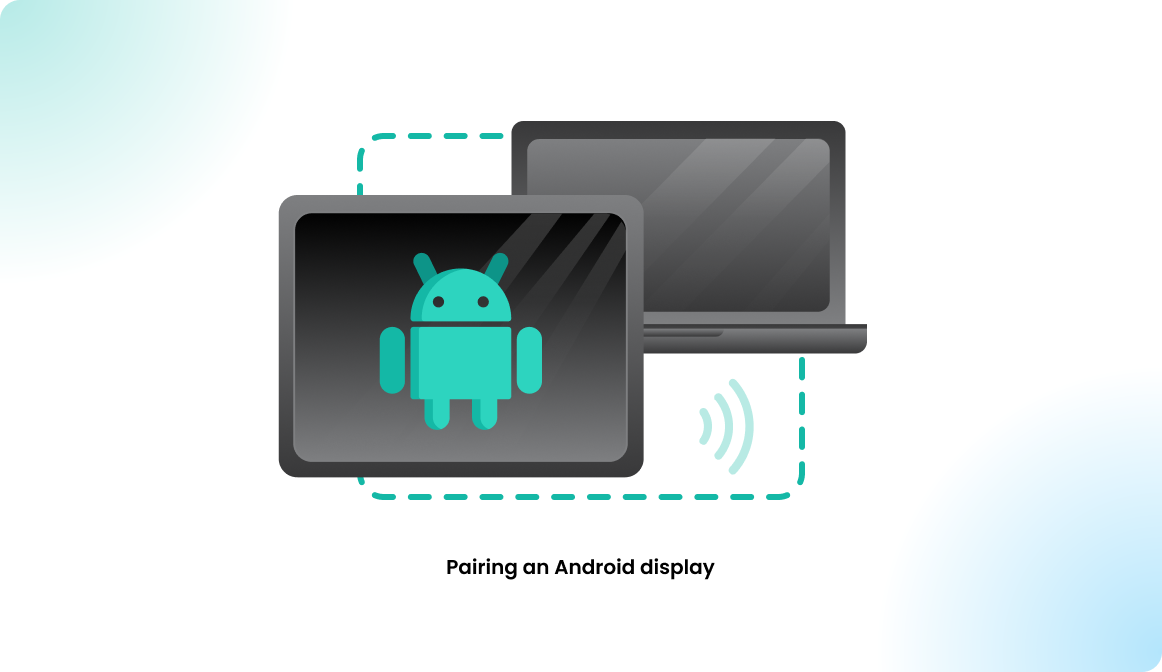
After the last step of the provisioning process, the pairing screen of Flexopus Device Connect will appear. From here, you can proceed with pairing the same way as with any other Flexopus display. Read Pairing an Android display for detailed instructions.
Changing the device configuration
As mentioned above, the configuration transferred to the device will not be updated automatically based on the changes in ProMGR Cloud. You have two options to change device settings after provisioning:
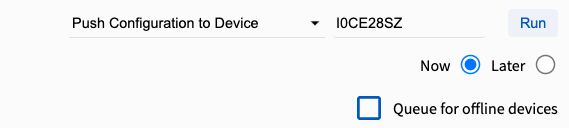
Option 1 - Push configuration to the device
Once registered in the cloud, your device will appear in the Devices section of ProMGR. To update a device configuration remotely, select your device (or multiple devices), and select Push Configuration to Device in the Fast Admin Action dropdown. Select your updated configuration (or any other configuration) and click on Run.
Option 2 - Modify settings on the device
You can access almost every configuration parameter directly on the device.
- Exit kiosk mode: Fast tap anywhere 7 consecutive times (or use another kiosk exit gesture you may have set)
- Enter PIN: a dialog will show up asking for your predefined PIN code
- Go to settings: on the left side, the ProMGR menu will appear, allowing you to enter
Settings.
In the settings menu, you can freely set any parameter to the device.
Advanced configuration options
ProMGR offers several configuration parameters. These parameters can be modified both in the JSON config and the Settings menu. Without being exhaustive, we are presenting some of the useful features.

Automatic app updates
ProMGR can download and apply updates to the running Flexopus Device Connect app. It provides two options to check for updates. Both options can be found under Device Owner Settings (PLUS) in the Settings menu.
Option A: Check every N minutes (APK File Update Interval)
To check for updates in a desired interval, set mdmApkToInstallInterval to the corresponding value in the configuration. This parameter accepts a number larger than 15 or 0 to disable the check. Example:
{
  …
  "mdmApkToInstallInterval": "30",
  …
}
Check for updates every 30 minutes
Option B: Check once a day (APK File Update Time)
Another option is to check for updates once a day, specifying the time in mdmApkToInstallTime parameter, in HH:MM format. Example:
{
  …
  "mdmApkToInstallTime": "03:00",
  …
}Scheduled sleep/wake-up
For power management purposes, it is possible to schedule sleep and wake-up times on the device. When sleeping, the device will turn off the screen completely.
To set it from the Settings menu, navigate to Settings/Power Settings/Schedule Wakeup and Sleep ( PLUS ). Here you can set multiple rules with sleep and wake-up times.

To set it from the JSON configuration, you will have to use a JSON-encoded string with a strict format. The JSON description of the schedule looks like this:
[
  {
    "wakeUpTime": "07:00",
    "sleepTime": "18:00",
    "dayOfWeek": 8
  }
]
JSON description of a schedule
Finally, the sleepSchedule has to contain the string representation of the JSON formatted scheduled, with escaped special characters. You can use JSON Escape to create the string.
{
  …
  "sleepSchedule": "[\r\n  {\r\n    \"wakeUpTime\": \"07:00\",\r\n    \"sleepTime\": \"18:00\",\r\n    \"dayOfWeek\": 8\r\n  }\r\n]",
  …
}
Final configuration value for sleepSchedule
Hint: JSON pretty print is not required, you can omit the whitespaces for conciseness.
"sleepSchedule": "[{\"wakeUpTime\":\"07:00\",\"sleepTime\":\"18:00\",\"dayOfWeek\":8}]",Screensaver
ProMGR can start a screensaver after a predefined idle time. Tapping the screen will stop the screensaver and return to the application.
To set a screensaver, navigate to Settings/Screensaver (PLUS). To enable it, set the Screensaver Timer property to a non-zero value. Feel free to set a custom screensaver wallpaper, or even multiple media sources in a playlist.
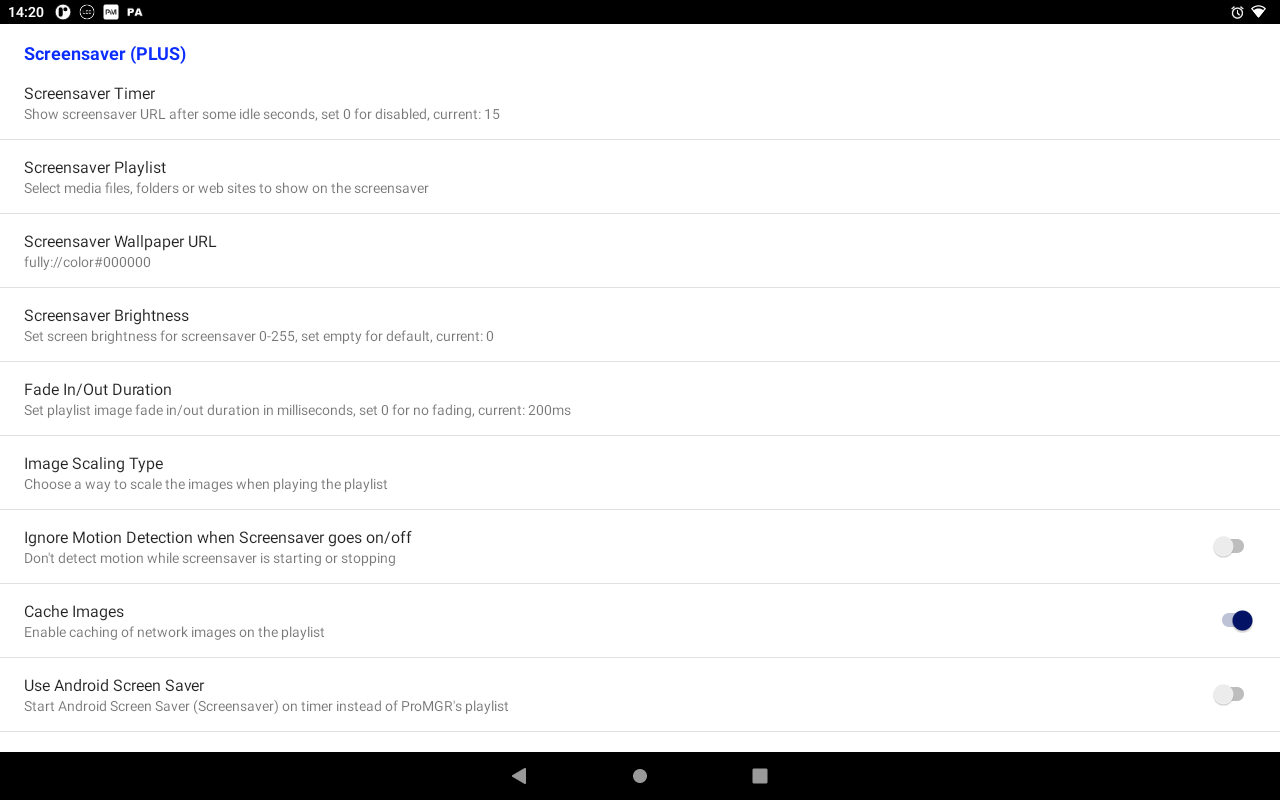
To achieve a sleep/wake-like screensaver, you will have to:
- Set a
Screensaver Timer(eg.60seconds) - Set a plain black
Screensaver Wallpaper URL:fully://color#000000 - Set
Screensaver Brightnessto a low value (0).
With these options, your device "goes to sleep" after 60 seconds of inactivity and wakes up once someone taps the screen. The JSON parameters for this example are the following:
{
  …
  "timeToScreensaverV2": "60",
  "screensaverWallpaperURL": "fully://color#000000",
  "screensaverBrightness": "0",
  …
}
Sleep-like screensaver