Microsoft AD FS SAML2 SSO
Introduction
The Microsoft AD FS (Active Directory Federation Services) is an Identity Provider (IdP) developed by Microsoft to provide a Windows based self-hosted (on premise) version. You can connect an enterprise application over SAML2 to AD FS and manage, who can log in to view Single Sign-On in the connected application. Define which user attributes you want to synchronize between AD FS and the connected application. Flexopus supports a Microsoft AD FS integration via SAML for Single Sign-On.
SAML2 Instruction Manual
STEP 1 - Trust party setup
- Go to your
Microsoft AD FS management consoleas anAD FS administrator. - Select the
Relying Party Trustsfolder. - In the
Actionssidebar, click on the default settingRelying Party Trustand then clickStart. This opens theAdd Relying Party Trust Wizard. - In the popup, select the first option as a data source:
Import data about the relying party published online or on a local network.
https://{your-flexopus-domain}/internal-api/auth/integrations/saml2/metadata
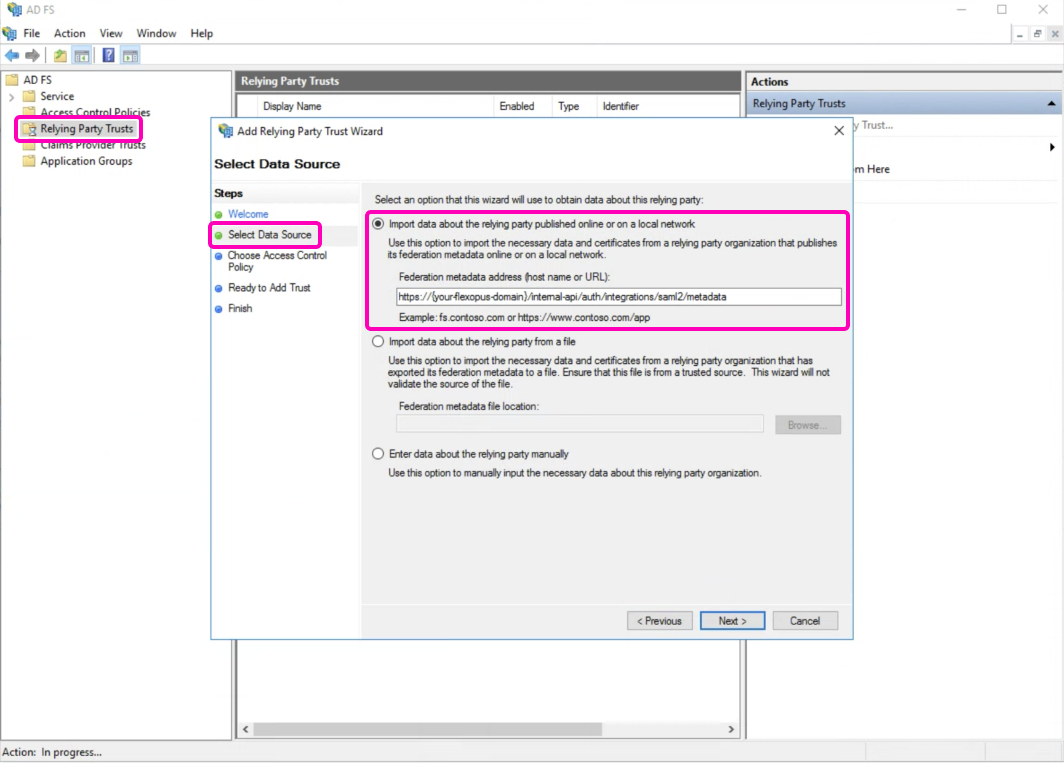
To find your Federation metadata address, follow these steps:
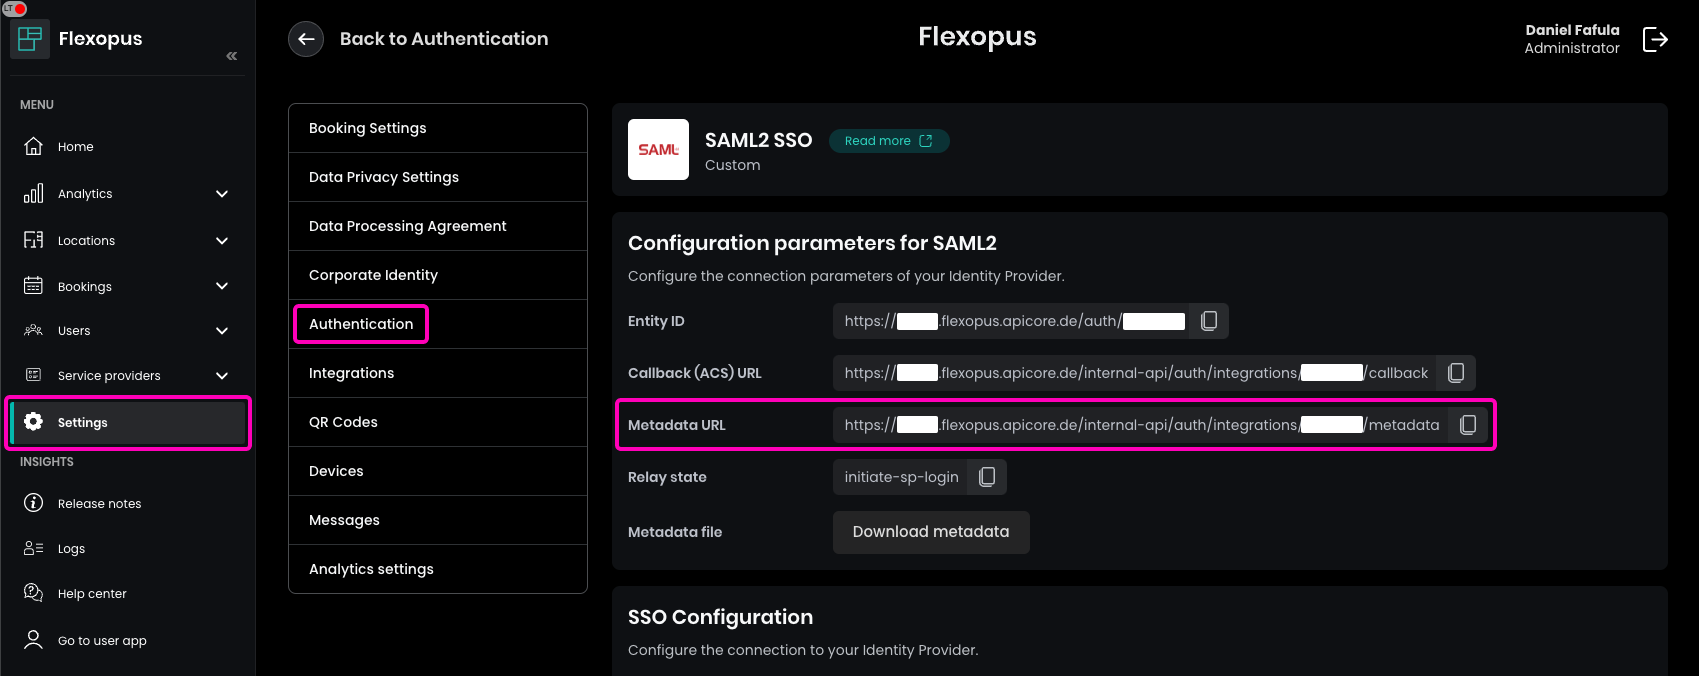
- Navigate to your Flexopus instance.
- Go to
Dashboard > Settings > Authentication. - Click on
Add provider. - You can find the
Metadata URLat the top of the page.
- Display Name: Enter Flexopus.
- Choose Access Control Policy: Select Permit Everyone.
(Depending on your internal policies, you may choose a more suitable policy.) - Ready to add Trust: You can skip this step and the next two steps.
- Complete the wizard afterward.
STEP 2/A - Setting the “Claim Rule”
- On the right side, select
Edit Claim Issuance Policy. - Click on
Add rule. - Select the option
Send Claims Using a Custom Rule.
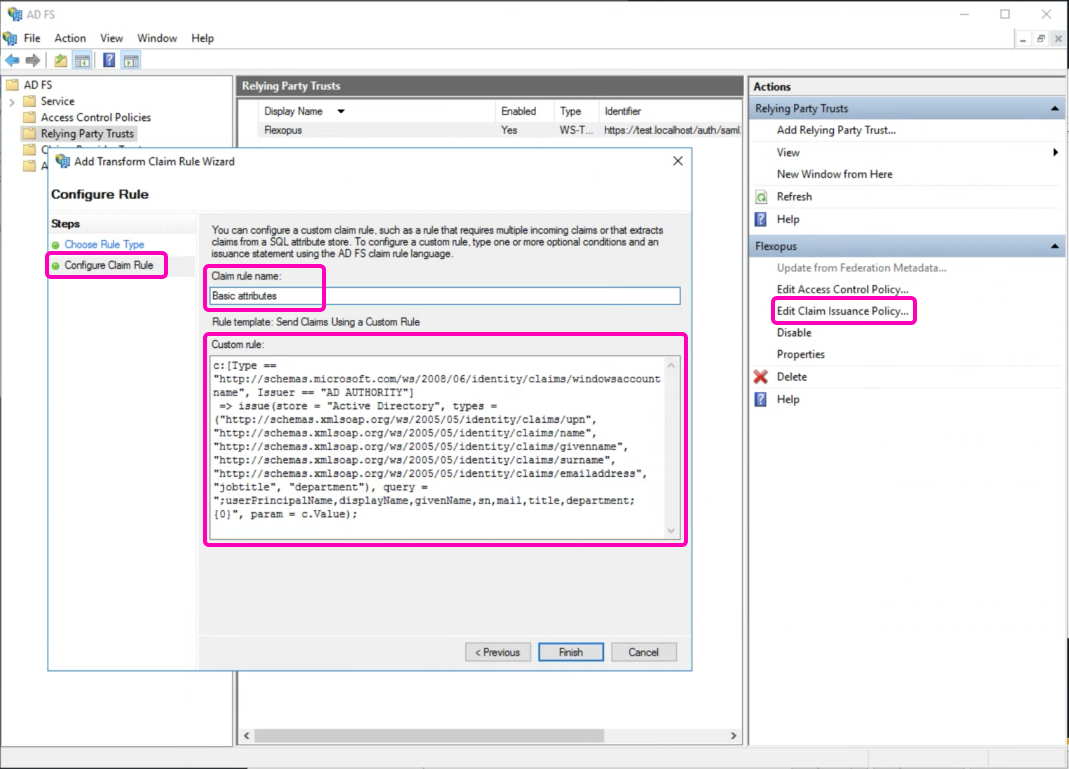
Enter the rule name Basic Attributes and set the following custom rule:
c:[Type == "http://schemas.microsoft.com/ws/2008/06/identity/claims/windowsaccountname", Issuer == "AD AUTHORITY"]=> issue(store = "Active Directory", types = ("http://schemas.xmlsoap.org/ws/2005/05/identity/claims/upn", "http://schemas.xmlsoap.org/ws/2005/05/identity/claims/name", "http://schemas.xmlsoap.org/ws/2005/05/identity/claims/givenname", "http://schemas.xmlsoap.org/ws/2005/05/identity/claims/surname", "http://schemas.xmlsoap.org/ws/2005/05/identity/claims/emailaddress", "jobtitle", "department"), query = ";userPrincipalName,displayName,givenName,sn,mail,title,department;{0}", param = c.Value);
Click on Finish
Let's repeat the steps:
- On the right side, select Edit Claim Issuance Policy.
- Click on Add rule.
- Select the option Send Claims Using a Custom Rule.
- Enter the rule name: NameIDFormat.
- Set the following custom rule:
c:[Type == "http://schemas.xmlsoap.org/ws/2005/05/identity/claims/upn"] => issue(Type = "http://schemas.xmlsoap.org/ws/2005/05/identity/claims/nameidentifier", Issuer = c.Issuer, OriginalIssuer = c.OriginalIssuer, Value = c.Value, ValueType = c.ValueType, Properties["http://schemas.xmlsoap.org/ws/2005/05/identity/claimproperties/format"] = "urn:oasis:names:tc:SAML:2.0:nameid-format:persistent");
- Click on Finish
STEP 2B - Manual setting of assignments
- On the right side, select
Edit Claim Issuance Policy. - Click on
Add rule. - Select
Custom Rule Type: Send LDAP Attributes as Claims.
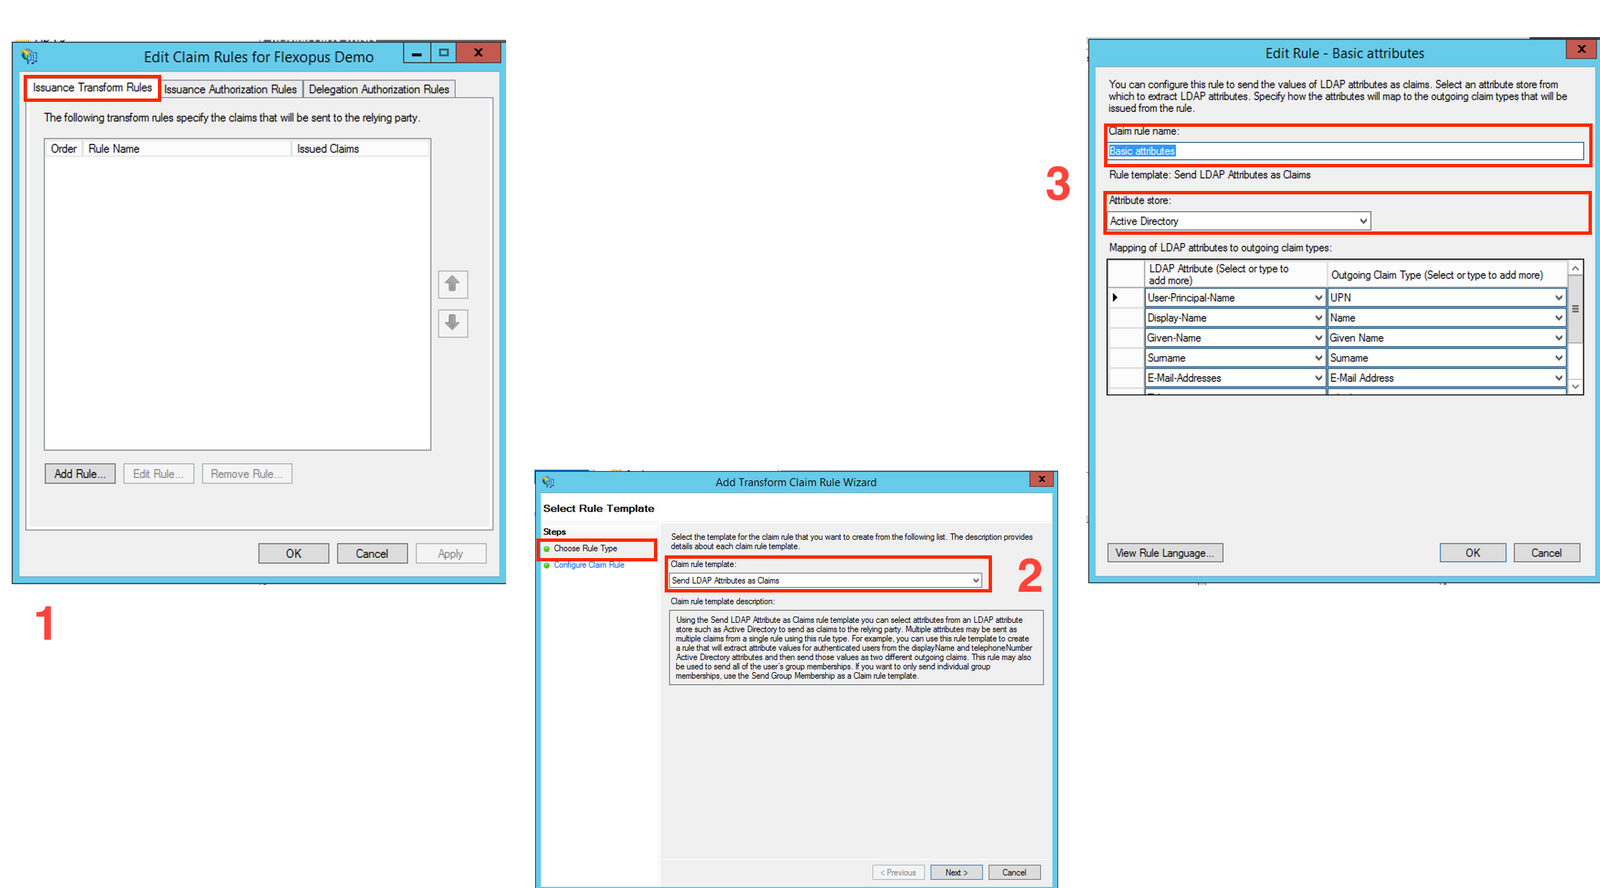
- Enter the rule name:
basic attributes. - Select the
Attribute Store: Active Directory. - Set the attribute mappings as listed below.
(Note thatjobtitleanddepartmentare optional, but we recommend connecting them.)
This setup ensures the proper mapping of user attributes from Active Directory to Flexopus.
| LDAP Attribute | Outgoing Claim | Note |
|---|---|---|
| User-Principal-Name | UPN | required |
| Display-Name | Name | required |
| Given-Name | Given Name | required |
| Surname | Surname | required |
| E-Mail-Address | E-Mail Address | required |
| Department | Department | optional |
| Jobtitle | Jobtitle | optional |
- Afterward, select
Add ruleagain. - Select
Transform an Incoming Claim. - In the final step, set the
Name ID assignment:Incoming claim type: UPNOutgoing claim type: Name IDOutgoing Name ID format: Persistent Identifier
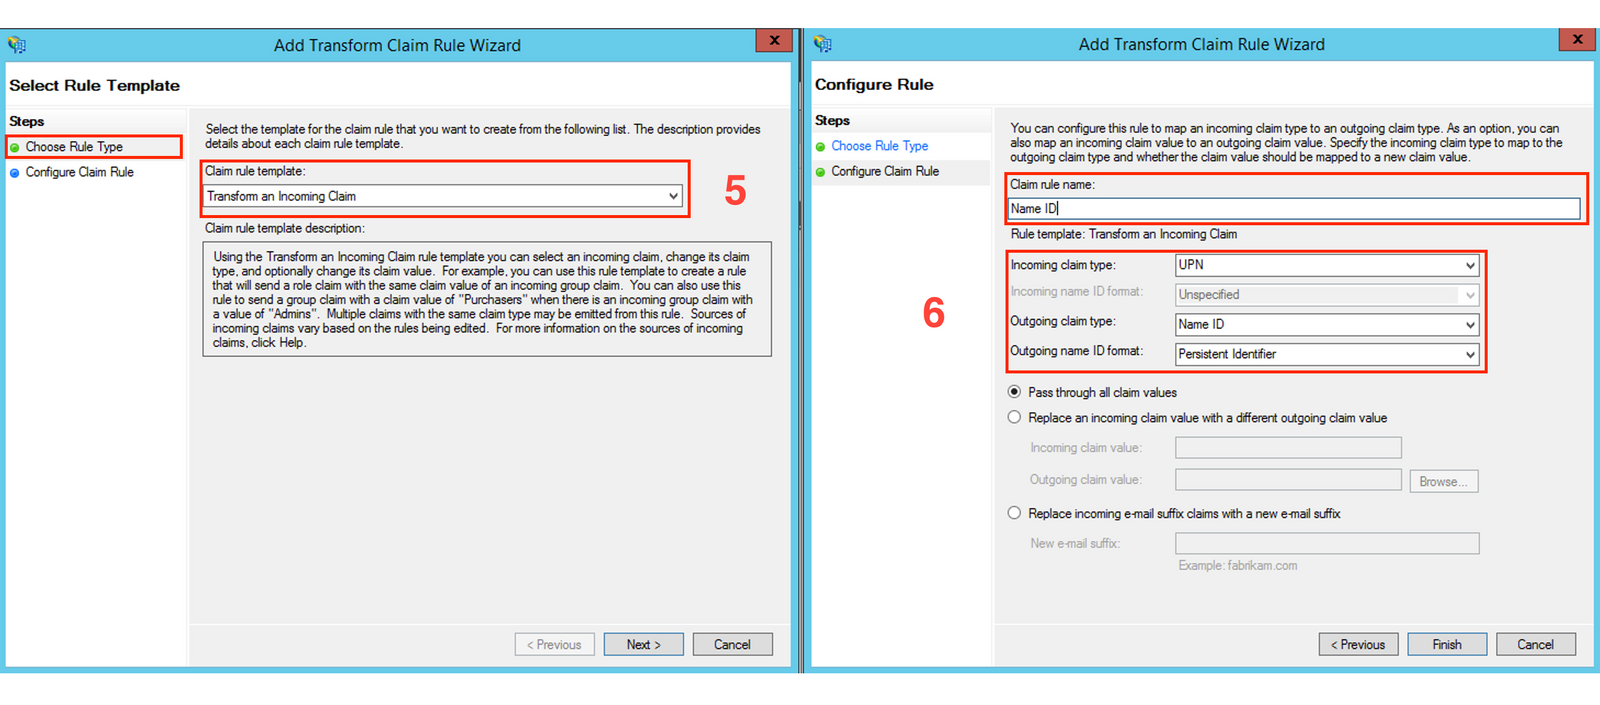
- Click Finish.
STEP 3 - Configure Flexopus for the SSO
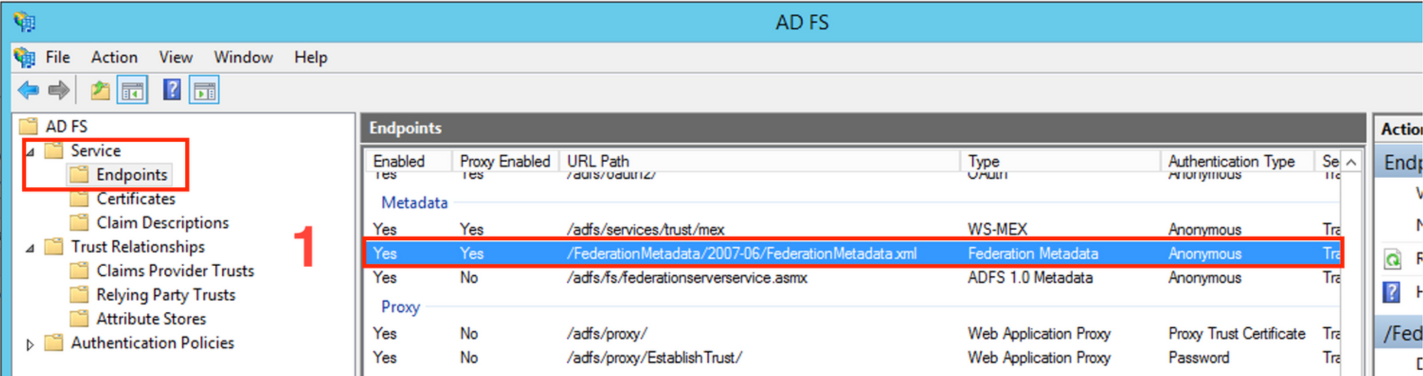
- Navigate to
AD FS > Service > Endpoints. - Copy the
Federation Metadata(metadata-endpoint-path). - Based on this path, create your metadata URL, which will look like this:
https://<your-adfs-domain>/<metadata-endpoint-path>
https://{your-adfs-server-url}/{metadata-endpoint-path}
In Flexopus, navigate to Dashboard > Settings > Authentication and select the previously created SAML2 provider. Paste the URL into the Metadata URL field and enable the SAML2 module.
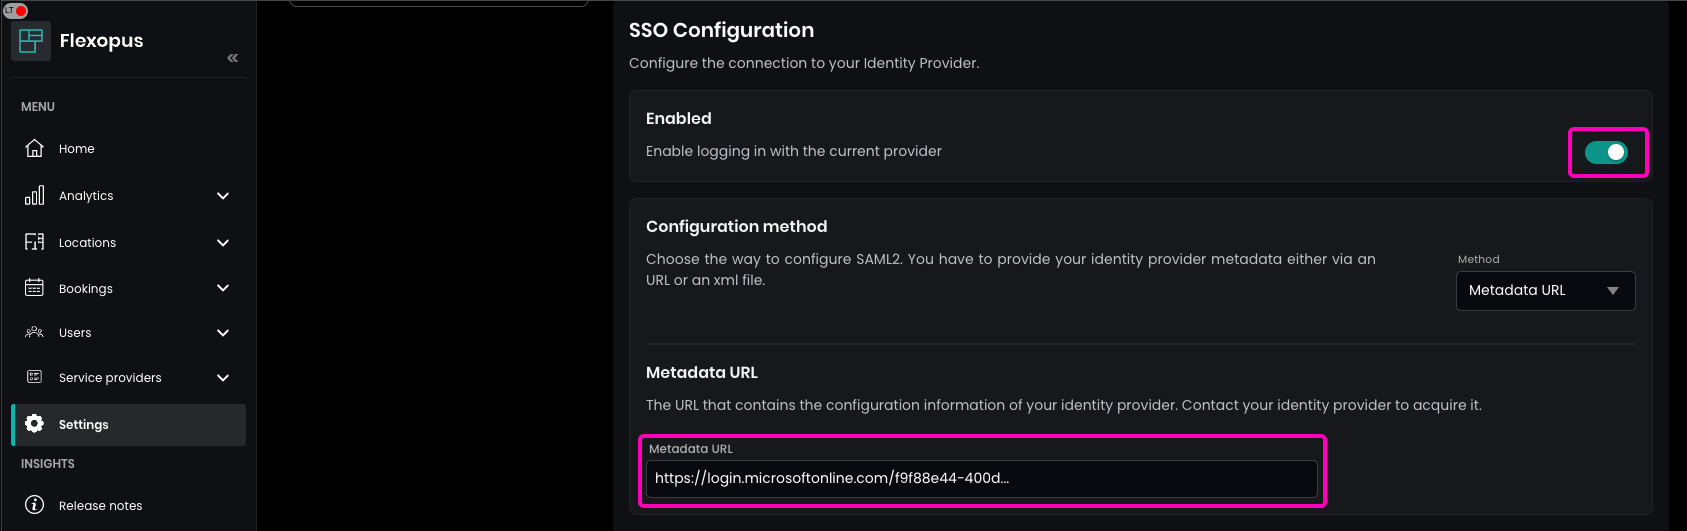
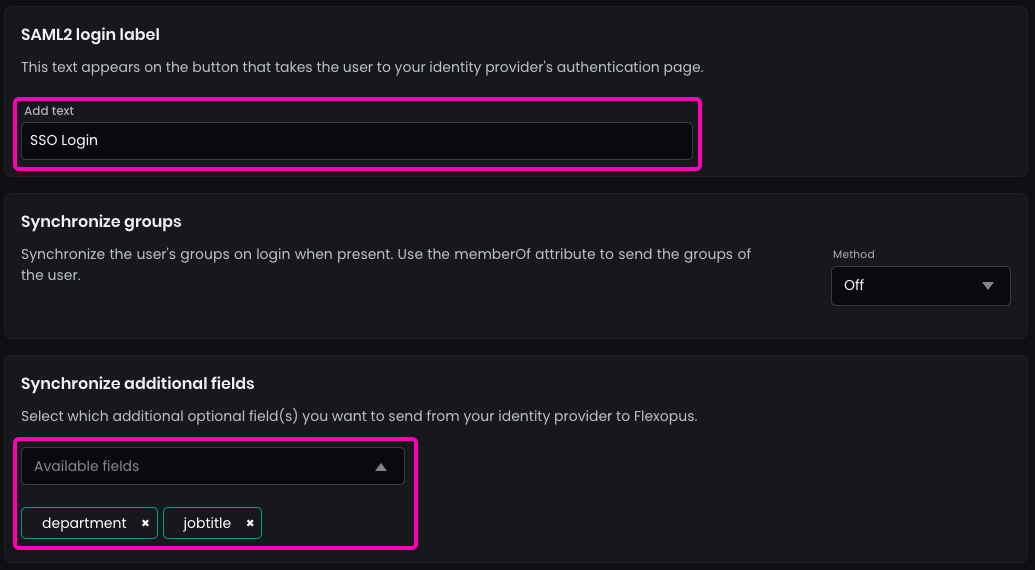
Enter the name of the SAML2 Login button, which will be displayed on the login page.
Recommendation: Use SSO Login.
(Optional) Enable the synchronization of the fields that you configured in the SAML2 settings, such as jobtitle or department.
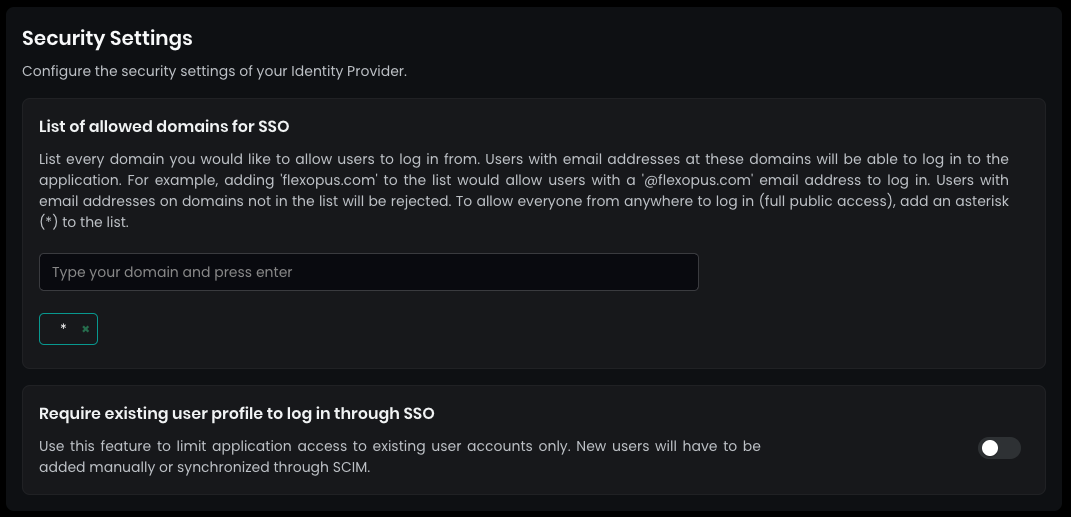
In the security settings, set the allowed domains for SSO by entering a * (star) and pressing ENTER. This allows every user configured in your Active Directory to log in.
By default, SAML2 SSO users are automatically registered after their first login attempt. This simplifies the process, as you won’t need to manually create user profiles before the first login. You can disable this setting, but it's not recommended.
Save your settings at the bottom.
STEP 4 - Test SSO
Open Flexopus in a new incognito window and test the login:https://{your-company}.flexopus.com/ or in case you have a custom domain, then go to the custom domain.
You should be able to log in with an existing or a new user, depending on how you configured the access rights in your Azure Active Directory and Flexopus.
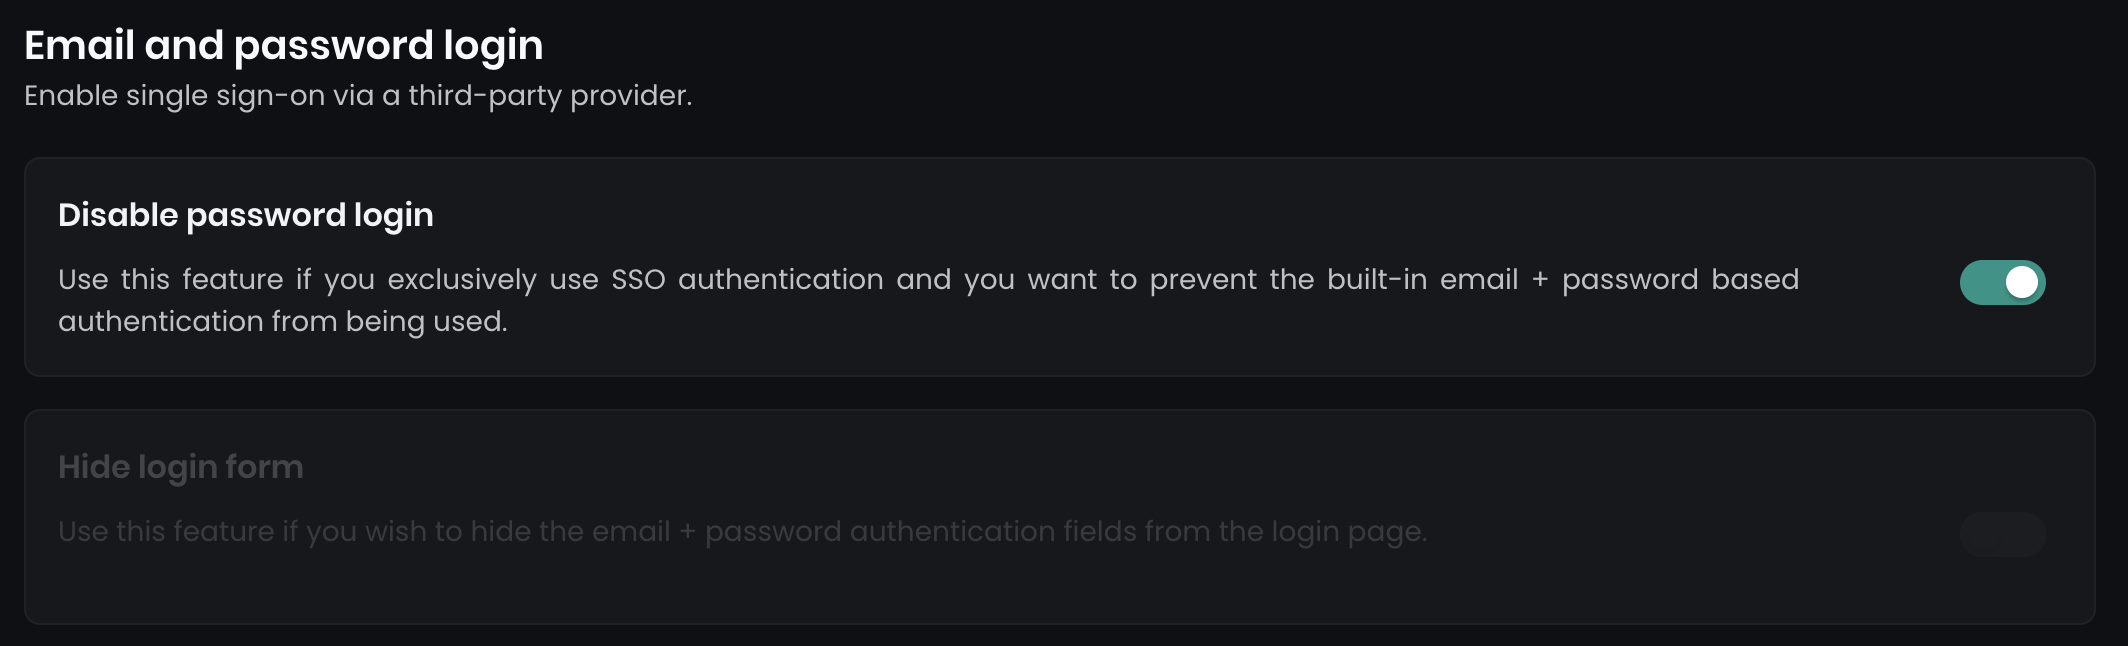
Once the SAML2 SSO is successfully configured, you can optionally disable the email and password login and enforce Single Sign-On for all users. Navigate to Dashboard > Settings > Authentication, where you will find two options:
- Disable password login: This disables all email and password login forms.
- Hide login form: This hides the login form on the main page, while a secondary form remains accessible at
../dashboard/auth/loginfor backup admin users.
(Optional) Sending groups
Microsoft AD FS does not offer the possibility to synchronize user groups through the SCIM API. However, you can use a workaround by sending groups via a SAML2 attribute. You can send the groups associated with a user using the memberOf SAML2 attribute. This attribute sends an array of groups that the user is supposed to be associated with.
STEP 1 - Configure AD FS
- Select the option
Edit Claim Issuance Policy. - Click on
Add rule.
In case you did the configuration with the 2A Method:
Create a rule with the name group membership and paste the following rule:
c:[Type == "http://schemas.microsoft.com/ws/2008/06/identity/claims/windowsaccountname", Issuer == "AD AUTHORITY"] => issue(store = "Active Directory", types = ("memberOf"), query = ";memberOf;{0}", param = c.Value);
In case you did the configuration with the 2B Method:
- Custom Rule Type: Select
Send LDAP Attributes as Claims. - Create the rule with the name:
group membership. - Attribute Store: Select
Active Directory. - Add the following attribute:
| LDAP Attribute | Outgoing Claim | Note |
|---|---|---|
| Is-member-Of-DL | memberOf | required |
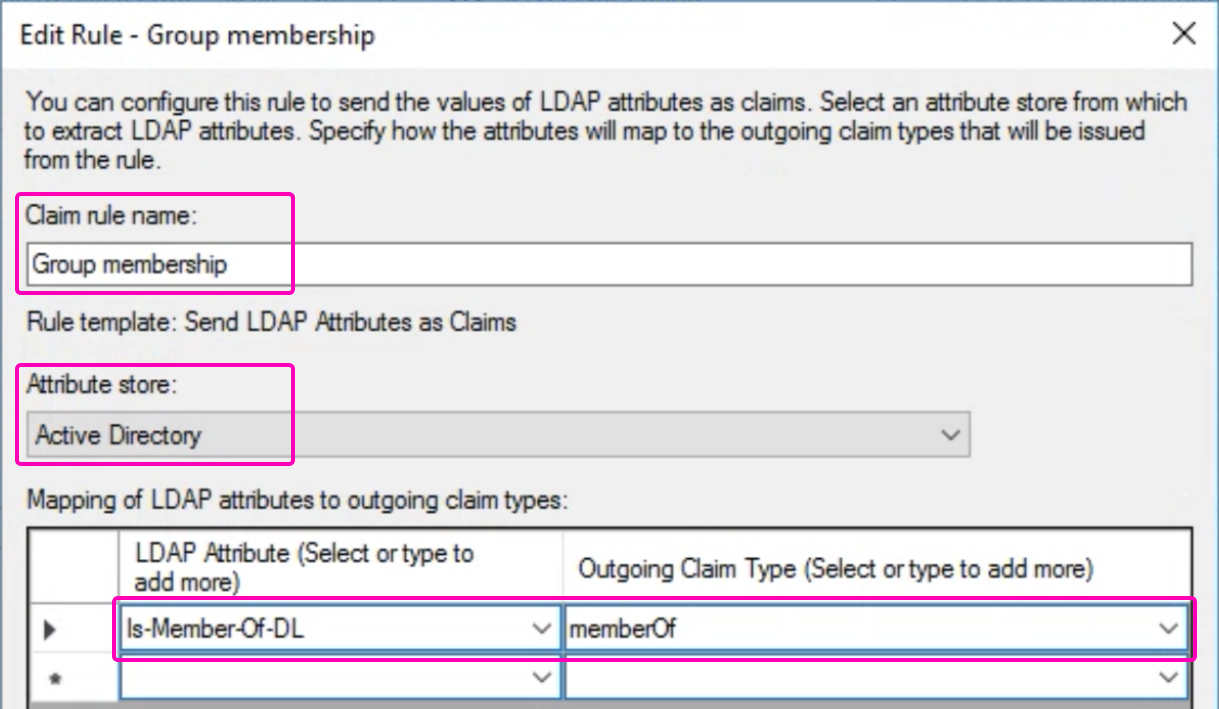
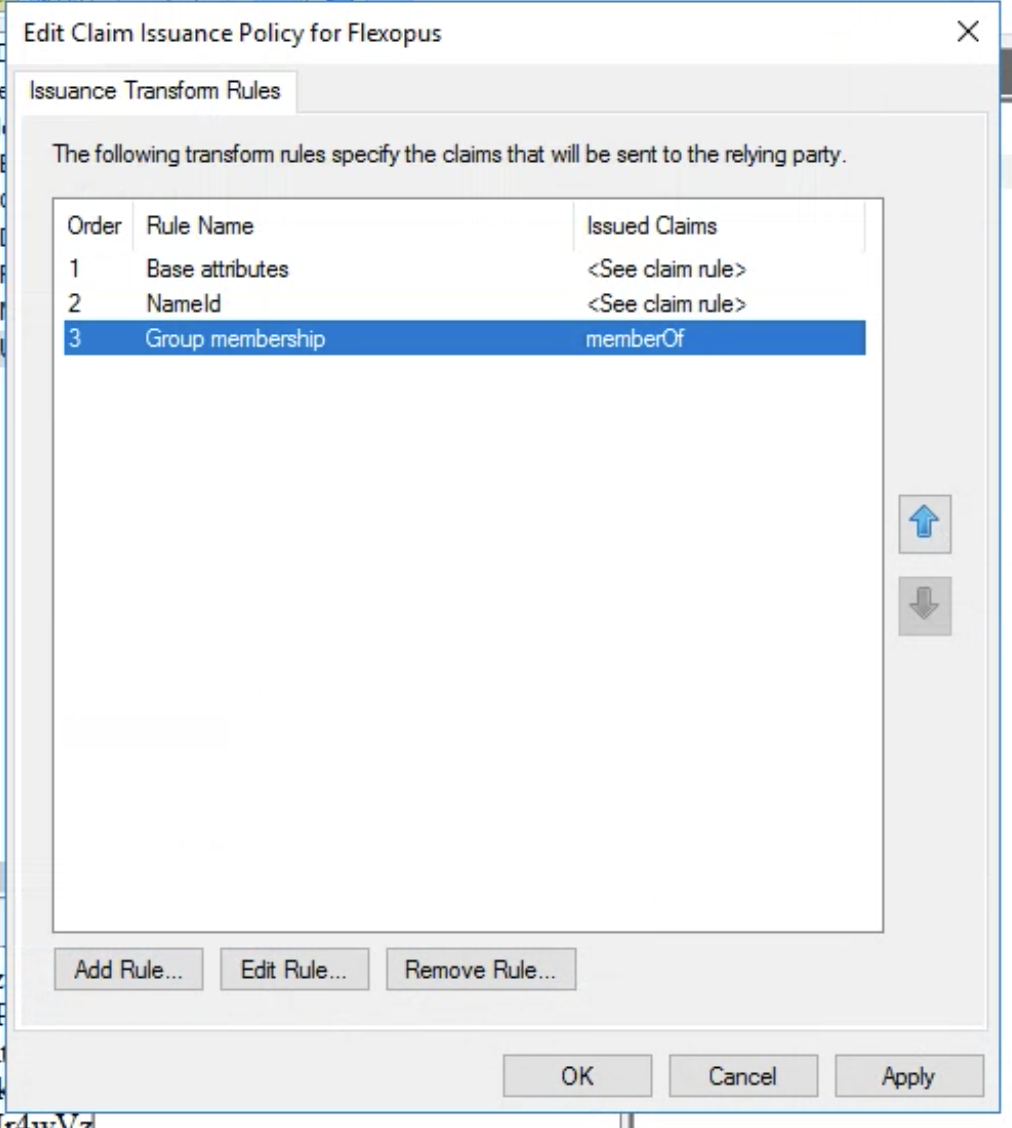
Your Issuance Transform Rules should look like this:
STEP 2 - Configure Flexopus
To receive and process the additional attribute at Flexopus, follow these steps:
- Go to
Dashboard > Settings > Authentication. - Select the previously created
SAML2 SSO provider. - Change the setting for the Synchronize groups option from
OfftoAD FS.

- Save the setting in the bottom.
memberOf attribute has an upper limit. You can not send an unlimited number of groups through this array. If the limit is reached, no groups will be sent. Learn more here.STEP 3 - Test configuration
- Assign groups to your test user in AD FS. The assigned groups will be sent to Flexopus when you log in with your user.
- Open Flexopus in a new incognito window and test the login:
https://{your-company}.flexopus.com/or use your custom domain if applicable. - You need to initiate a new login for the groups to be exchanged. The SAML2 protocol only exchanges data between your IdP and Flexopus when you log in.
After the login, the groups received via memberOf will be assigned as external groups to the users, and any previously assigned external groups will be detached. The internal groups managed within Flexopus will remain unchanged.
Groups are identified by their names, which are always unique:
- If Flexopus receives a group name that already exists as an internal group, the internal group will be converted to an external group.
- If Flexopus receives a new group name, it will create the group as an external group.
Learn more about the groups here: (link to follow).
Trouble Shooting and FAQ
Metadata can not be shared outside the companies network and VPN.
In some cases, the AD FS server may be restricted to local network access only. When this happens, configuring the metadata URL in Flexopus can lead to 500 server errors, as the Flexopus server cannot access the information on the restricted server.
To test this, try opening the metadata URL from your private phone using a mobile network. The file should be readable and accessible. If not, you have this issue.
In this case, we recommend configuring the metadata in Flexopus with a file instead of a URL. However, this means that automatic updates for certificates and signatures will not occur. If changes are made to these, you will need to manually upload a new metadata file in Flexopus to maintain a seamless SSO experience.
No worries—this typically only happens every 3-5 years, depending on your IdP settings, and can be resolved quickly when needed.
I am getting a 500 server error.
Please check the configuration steps once again, if you can not find the issue, contact us. For the 500 server error, we have server logs, which help to locate the issue faster. support@flexopus.com