Azure Active Directory SAML2 SSO
Introduction
To connect Flexopus with your Entra Active Directory (formerly known as Azure Active Directory) via a SAML2 Single Sign-On (SSO) integration:
- Manage User Access
Through your Active Directory, control which users have access to Flexopus, requiring them to log in using their Microsoft AD credentials. - User Profile Creation
In Flexopus, configure a SAML2 setting to automatically create user profiles after their first successful SAML2 SSO login attempt. This eliminates the need for manual user creation in Flexopus.
This integration simplifies user management and ensures secure, centralized access.
Setup Instruction Manual
Follow the step by step introduction manual to configure the integration. The manual also includes best practices and solutions for some commonly made errors during the configuration. Still, if you require help with the setup, feel free to reach out to our support team via support@flexopus.com.
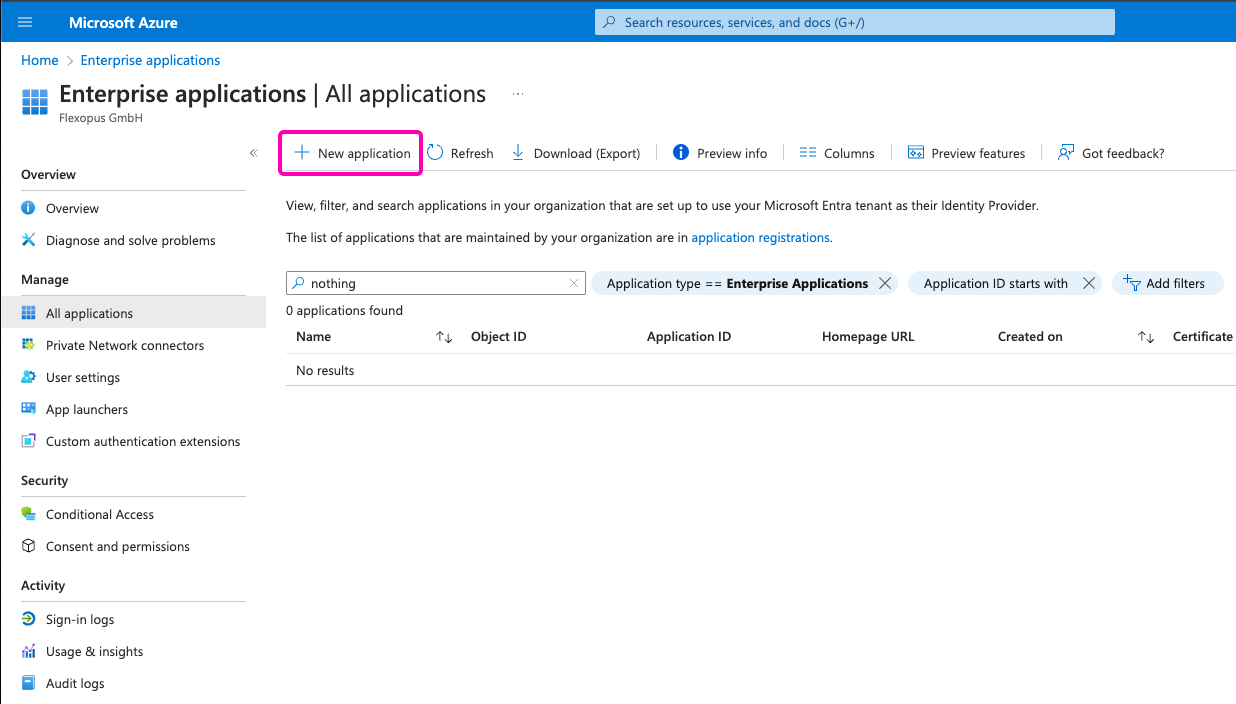
STEP 1 - Create a new enterprise application
Go to your Azure Active Directory and navigate to the Enterprise Applications list. In the list view, click in the left top corner on the New application button.
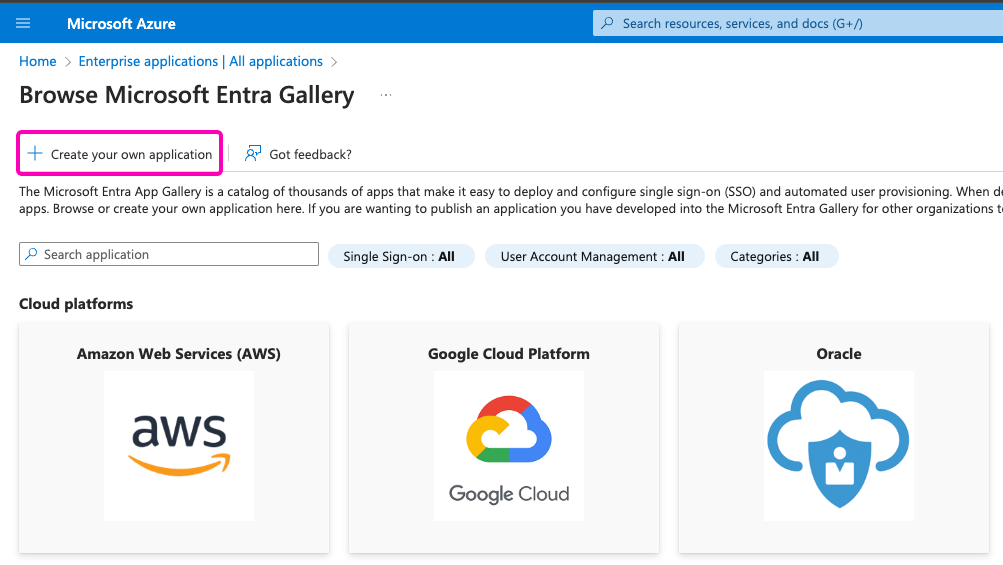
On the new screen, click on the Create your own application button:
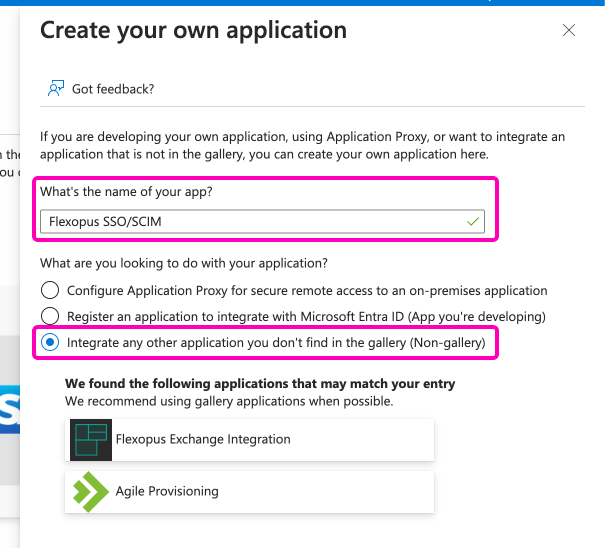
In the popup for integrating Flexopus with Entra Active Directory:
- Enter the name:
Flexopus SSO / SCIM(or any name of your choice). - Keep the selection on,
integrate any other application you don't find in the gallery (non-gallery). - Do not select anything else at the bottom.
This setup allows you to proceed with the SAML2 SSO and SCIM integration for Flexopus.
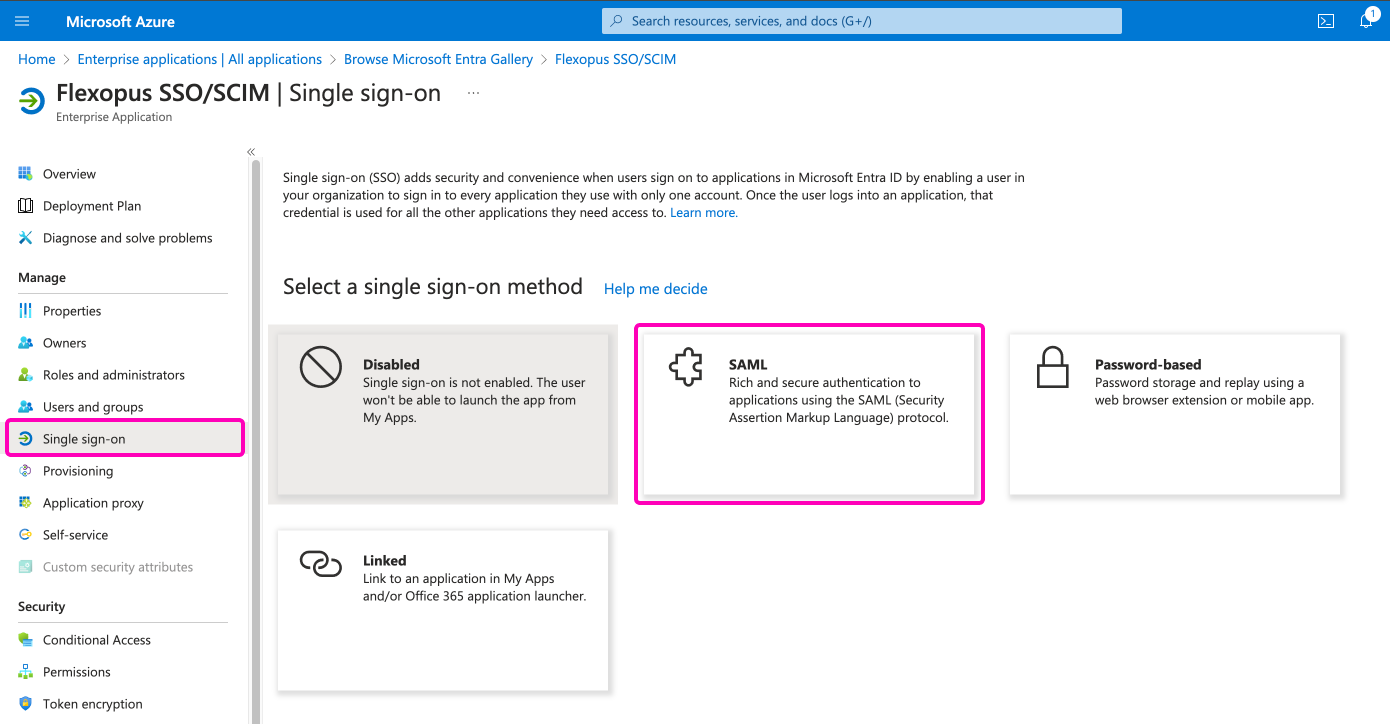
STEP 2 - Configure SAML2
Navigate to the Single Sign-On menu item on the left side and select the SAML box:
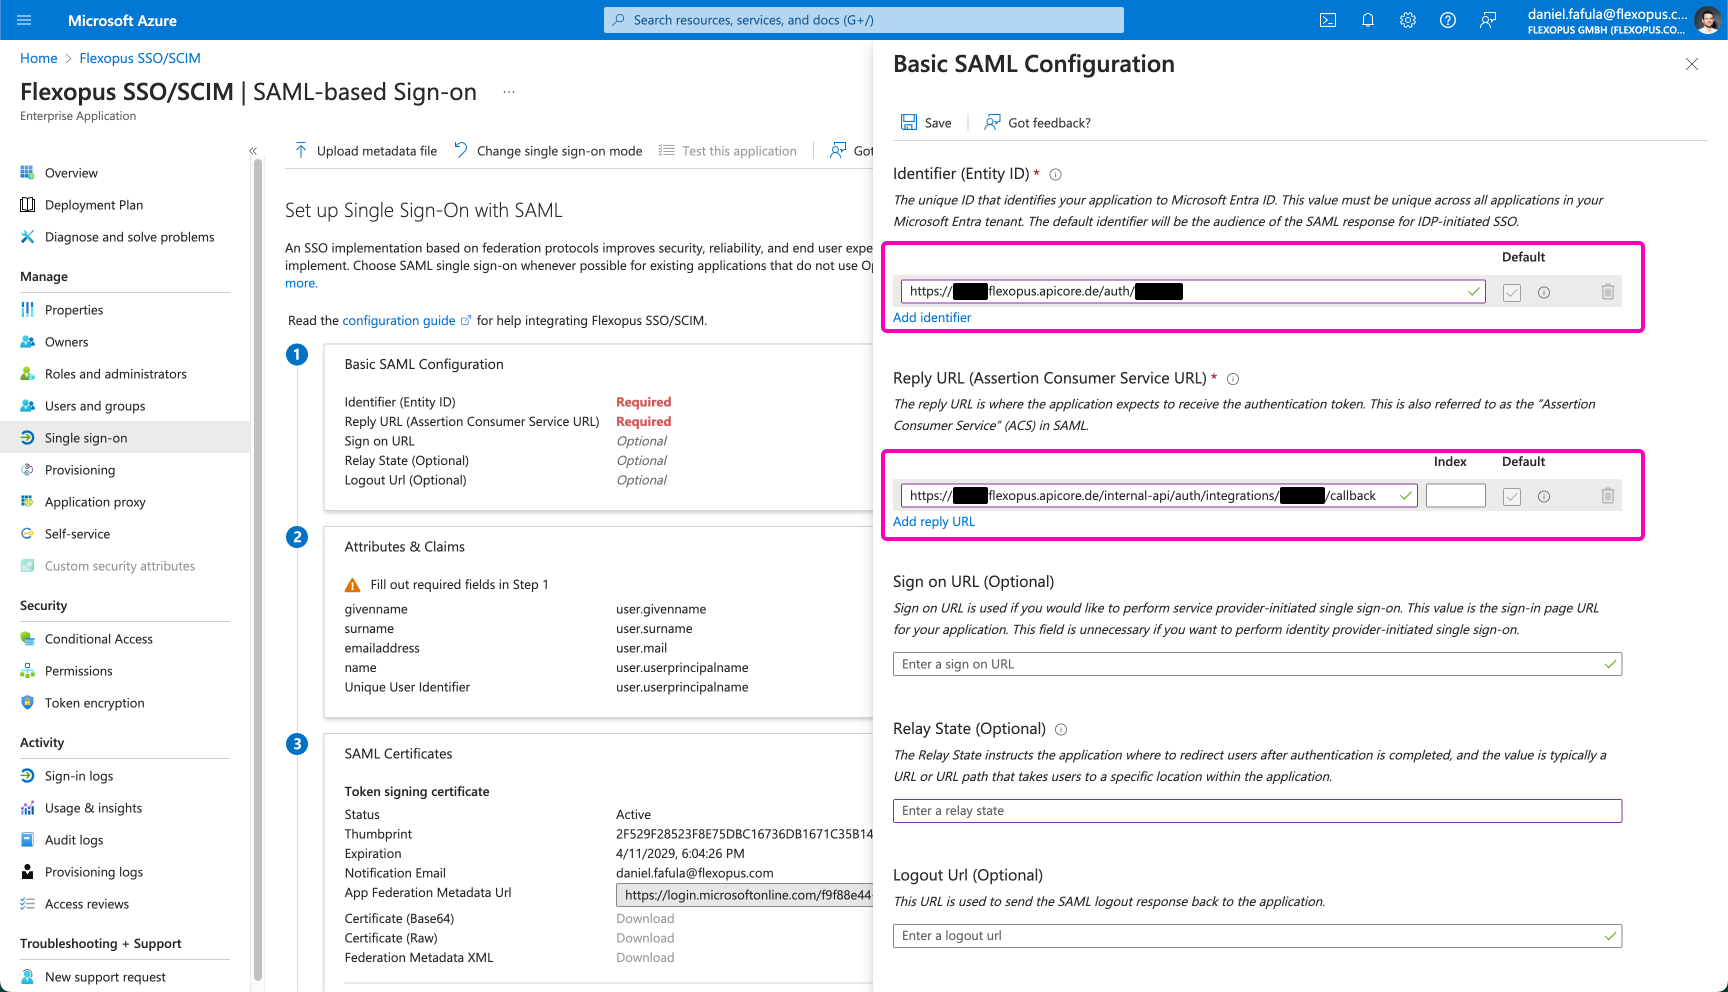
On the Basic SAML Configuration page, click on the Edit button:
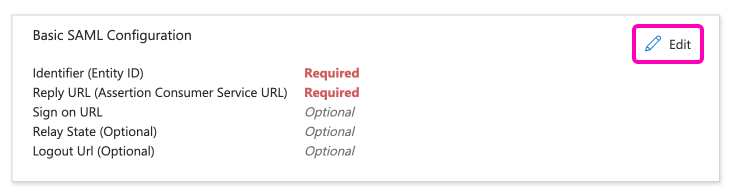
To proceed with the SAML2 SSO integration for Flexopus, you need to enter the following details:
- Identifier (Entity ID)
This is the unique identifier for Flexopus in your SSO setup. - Reply URL (Assertion Consumer Service URL)
This is the URL where the SAML responses (assertions) are sent after authentication.
These values are typically provided by Flexopus during the SSO setup process. Make sure to enter them correctly to ensure proper integration.
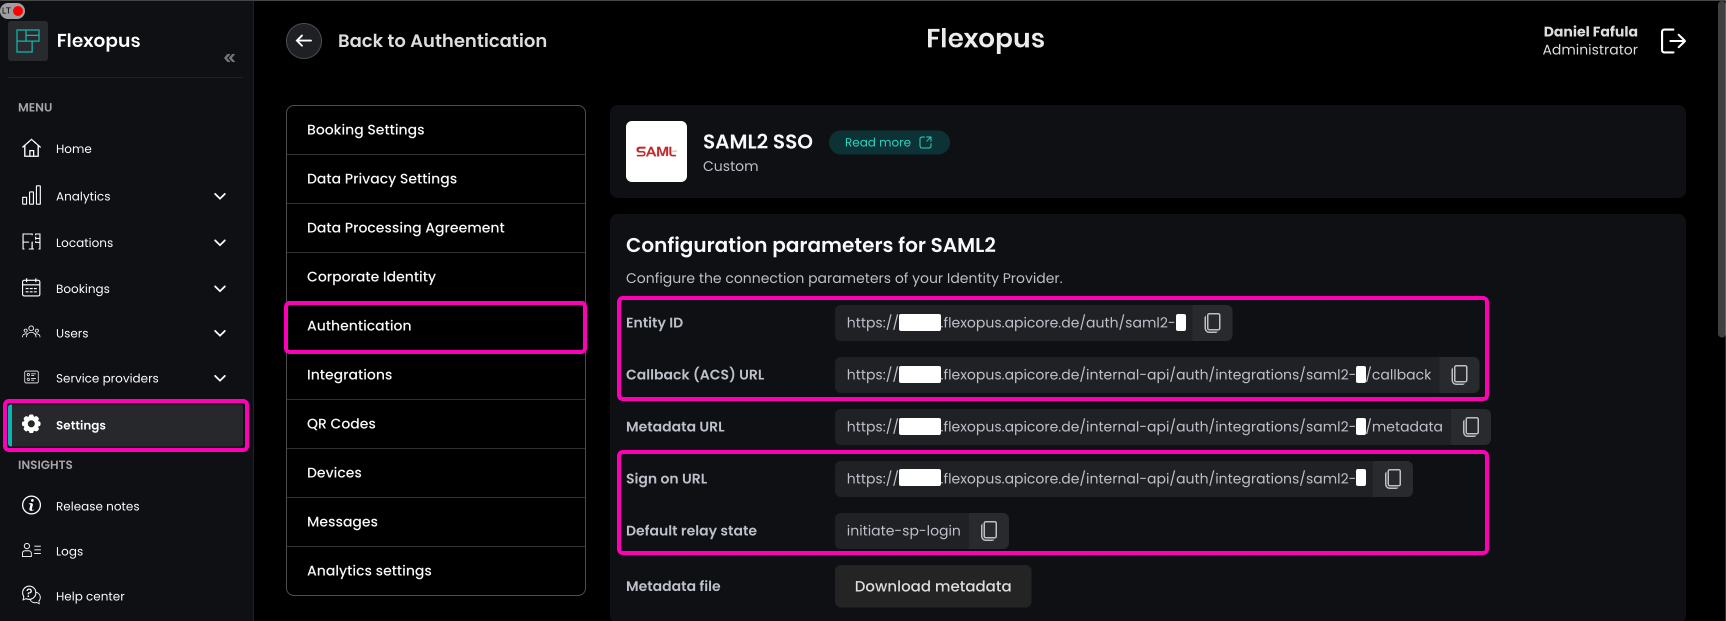
To find the necessary URLs for the SAML2 SSO integration:
- Navigate in Flexopus as an administrator to
Dashboard > Settings > Authentication. - Click the
Add providerbutton and select theSAML2 SSOoption. - You will find the
Entity IDand theCallback (ACS) URLat the top of the page.
Optionally, you can also configure the Relay State and the Sign-on URL if needed for your setup.
STEP 3 - Configure Attributes
Go to the Attributes and claims section and click on the Edit button.
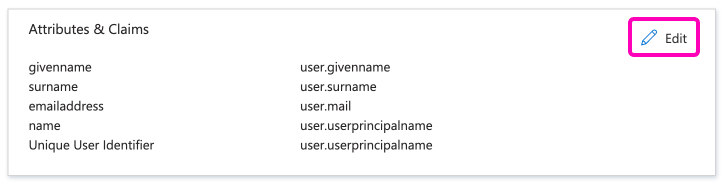
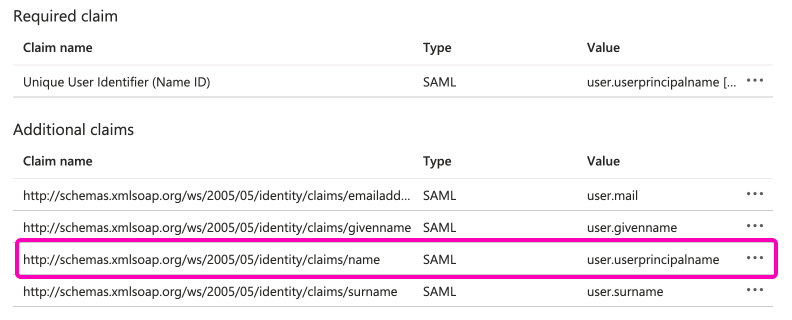
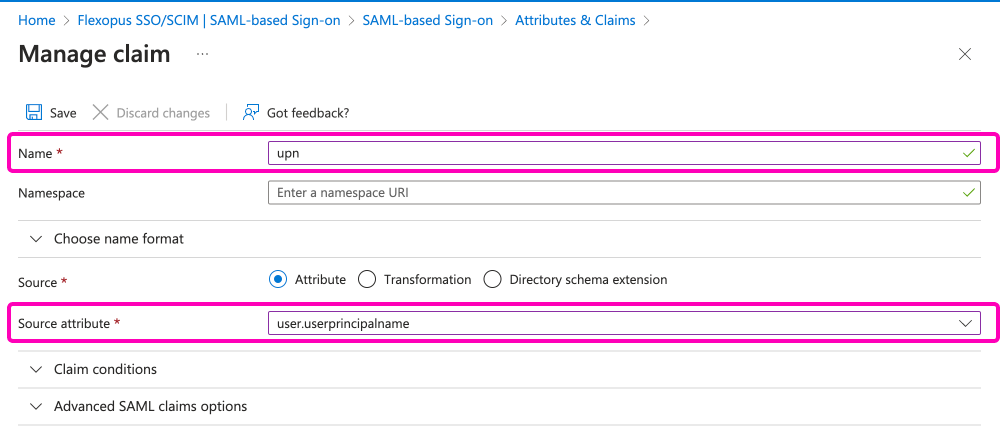
Select in the list the …/claims/name row by clicking on the row:
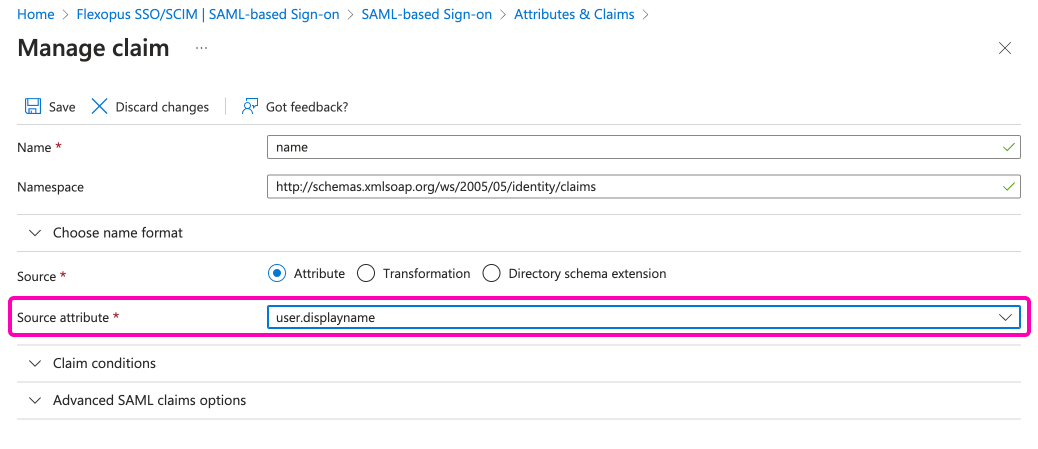
To change the source attribute for SAML2 SSO in Flexopus:
- Navigate to the
attribute mappingsection in your Identity Provider (IdP) settings. - Change the source attribute from
user.userprinciplenametouser.displayname. Savethe change.
This adjustment will ensure that the display name is used for user identification within Flexopus.
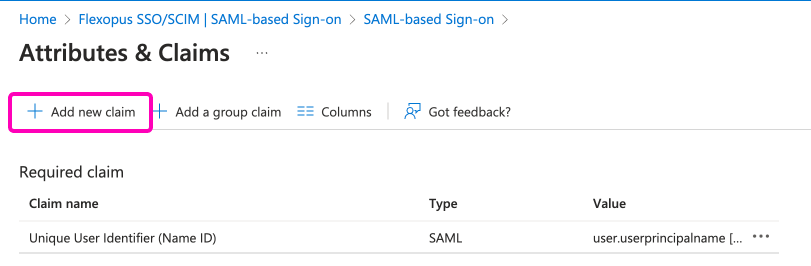
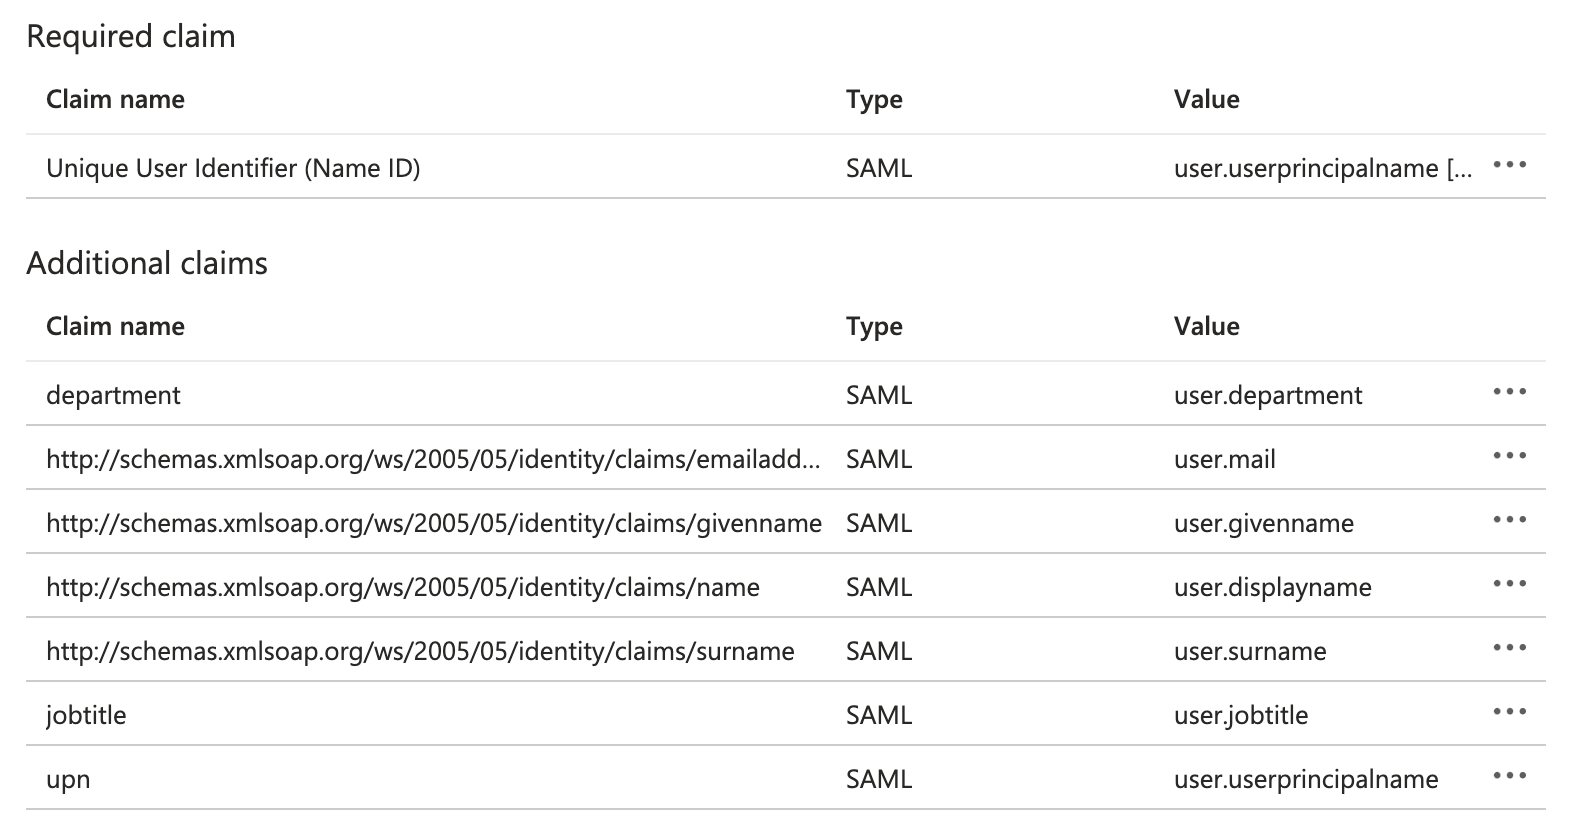
In the list view, click on the Add new claim button:
Add the following claims as listed below. Please only fill out the listed name and source attribute parameters. Leave the namespace field empty for these attributes!
| Name | Source attribute | Note |
|---|---|---|
| upn | user.userprincipalname | required |
| jobtitle | user.jobtitle | optional |
| department | user.department | optional |
| extensionAttribute1 extensionAttribute2 … extensionAttribute10 |
any attribute you need | optional |
Once you finished the attribute mappings, it should look like this:
STEP 4 - Configure Flexopus
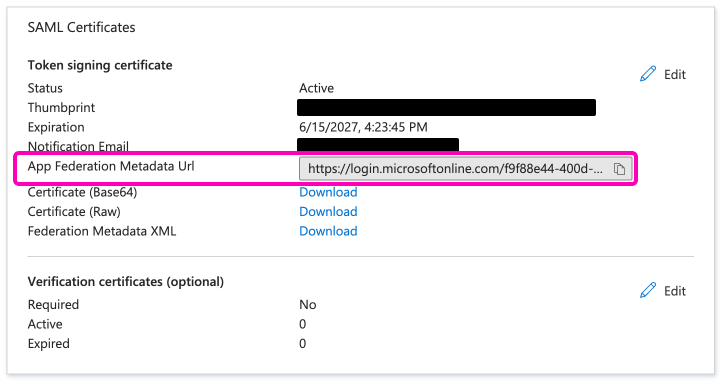
In the third configuration box of your Identity Provider (IdP) settings, locate the App Federation Metadata URL:
- Copy the URL.
- Go to Flexopus.
- Use the URL within Flexopus to complete the SAML2 SSO configuration.
This URL allows Flexopus to fetch the necessary configuration data from your IdP.
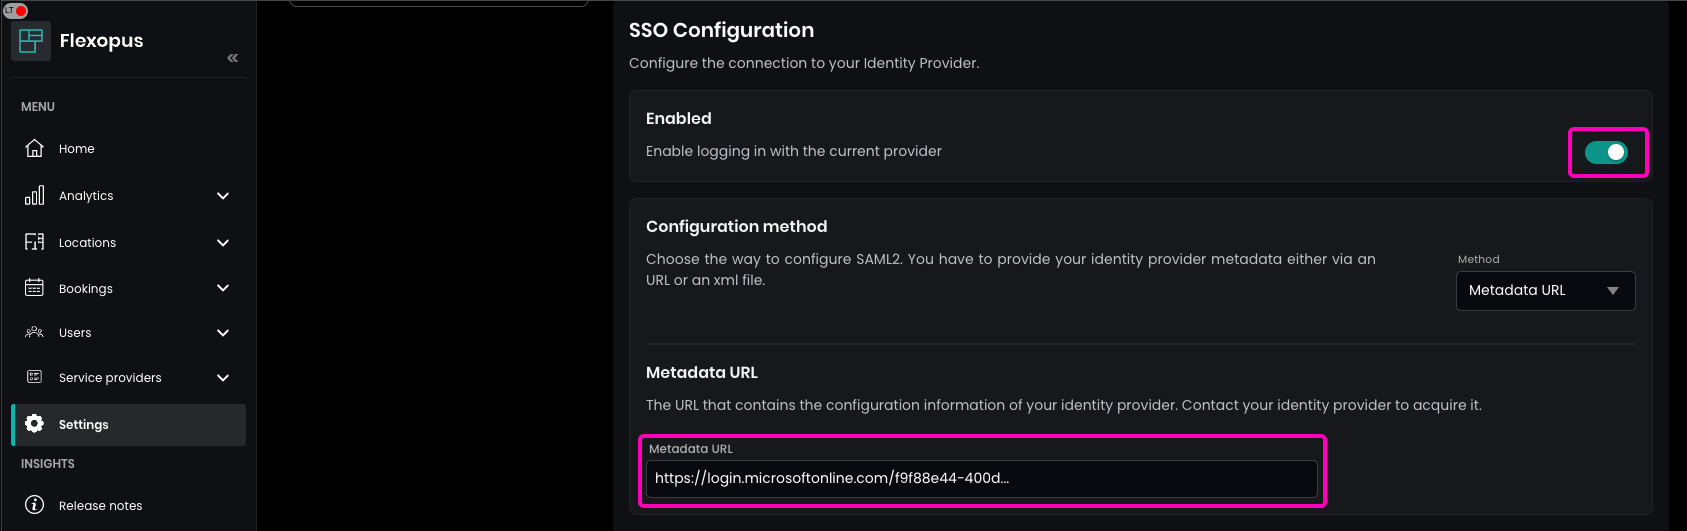
To complete the SAML2 configuration in Flexopus:
- Navigate to
Dashboard > Settings > Authentication. - Select the
created SAML2 Provider. - Paste the
App Federation Metadata URLinto theMetadata URLfield. - Enable the
SAML2 module.
This will activate SAML2 Single Sign-On for your Flexopus application.
To finalize the SAML2 setup in Flexopus:
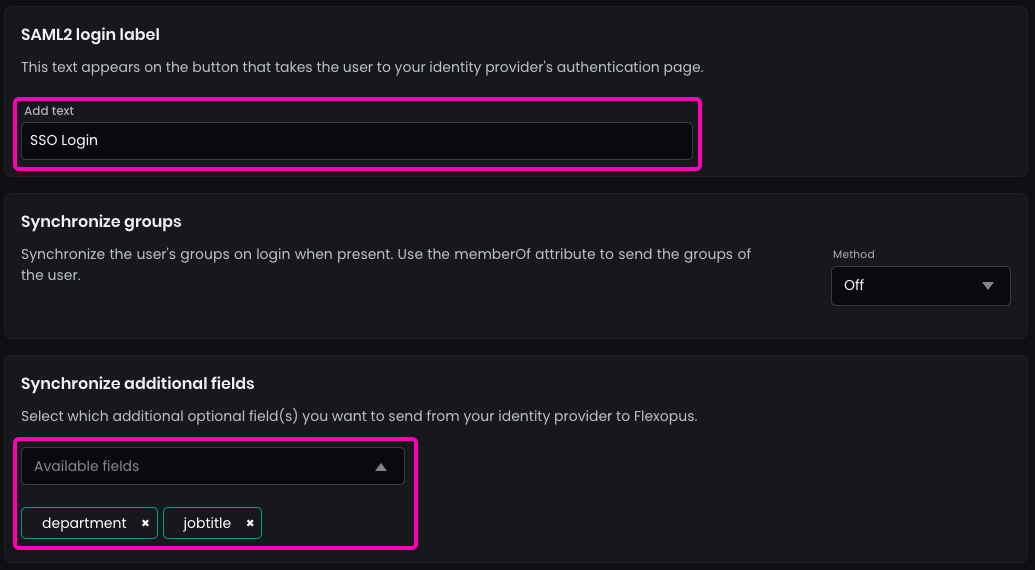
- Enter the name for the SAML2 Login button that will appear on the login page.
Recommendation: Use SSO Login for clarity. - (Optional) Enable the synchronization of the optional fields (e.g., jobtitle or department) that you configured in the SAML2 settings. This ensures that these fields are updated in Flexopus when changes occur in the Identity Provider (IdP).
Once these steps are complete, the SSO login will be ready for use.
In the security settings for SAML2 SSO in Flexopus:
- Set the allowed domains for SSO by entering a * (star) and pressing ENTER. This allows any user configured in your Active Directory to log in.
- By default, SAML2 SSO users are automatically registered after their first login attempt. This eliminates the need to manually create user profiles beforehand.
While you can disable this automatic registration, it is not recommended for ease of user management.
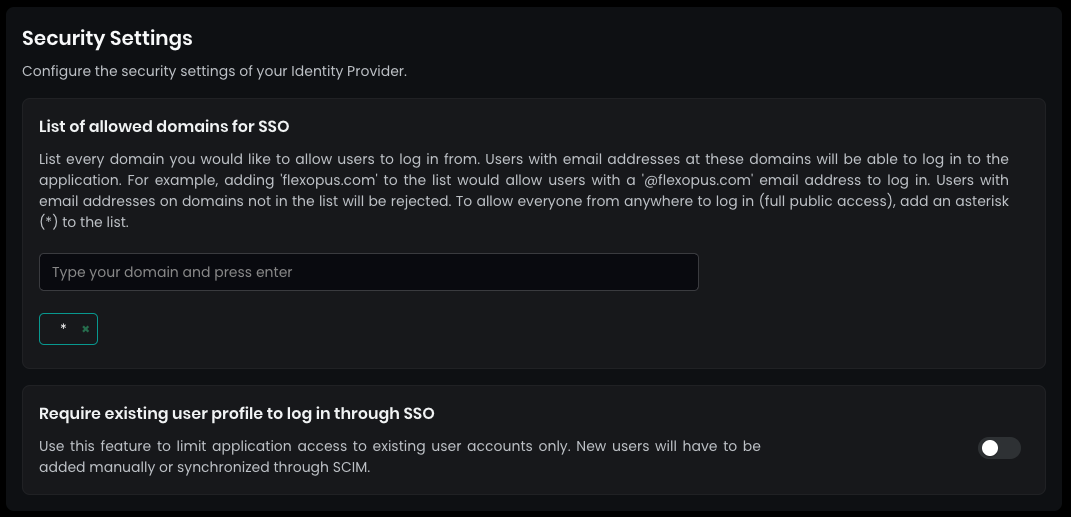
Always SAVE your settings at the bottom.
STEP 5 - Configure who can log in
If you try to log into Flexopus now, you will see the following error message displayed by Microsoft:
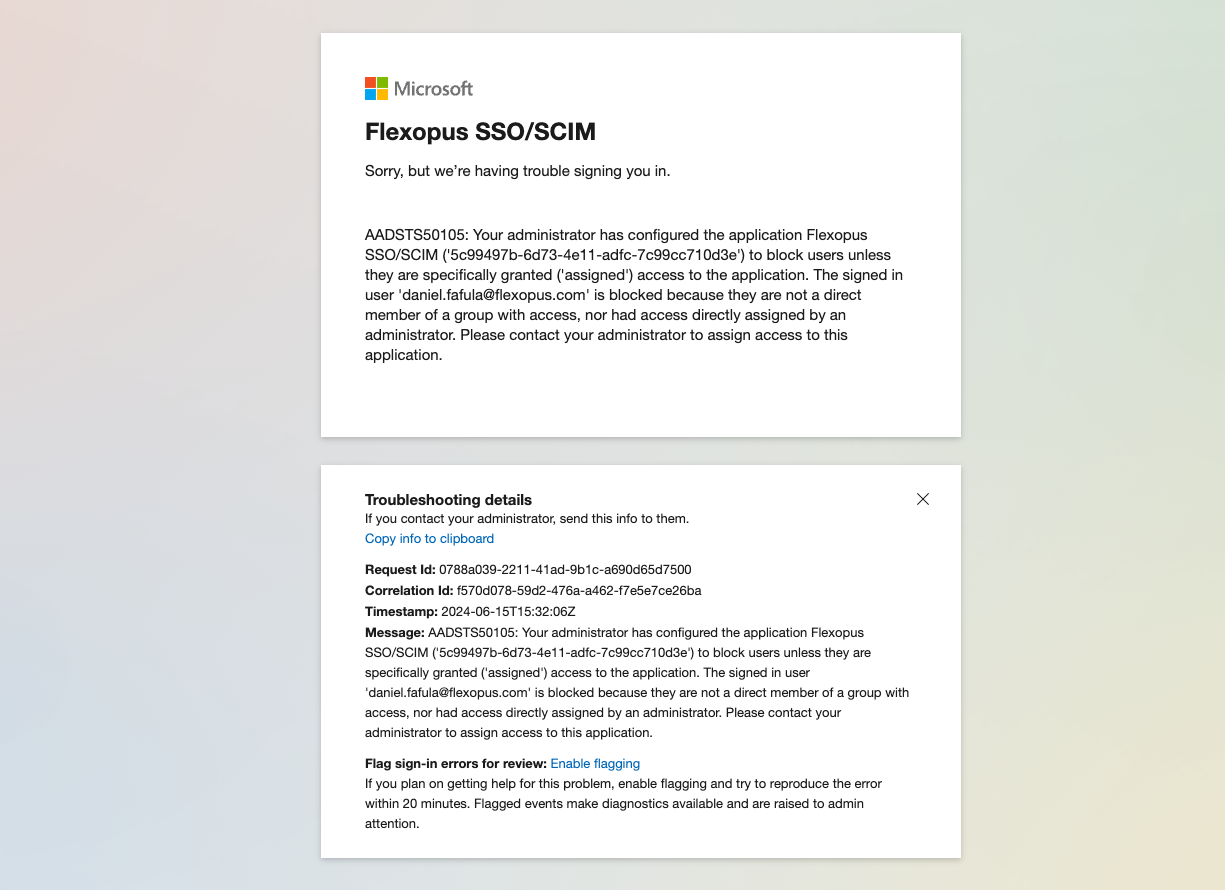
If a user is unable to log in to Flexopus, it's likely that Microsoft is blocking the login due to restrictions in your configuration.
Flexopus allows anyone authorized through your Identity Provider (IdP) using the SAML2 Single Sign-On protocol to log in. The number of possible users is limited by those in your Active Directory. Therefore, you need to determine which users are allowed to access Flexopus via SSO.
To enable broader access:
- Go to your
Enterprise Applicationwithin Azure Active Directory. - Open the created
Flexopus app. - Navigate to the
Propertiespage. - At the bottom, you'll find the option
Assignment required, which is set toYESby default. - Set this option to
NO.
This allows all users in your organization to use Flexopus without needing specific user assignments. It's recommended to set this to NO unless you have a specific reason to restrict login to certain employees. By doing so, you won't have to manually maintain user access for SSO login.

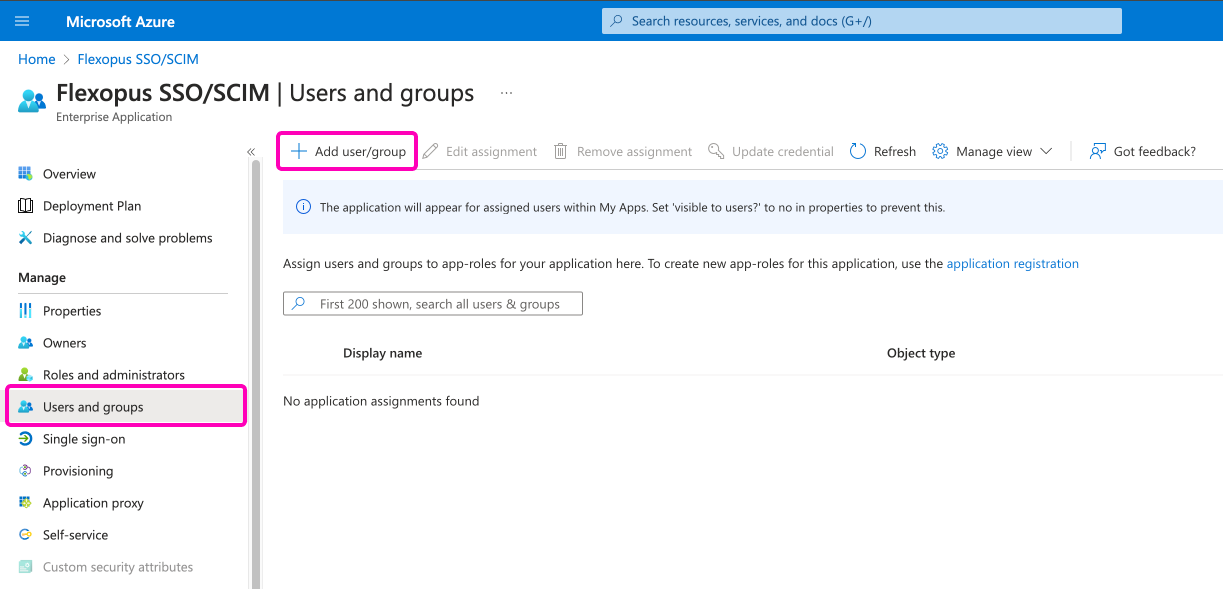
If you want to restrict login to a specific set of users, follow these steps:
- Leave the
Assignment requiredsetting toYESin your Flexopus app within Azure Active Directory. - Navigate to the
Users and groupsmenu. - Here, you can
assign groups or usersindividually, managing exactly who is allowed to log in to Flexopus.
This approach allows you to control access for selected users while keeping others restricted from logging in.
Once you decided who can log in, you are done with the configuration. Go and test the login in an incognito window.
STEP 6 - Test SSO
To test the SAML2 Single Sign-On integration:
- Open Flexopus in a new incognito window.
- Go to the URL:
https://{your-company}.flexopus.com/(or your custom domain, if applicable). - Attempt to log in using an existing or new user, depending on how you configured the access rights in your Azure Active Directory and Flexopus.
This allows you to verify that the SSO login is working correctly with your configured settings.
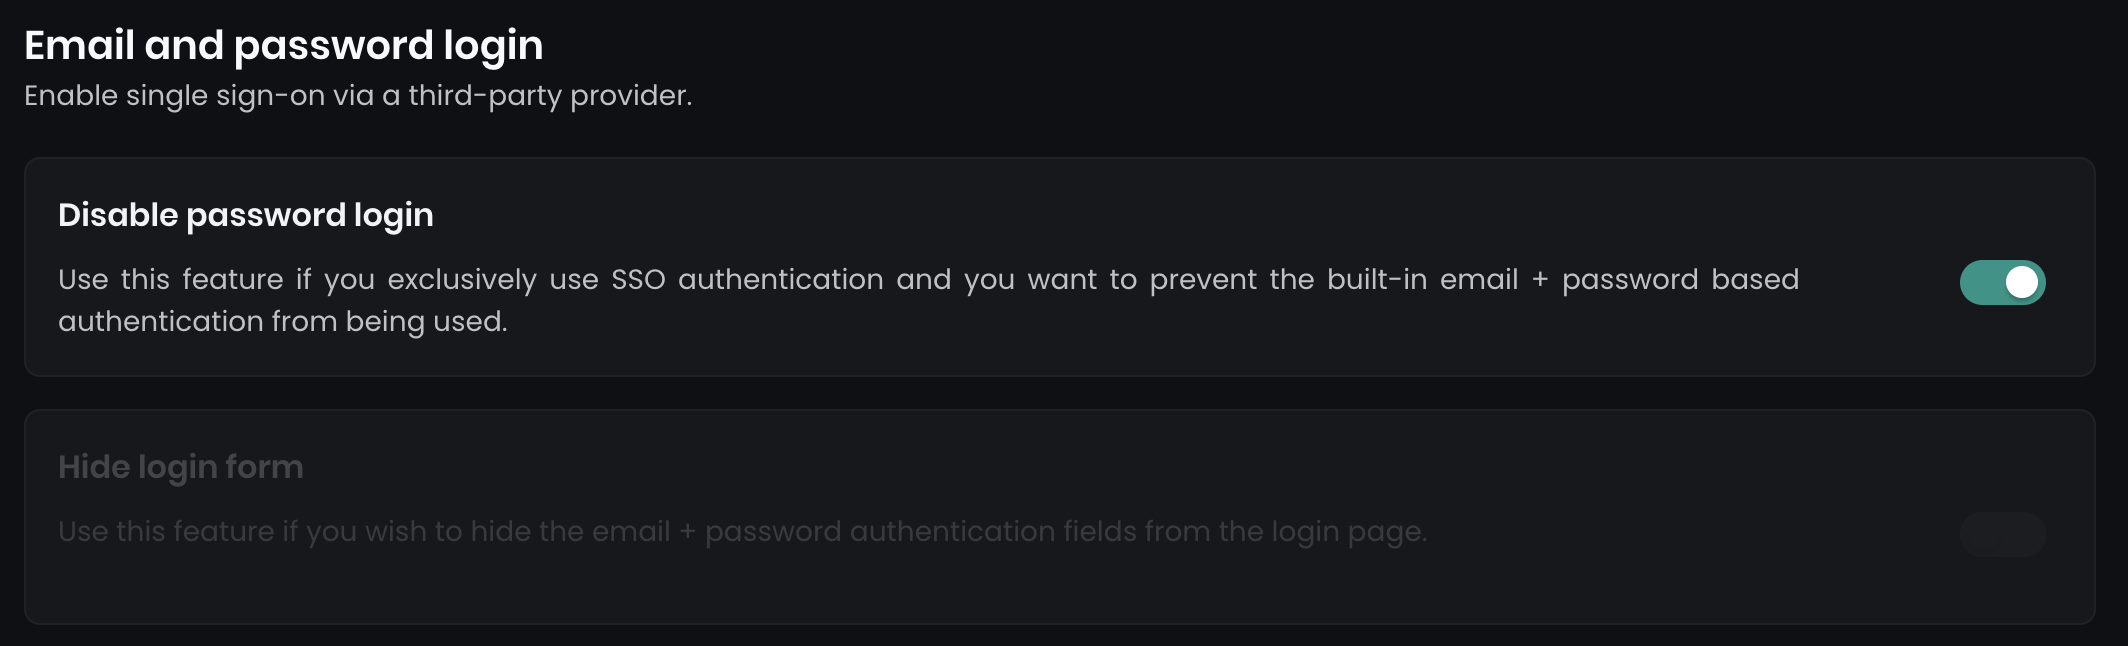
Once you've successfully configured SAML2 SSO, you can optionally enforce Single Sign-On for all users by disabling the email and password login. To do this:
- Navigate to
Dashboard > Settings > Authentication. - You’ll see two options:
Disable password login
Disables all email and password login forms, requiring users to use SSO.Hide login form
Hides the login form on the main login page. However, a secondary login form at../dashboard/auth/loginremains accessible, which can be used as a backup for admin users.
This setup ensures secure SSO while keeping a fallback login option for administrators.
Trouble Shooting / FAQ
I got a 500 Error during the login.
In case you get a 500 error, you may have misconfigured the URLs or the attributes. Check the settings based on the manual once again. If you can not find the issue, contact us via support@flexopus.com. We have server logs to see where the problem lies.
Can I change the UPN of the users?
As you may know, UPN stand for UNIQUE principal names. Unique attributes shall never change, especially the UPN of the user shall remain the same. It can be a number or anything else. External applications are identifying users based on their UPN, if you change you may risk creating a new user within Flexopus. Still, you may have a reason to change the UPN. In this case, contact us via support@flexopus.com. We can assist you by deleting the UPNs and the External IDs of the user to allow you the change of the UPNs in your IdP.
Which groups are assigned to the users after the first login?
After the first Single Sign-On (SSO) login or after manually creating a user in Flexopus, only the "all" system group is assigned by default.
If you want to assign additional groups to users, you can do this in two ways:
- SCIM API (recommended): Use the SCIM API to manage group assignments efficiently.
- SAML2 user attribute: You can use a special SAML2 attribute called memberOf to assign groups.
For more detailed instructions, visit the article on how to configure SCIM or SAML2 group assignments.
Can I also synchronize the user profile pictures?
Unfortunately, the SAML2 SSO protocol is not supporting the synchronization of profile pictures. We are planning to develop a way via the Microsoft Graph API to synchronize the user profile pictures.
I saw an attribute costcenters. What is it doing?
Indeed, we have an additional attribute, which is called costcenters. The feature is currently in a BETA testing phase. More information will follow.
I can not see the SAML configuration option.
In some cases, customers report that this page is not allowing the selection of SAML or showing this message: "OIDC Applications require custom signing keys to customize claims. Please check the security considerations before customizing the claims for the application"
If you encounter issues during setup, it's likely because STEP 1 in the manual was skipped, and you attempted to configure an automatically created application. When configuring integrations like OAuth SSO, Exchange Online, or Microsoft Teams, an extra Flexopus application is automatically created in the enterprise application list.
Unfortunately, Flexopus cannot combine all integrations into one application. If you configure all integrations, you’ll end up with:
- One application for SAML2/SCIM.
- One for Exchange Online.
- One for Microsoft Teams.
If you're switching from OAuth2.0 SSO to SAML2, you can delete the OAuth SSO app after completing the switch.
To avoid confusion, always follow the manual and create a new Enterprise app when setting up SAML2.
Does Flexopus support Identity Provider (IdP) Initiated Single Sign-On login?
Yes and No. We provide a workaround for the IdP initiated logins. You need to configure the initiate-sp-login parameter for the RelayState. This will convert the IdP initiated login request into an SP initiated login. This way, we can ensure a secure login process.
Reason: A classical IdP initiated login would enable a man in the middle attack for hackers. Through an SP initiated login, we can avoid it. This article explains the reasons in more details: https://www.identityserver.com/articles/the-dangers-of-saml-idp-initiated-sso