Okta SAML2 + SCIM
Introduction
Connect Flexopus with Okta via SAML2 for Single Sign-On. With the integration, you can manage which Okta users should have access to Flexopus and force them to use their Okta credentials for the login. Based on a SAML2 Setting in Flexopus you can let the user profiles be created after the first successful SAML2 SSO login attempt to avoid a manual user creation process at Flexopus.
Setup Instruction Manual
Follow the step by step introduction manual to configure the integration. The manual also includes best practices and solutions for some commonly made errors during the configuration. Still, if you need help with the setup, feel free to reach out to our support team via support@flexopus.com.
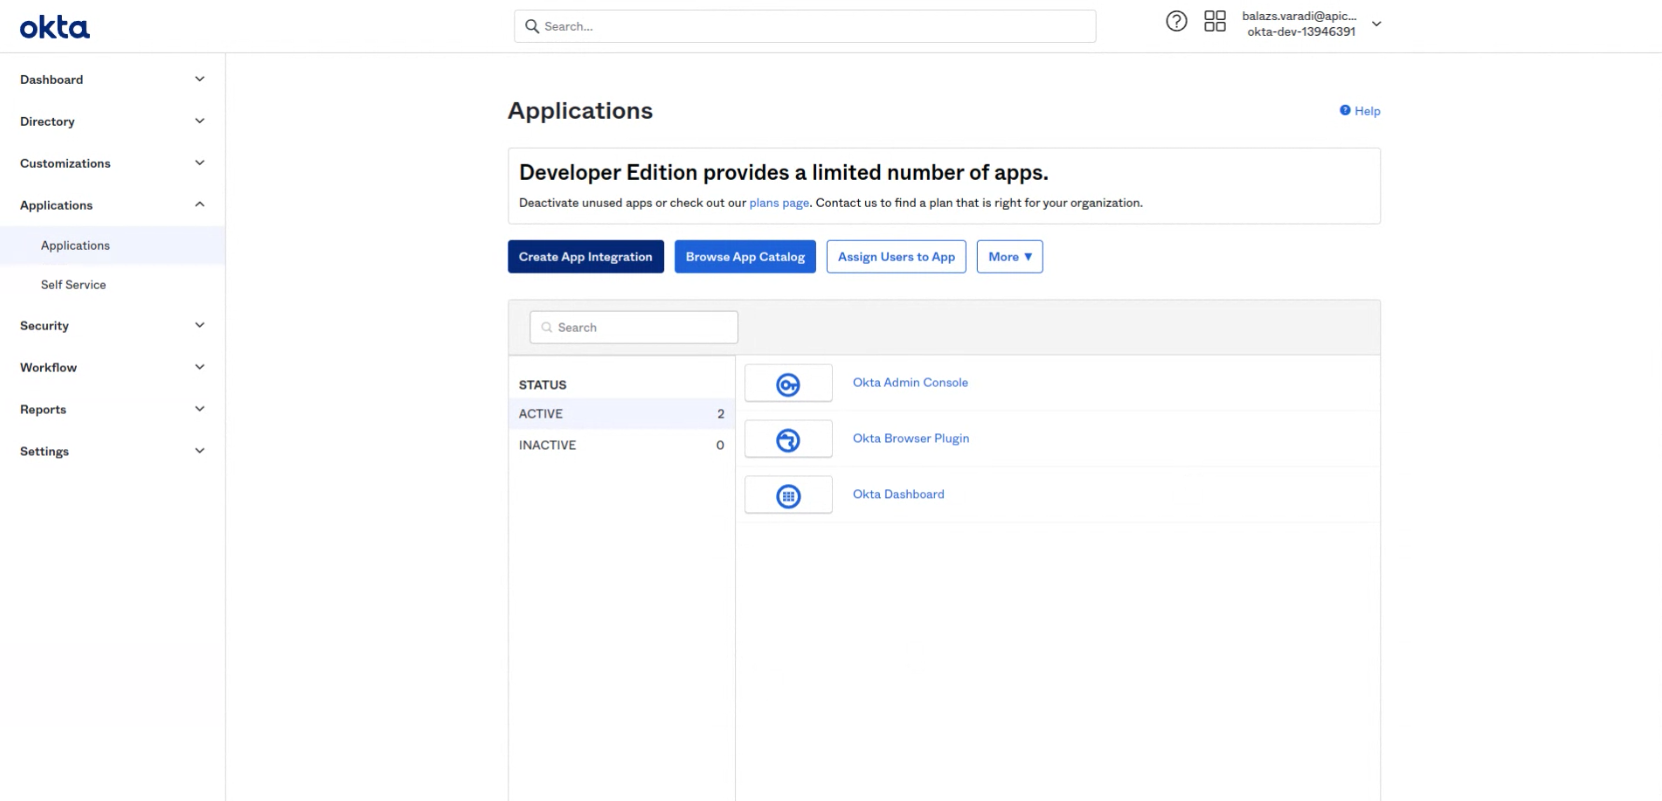
STEP 1 - Create custom SAML app
Open the Okta admin console and navigate to Applications > Applications. Click on the Create App Integration button.
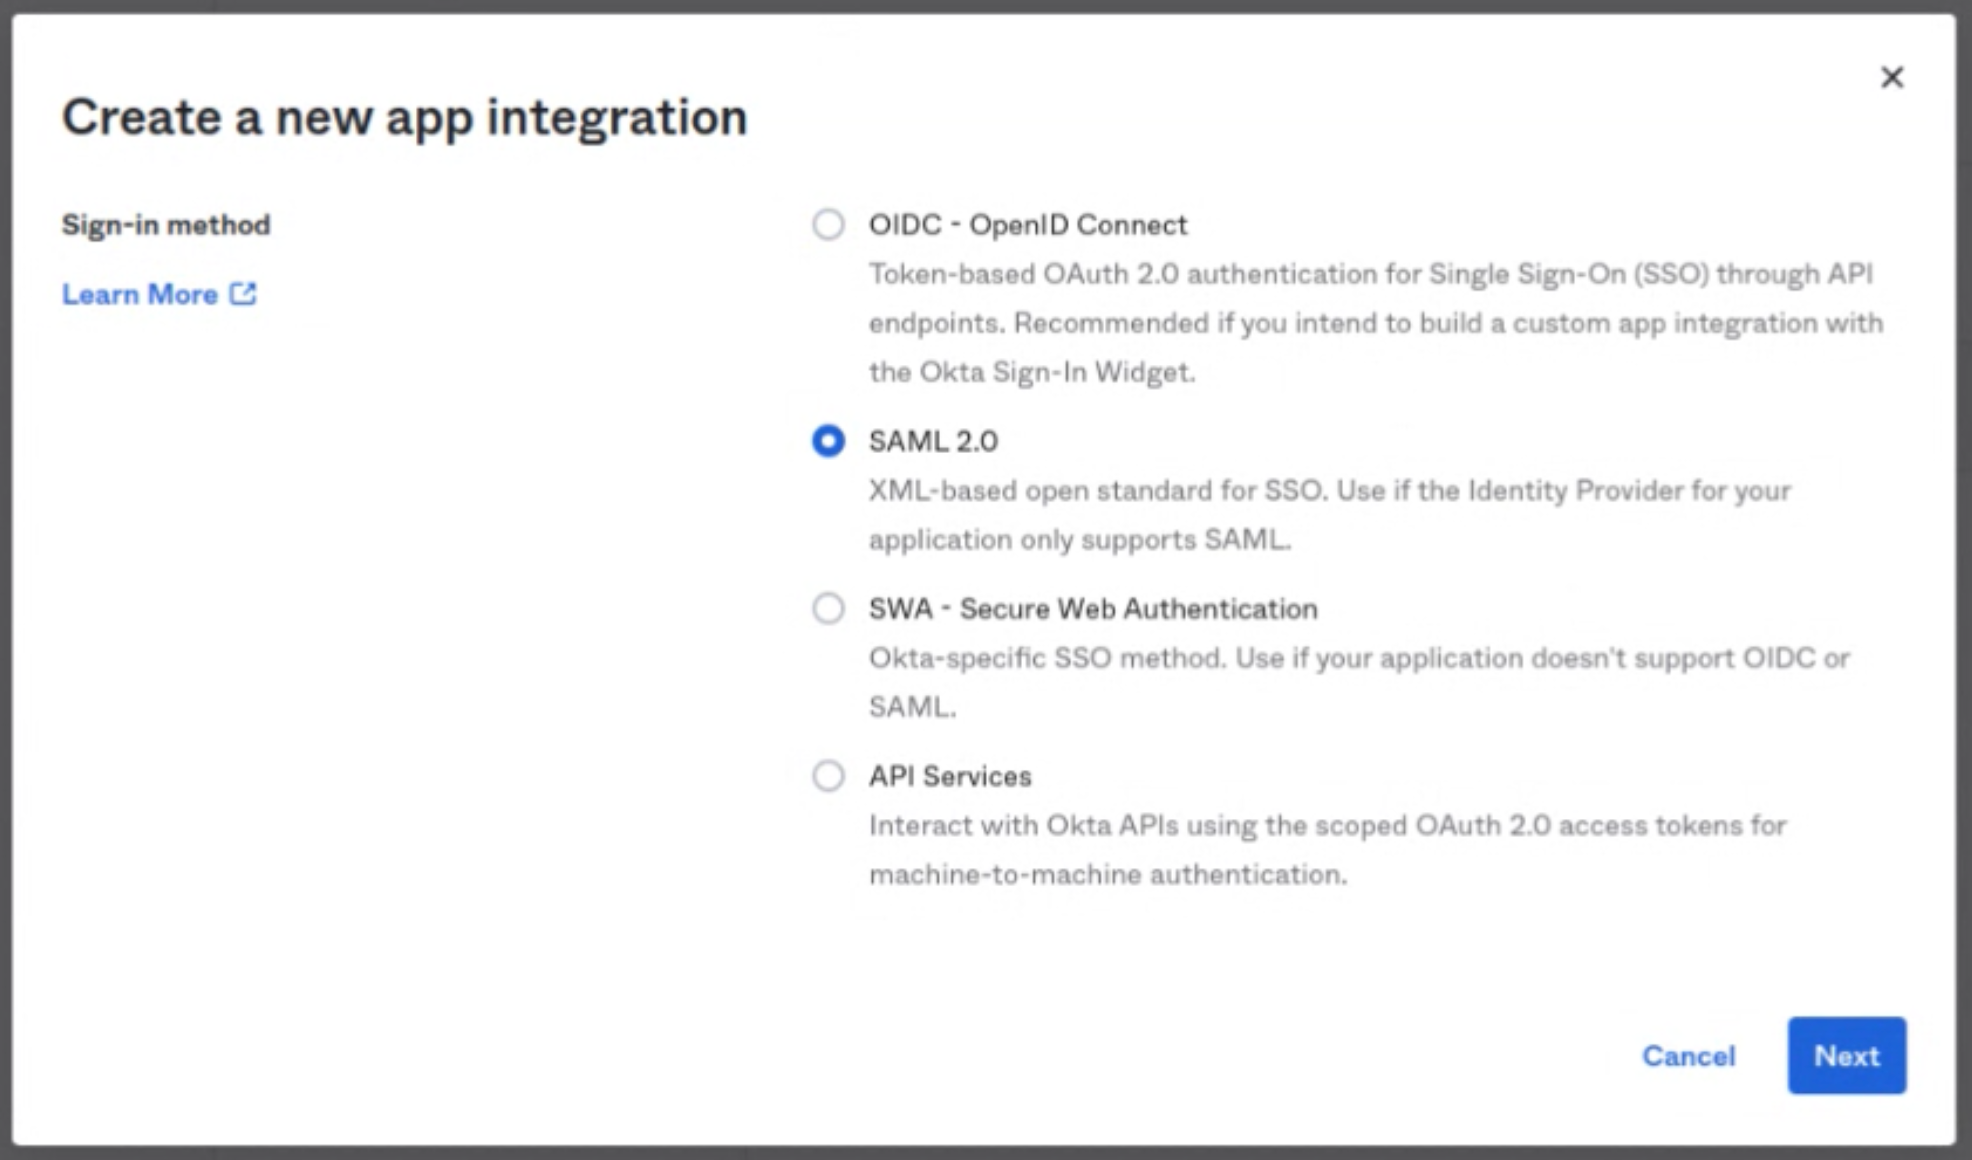
A popup will open. Select the SAML2.0 option and click on Next
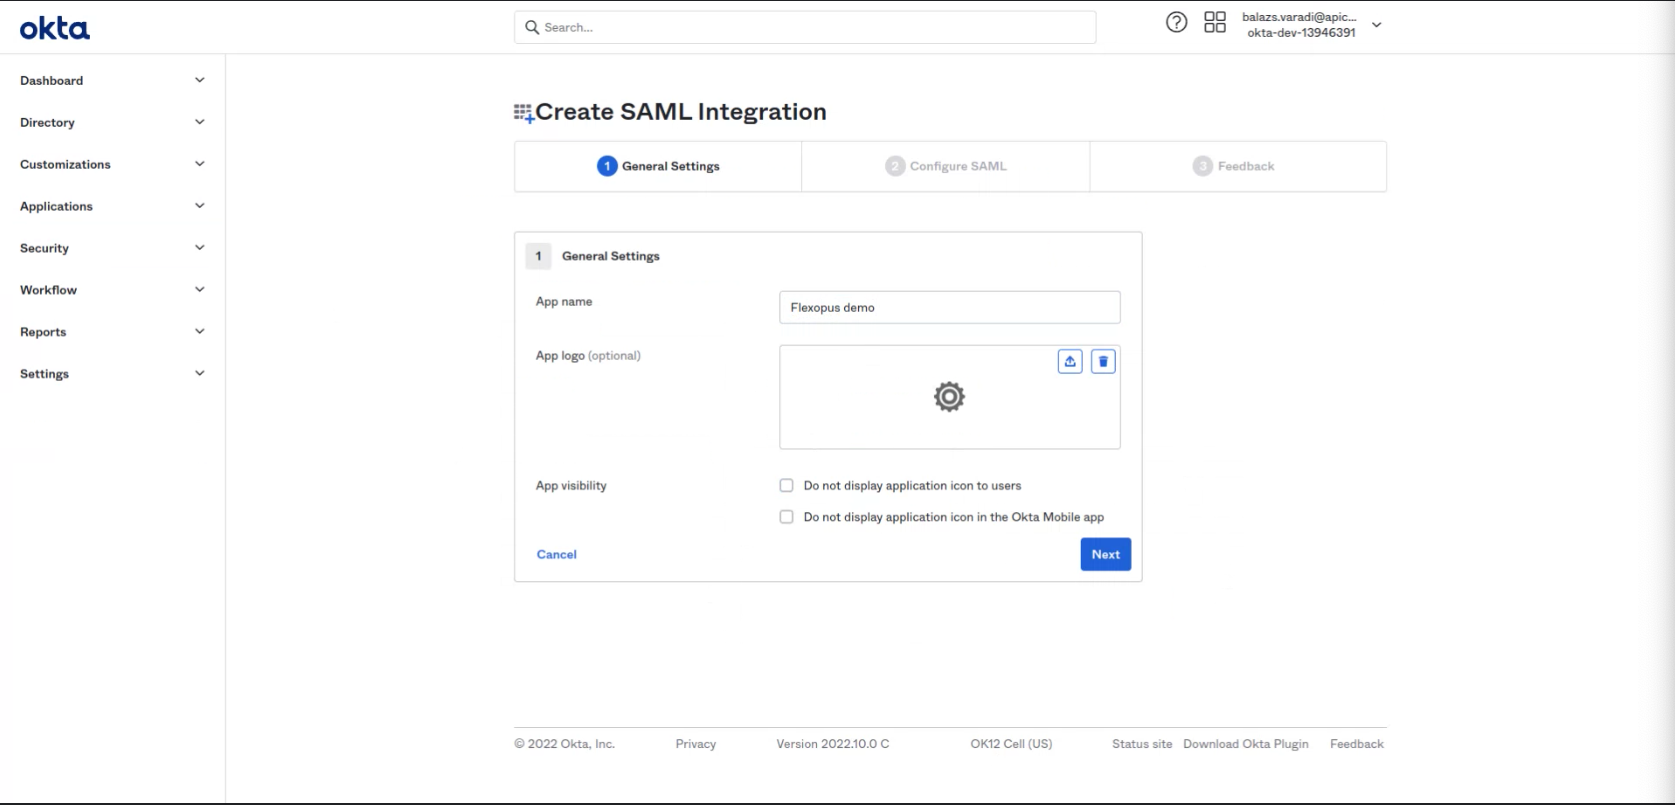
App name: Flexopus SAML2
Logo:
App visibility: Leave that unselected.
Click Next
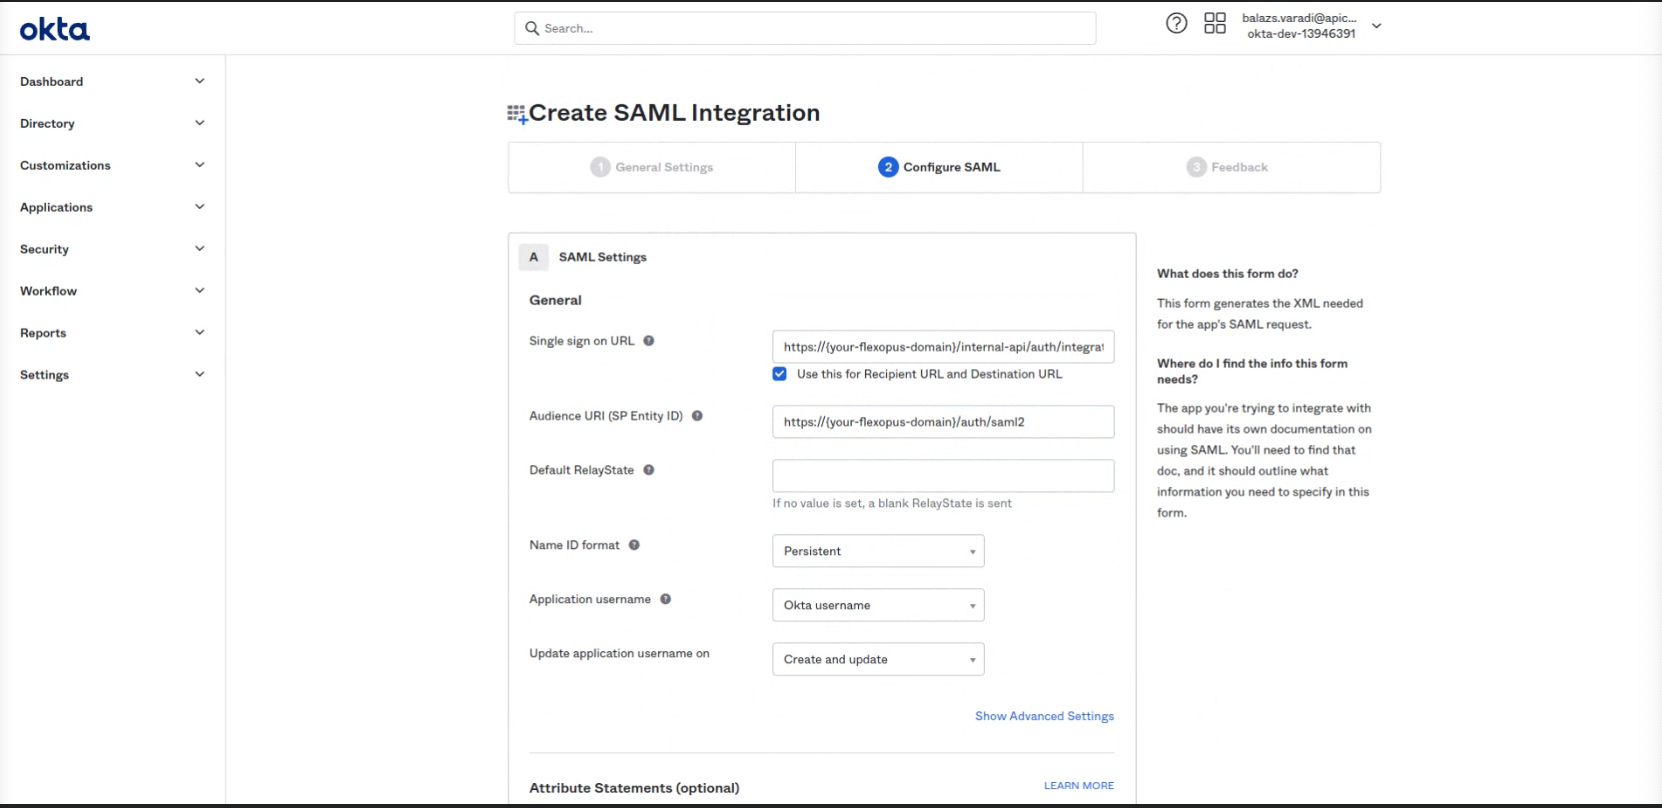
On this page, enter the Single Sign-On URL, Audience URL (SP Entity ID), and Default RelayState. You can find these parameters in Flexopus by navigating to Dashboard > Settings > Authentication as an administrator. Click on the Add provider button and select the SAML2 SSO option.

Copy the URLs from Flexopus to your Okta configuration:Entity ID = Audience URL (SP Entity ID) Callback (ACS) URL = Single Sign-On URL Relay state = Default RelayState Name ID format = PRESISTENT Application username = Okta username
Click Continue and first go back to Flexopus to finish the configurations there.
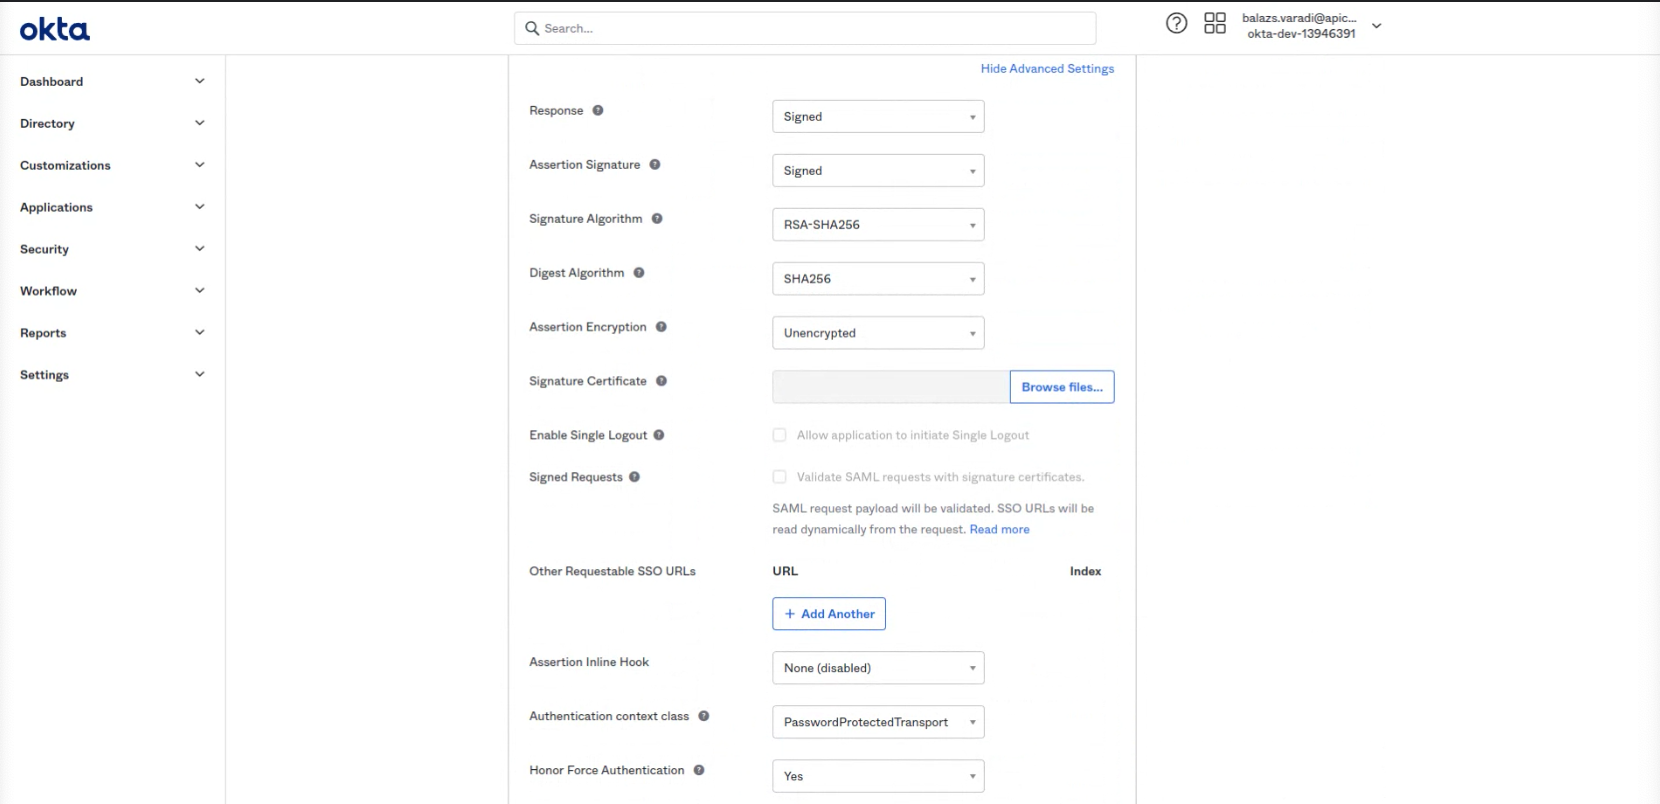
No need to change the Advanced Settings, still here is a screenshot about the default settings:
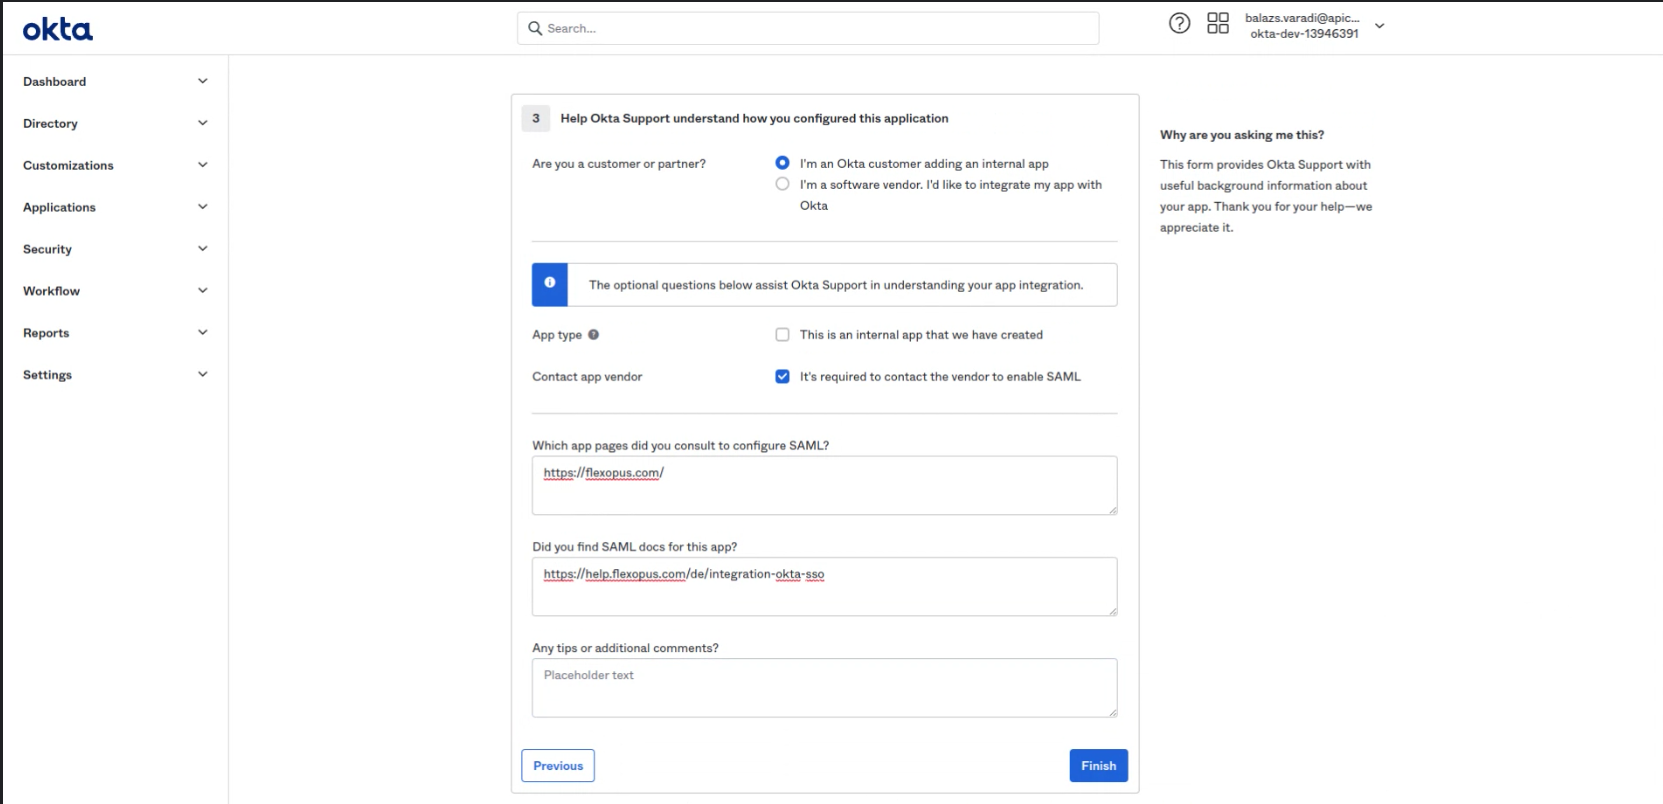
Select: I'm an Okta customer adding an internal app
Select: It's required to contact the vendor to enable SAML
You can optionally give some information to Okta about Flexopus:
(optional) First Field: https://www.flexopus.com
(optional) Second Field: https://help.flexopus.com/de/integration-okta-sso
(optional) Third Field: no tips and additional comments.
Click on Finish at the end.
STEP 2 - Attribute mapping
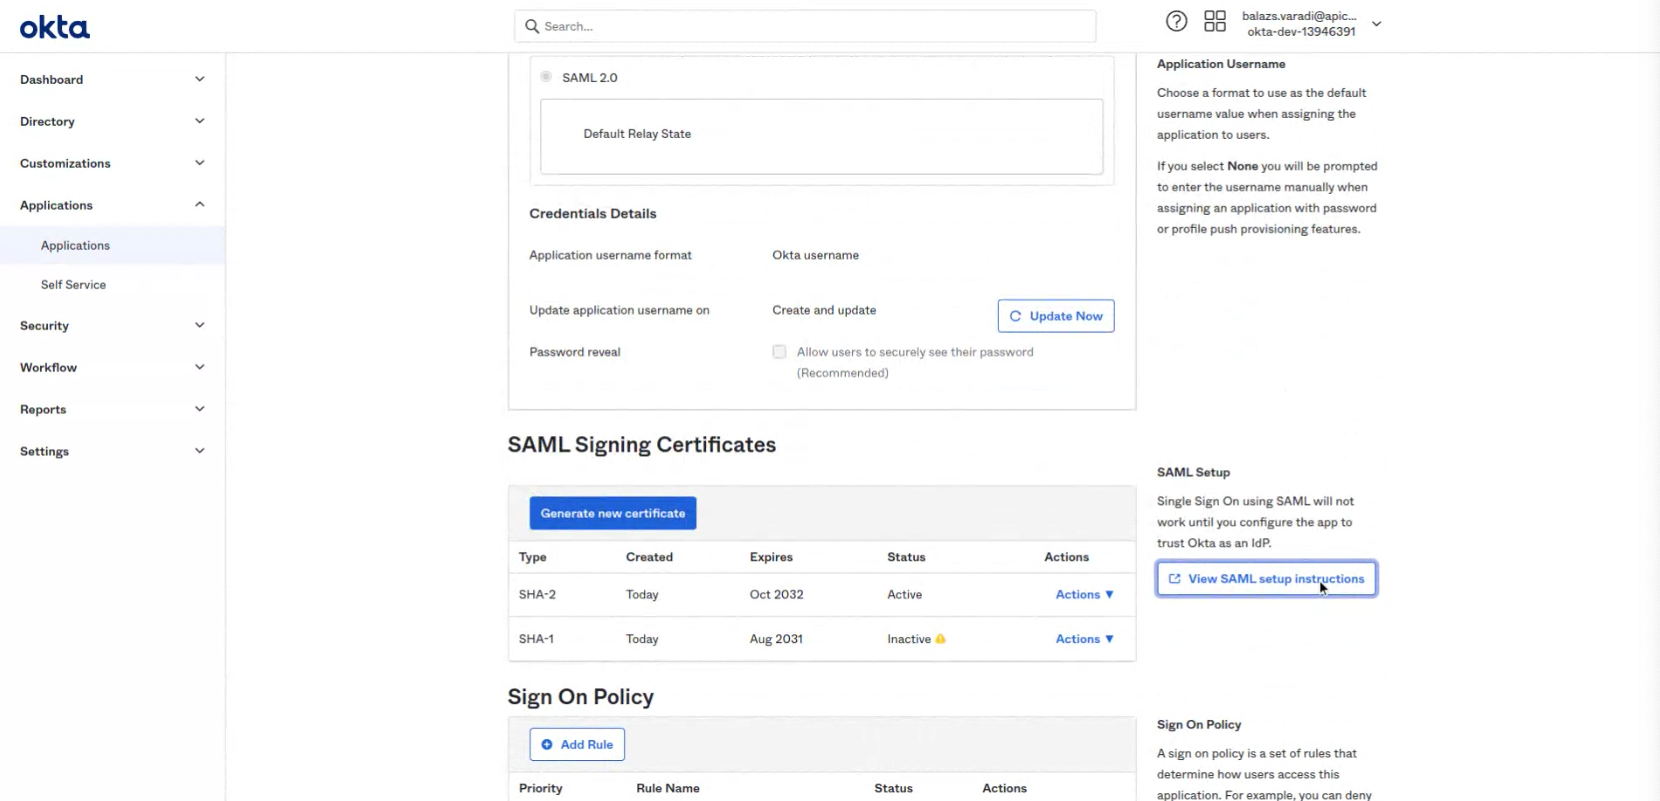
Click on the View SAML setup instructions
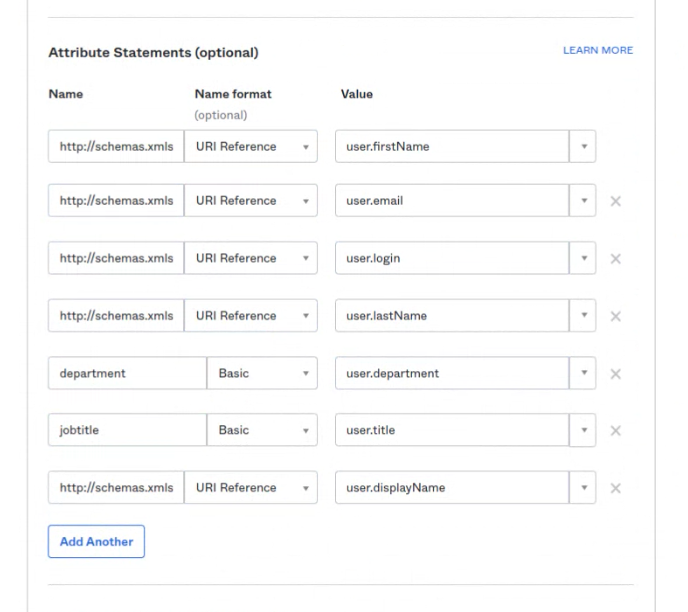
Configure the correct attribute mappings. Set the attributes as listed below.
| Name | Name format | Value | Note |
|---|---|---|---|
| http://schemas.xmlsoap.org/ws/2005/05/identity/claims/givenname | URl Reference | user.firstname | required |
| http://schemas.xmlsoap.org/ws/2005/05/identity/claims/emailaddress | URl Reference | user.email | required |
| http://schemas.xmlsoap.org/ws/2005/05/identity/claims/upn | URl Reference | user.login | required |
| http://schemas.xmlsoap.org/ws/2005/05/identity/claims/surname | URl Reference | user.lastName | required |
| http://schemas.xmlsoap.org/ws/2005/05/identity/claims/name | URl Reference | user.displayName | required |
| department | Basic | user.department | optional |
| jobtitle | Basic | user.title | optional |
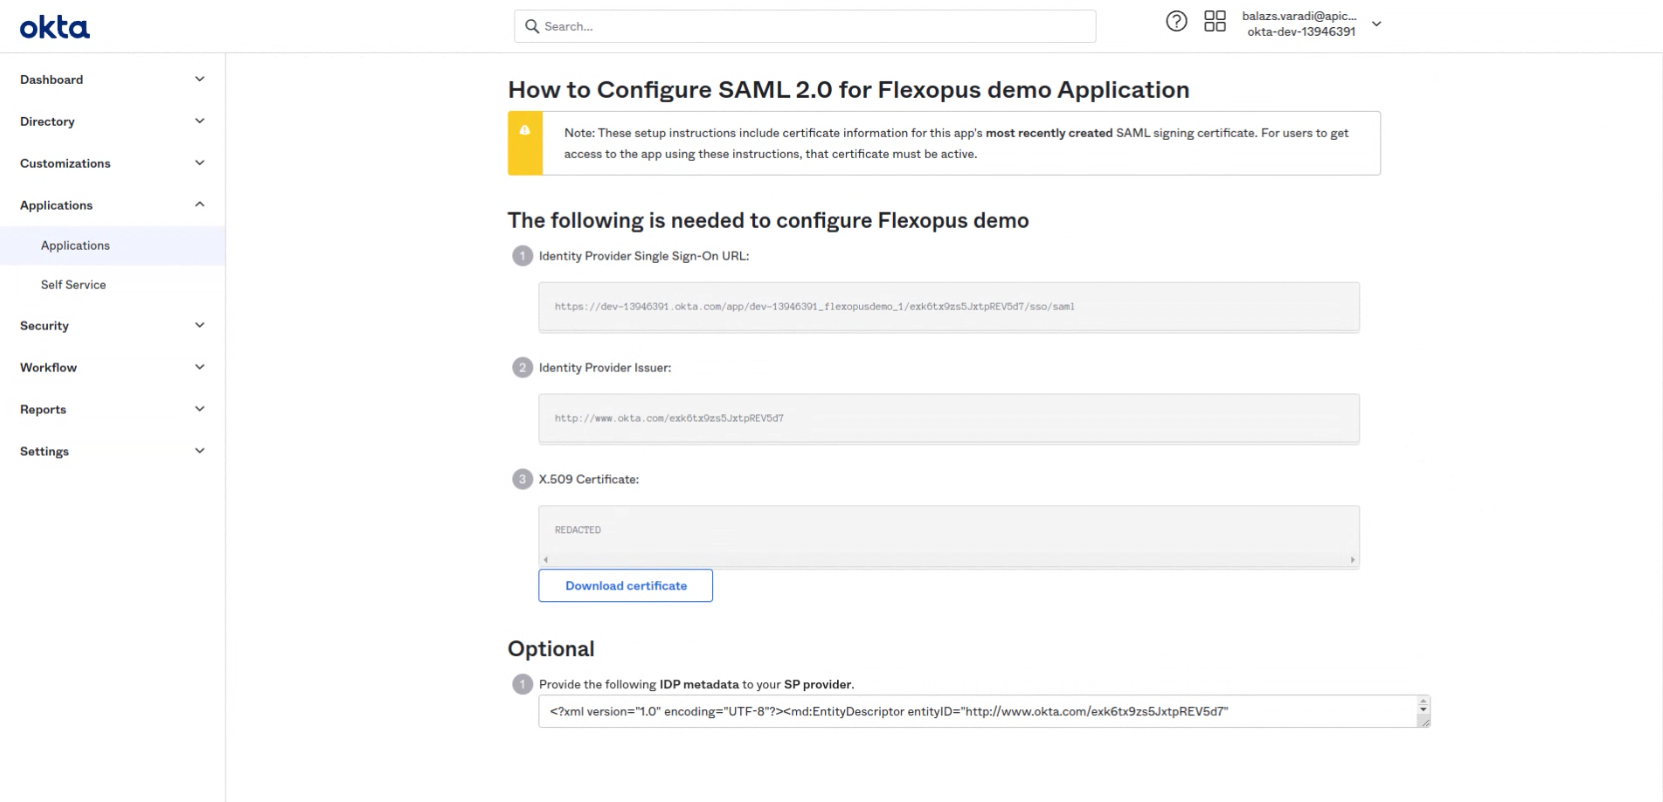
To complete the setup, follow these steps to share metadata with Flexopus:
- Copy the content in the field labeled
Provide the following IDP metadata to your SP provider(found at the bottom of the Okta configuration page). - Create a new, empty XML file on your computer.
- Paste the copied content into this XML file and save it.
This file will serve as the metadata for Flexopus.
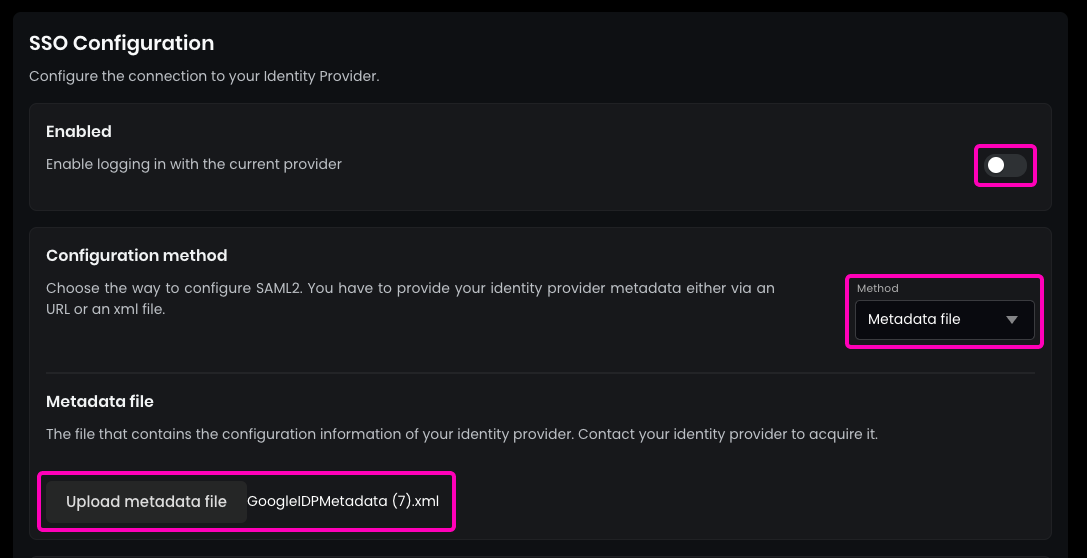
STEP 3 - Configure Flexopus
- In Flexopus, navigate to
Dashboard > Settings > Authentication. - Select the newly created
SAML2 Provider. - Enable
SAML2 SSO. - Choose
Metadata fileinstead ofmetadata URLfor the configuration option. - Upload the Metadata file you created from Okta.
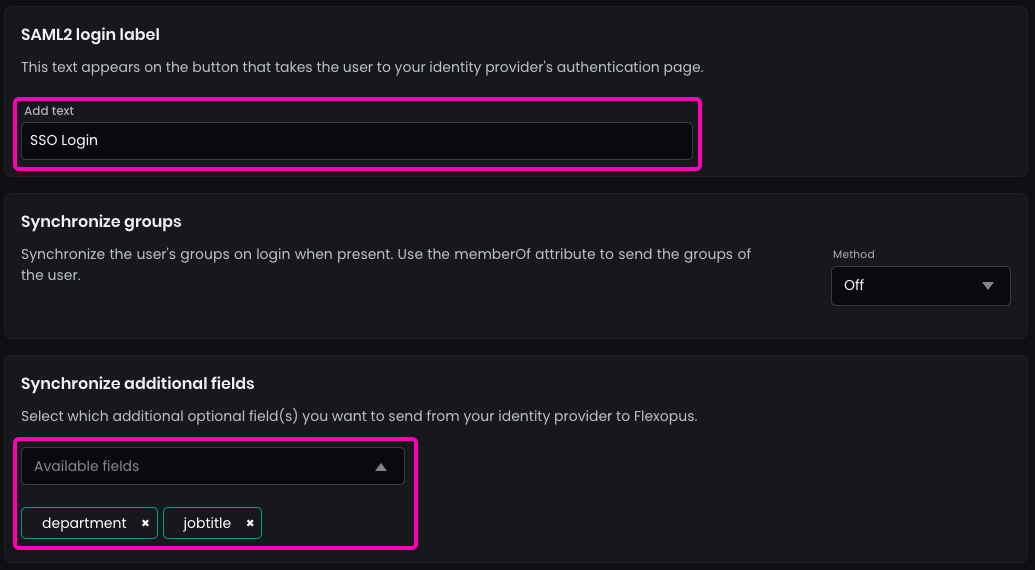
- Enter the name for the
SAML2 Login buttonto display on the login page (recommended:SSO Login). - (Optional) Enable synchronization for fields configured in the SAML2 settings, such as
jobtitleordepartment.
- In
Security Settings, setallowed domains for SSOto*and pressENTER. This will allow every user configured in your Active Directory to log in. - By default, SAML2 SSO users are automatically registered after their first login attempt. This saves you from needing to create user profiles manually before the first login; however, this setting can be disabled if necessary (not recommended).
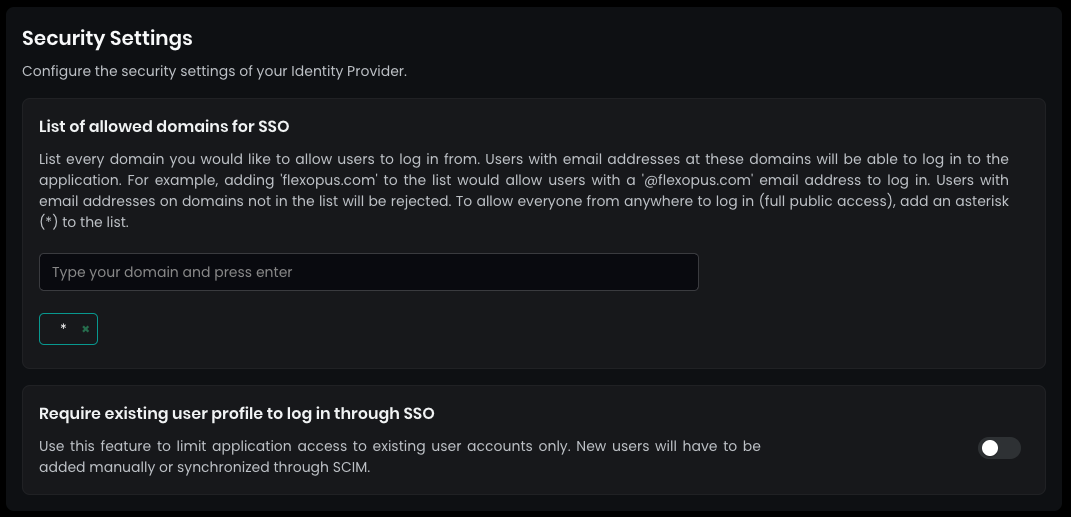
Save your settings in the bottom.
STEP 4 - Configure who can log in
If you try to log in now into Flexopus, you will see an error message, since you did not configure who can or cannot log in from your Okta user directory. You can set it under the assignments tab. Assign a test user to the application and test the connection at Flexopus.
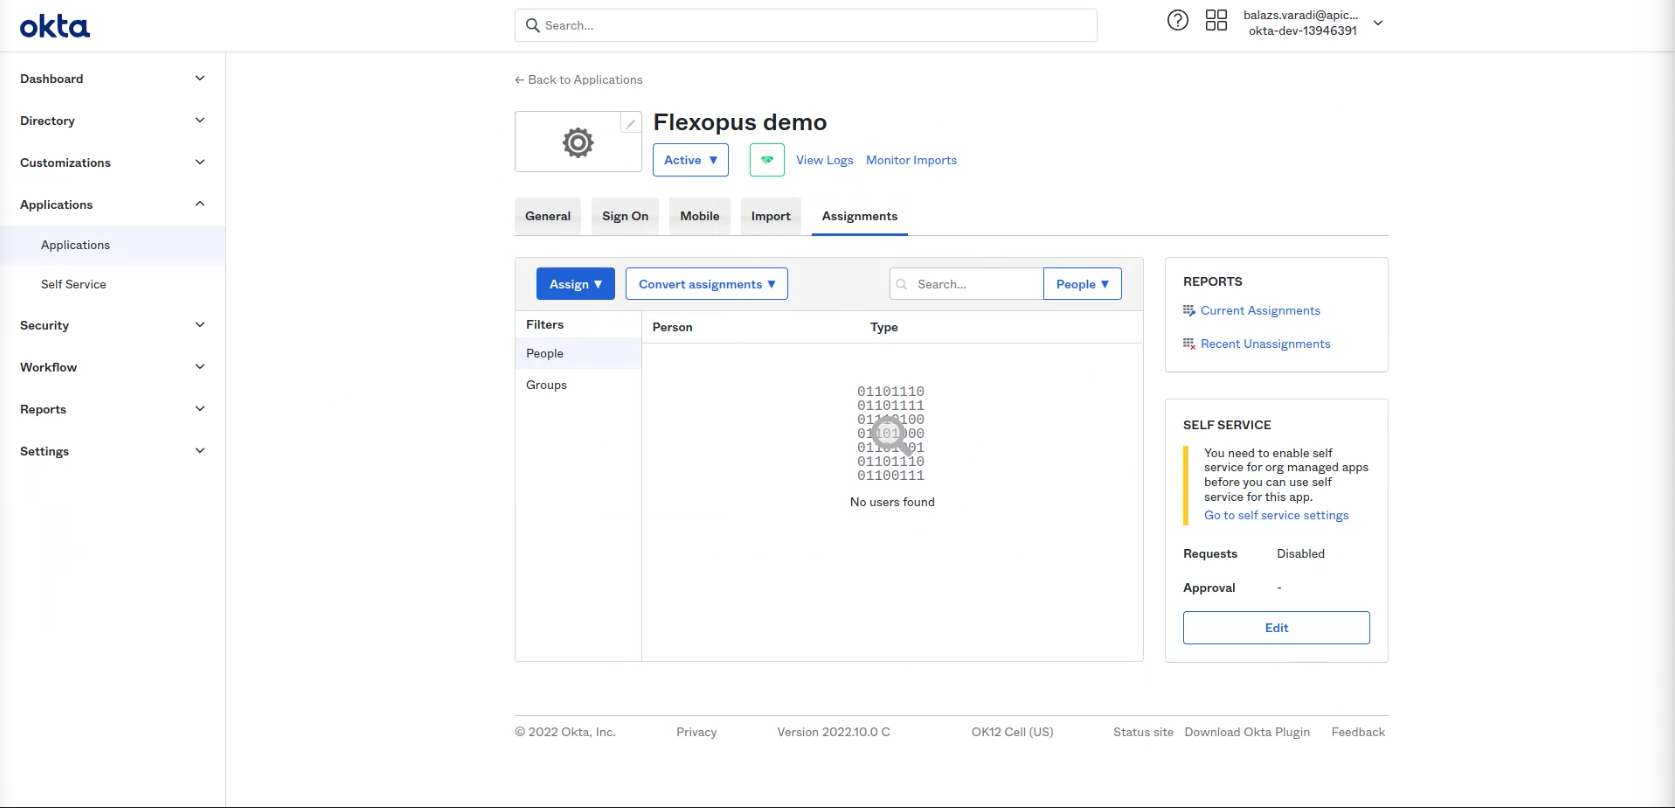
Open the settings and decide which user or group can log in into the application. It's recommended enabling the login for the whole organization in case you don't have any reasonable limitations in place. In this case, you don't need to maintain the user's access for the login, and you can reduce the number of possible support cases regarding the login configuration.
SCIM configuration
(optional) SCIM API configuration
Optionally, you can set up user and group provisioning between Okta and Flexopus. To start configuring SCIM:
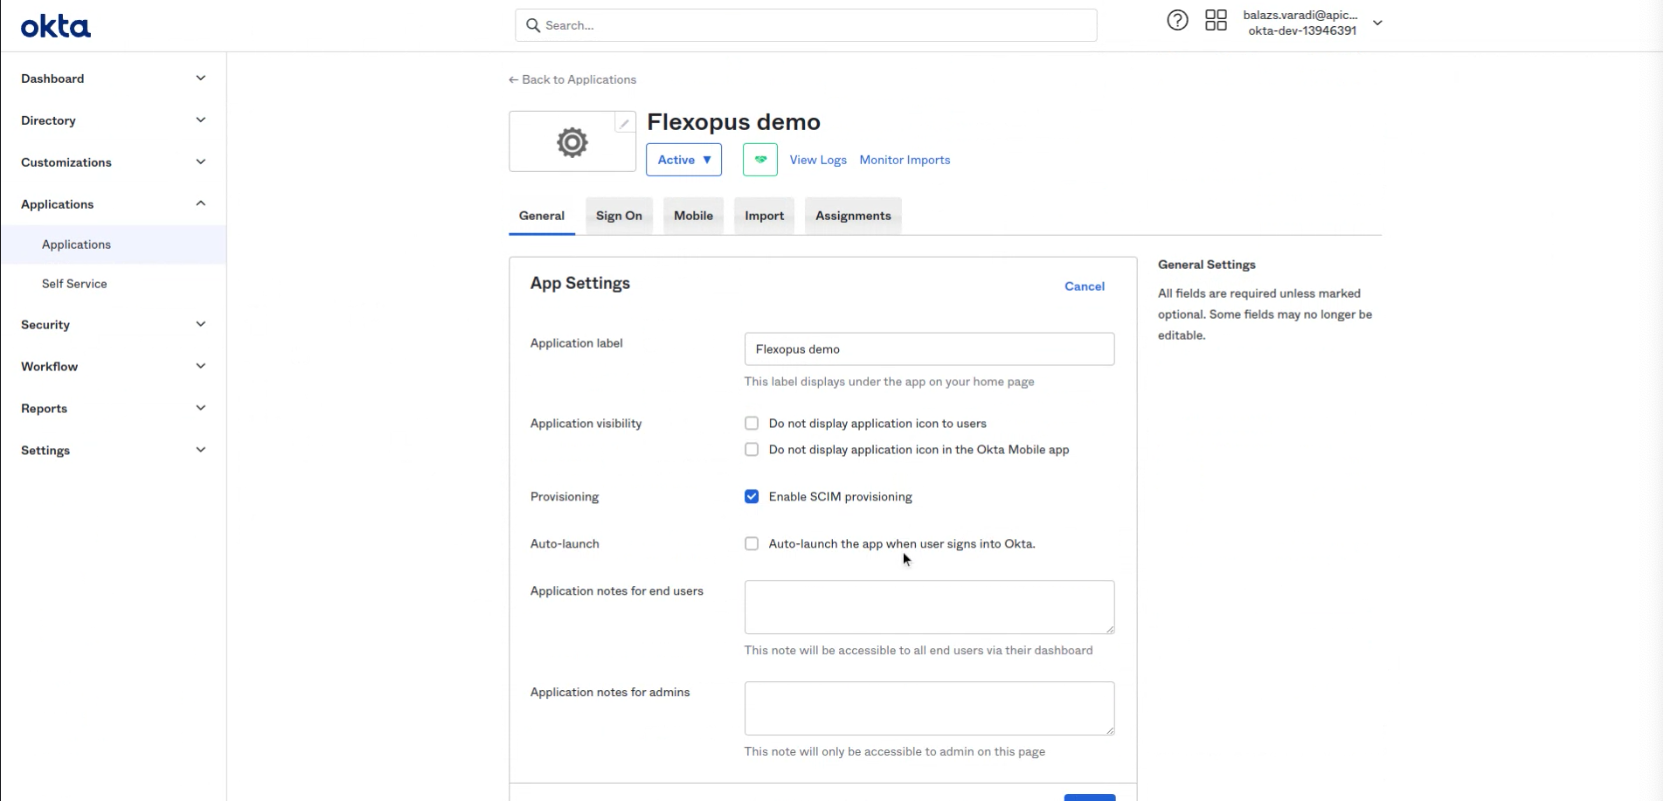
- Click on
Editin the App Settings. - Follow the instructions provided for SCIM setup to enable provisioning.
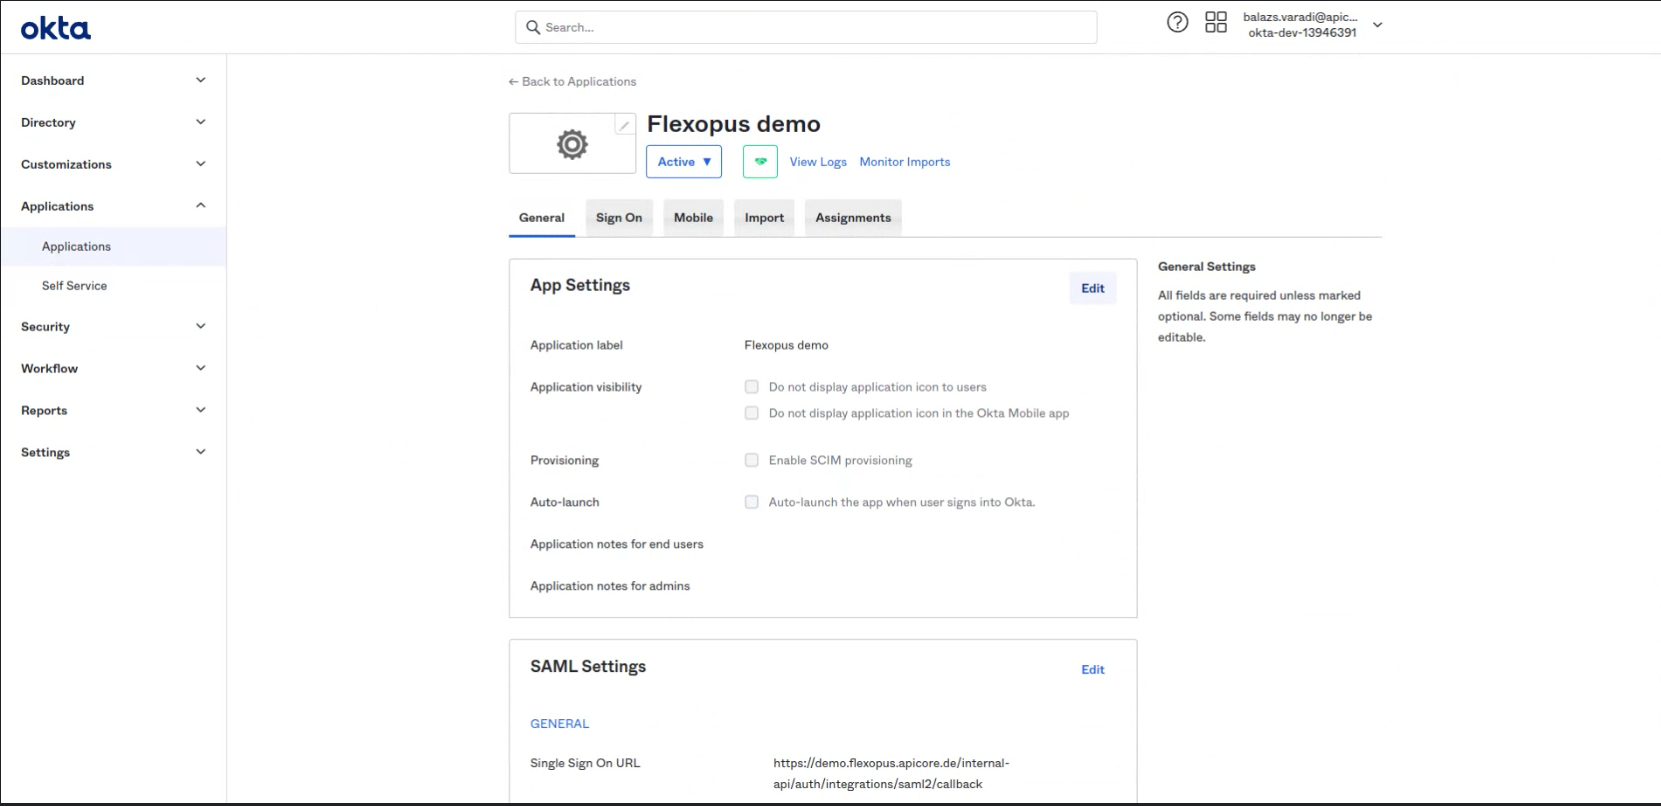
Select: Enable SCIM provisioning
- In Okta, navigate to the
Provisioningtab and click onEdit. - Go to your Flexopus admin dashboard:
Dashboard > Settings > Integrations. - Locate the
SCIM connector base URLandGenerate the SCIM API tokenfor authorization.
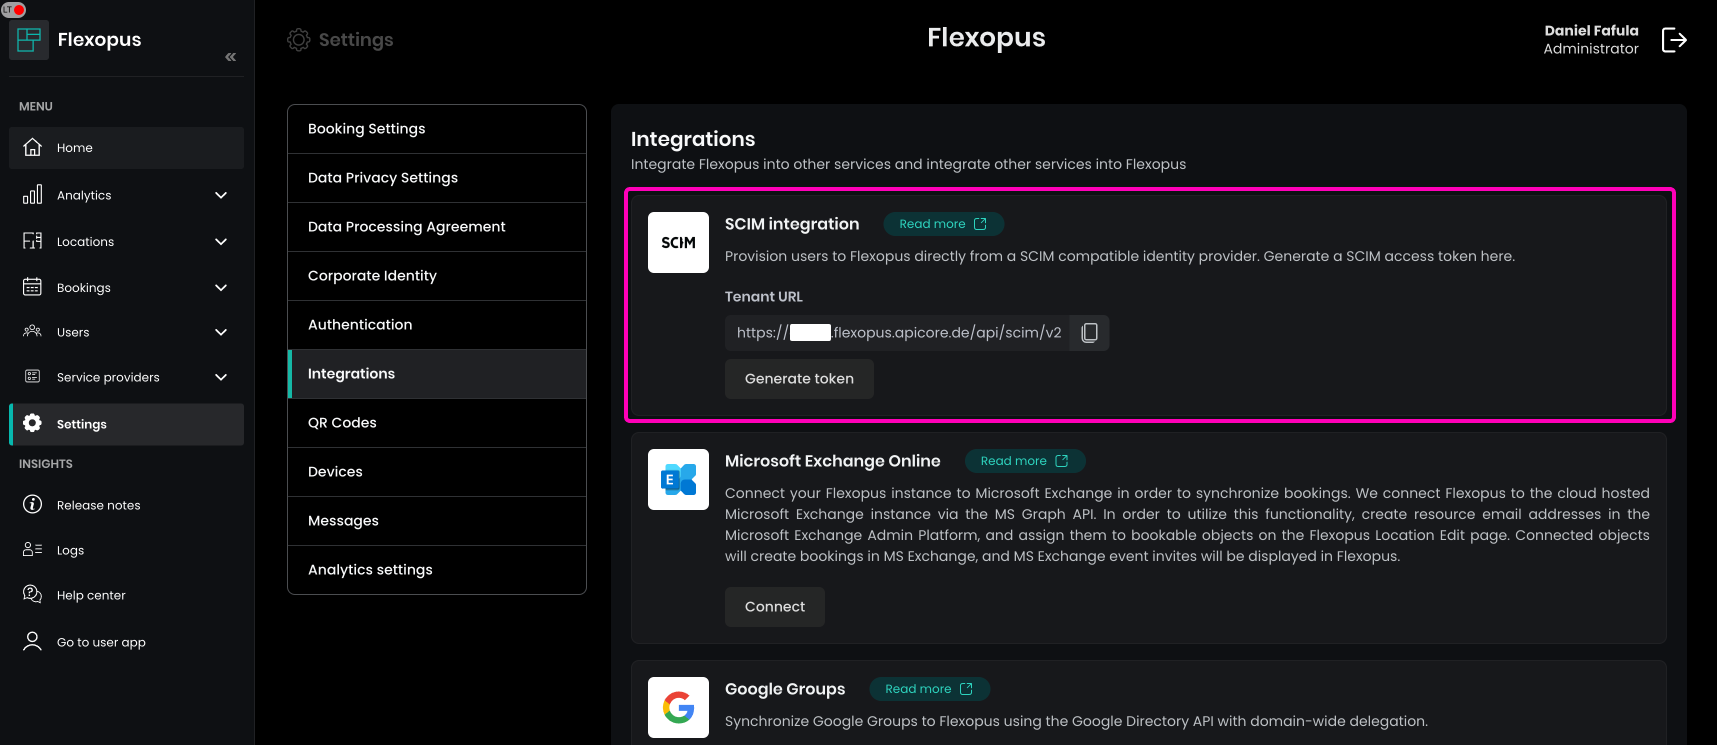
SCIM connector base URL: tenant URL
Unique identifier field for users: userName
Select options: Push New Users, Push Profile Updates, Push Groups
Select option: HTTP Header
Authorization: Generate a token in Flexopus.
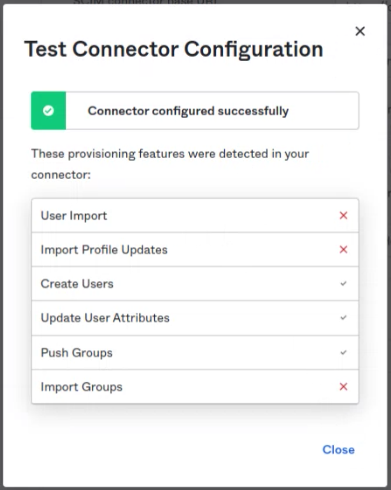
IMPORT GROUPS!!!Click on test. Test results looks like this:
Save the settings.
In the Provisioning tab select the To App menu point and click on Edit.
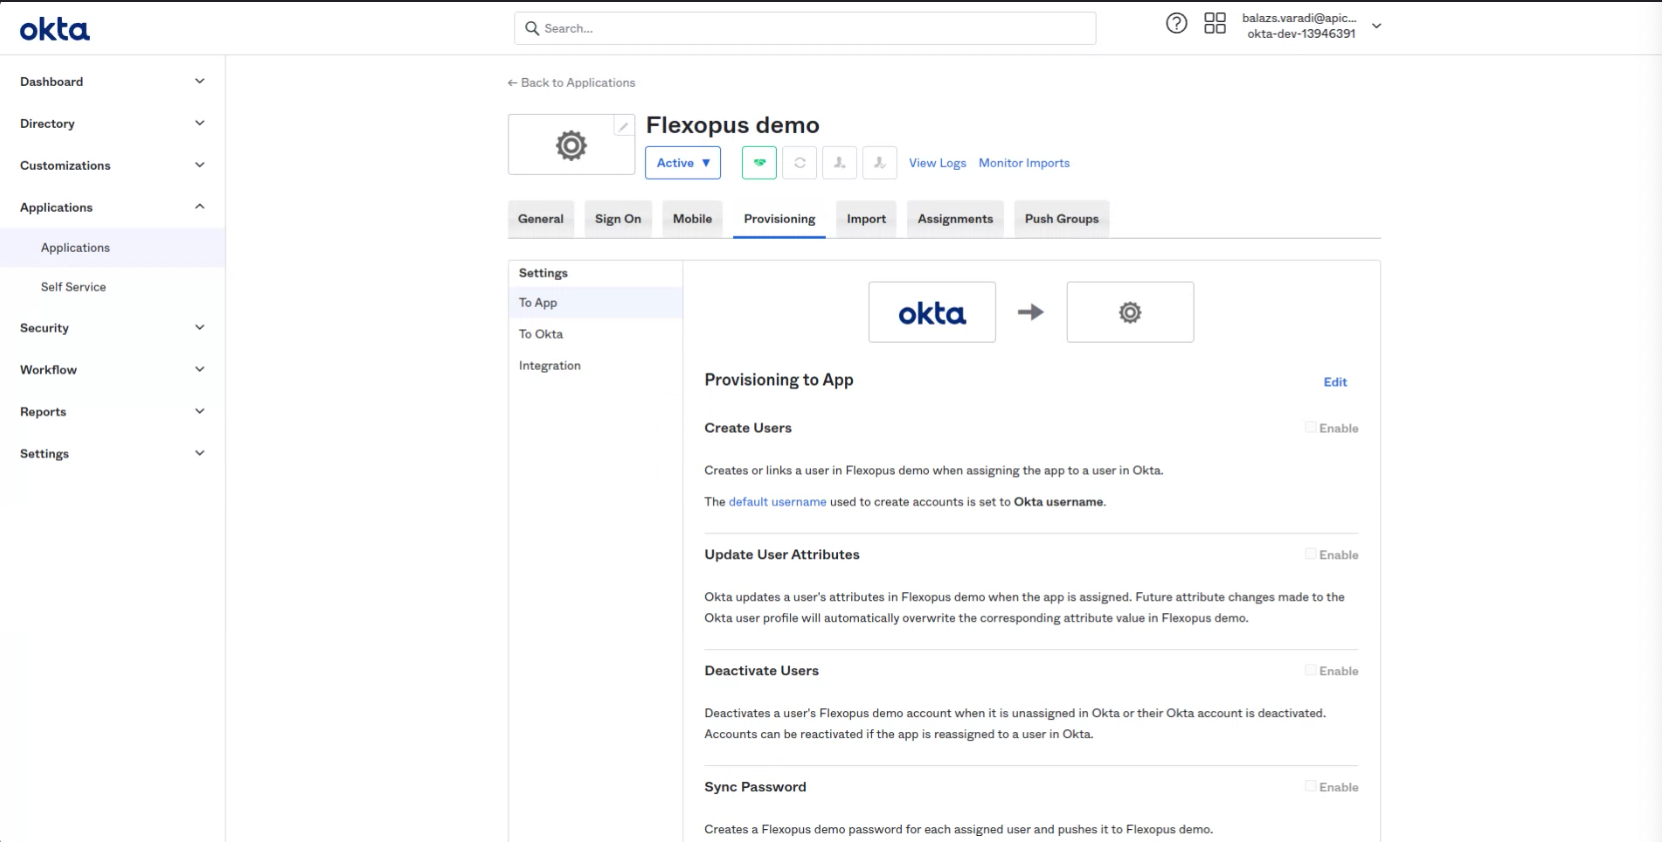
Enable: Select Create Users
Enable: Update User Attributes
Enable: Deactivate Users
The fourth option is not needed.
Edit the attribute mapping to send only the necessary attributes through SCIM to Flexopus. Only keep the following mappings:
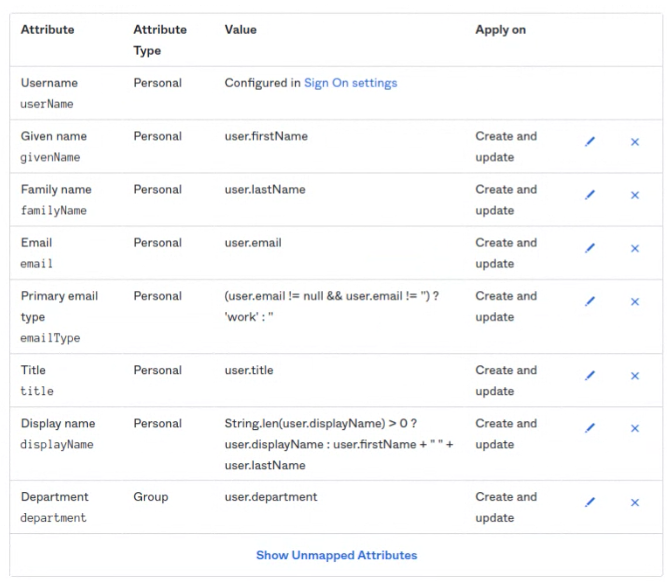
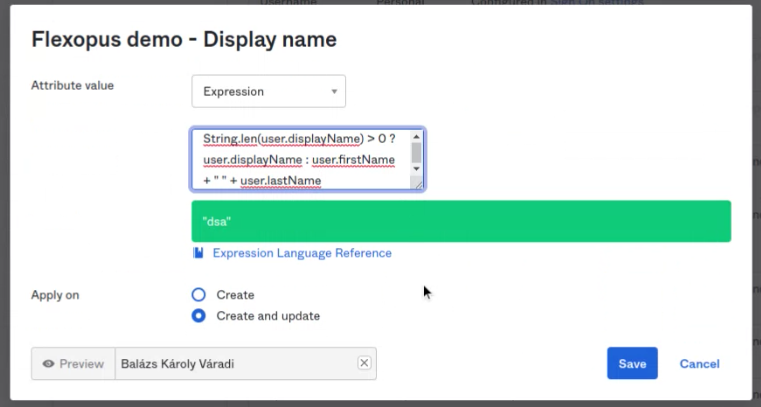
The Display Name needs to be changed.
Attribute value: Expression
String.len(user.displayName) > 0 ? user.displayName : user.firstName + " " + user.lastName
Select option Create and update
Save the settings.
Test the connection by assigning a group to Flexopus. The groups should be synced to Flexopus within a few minutes.
(optional) OKTA SCIM Workaround
At the current time (2023-10-30), due to a malfunction at Okta, the SCIM interface must be set up in SCIM via a detour. The normal “application” that we used for the SAML2 connection offers the “Provisioning” option, but cannot be used due to a technical error on the part of Okta. The problem has been reported by us to Okta, and we hope that it will change in the future. For the time being, you can use the alternative solution as follows:
WORKAROUND:
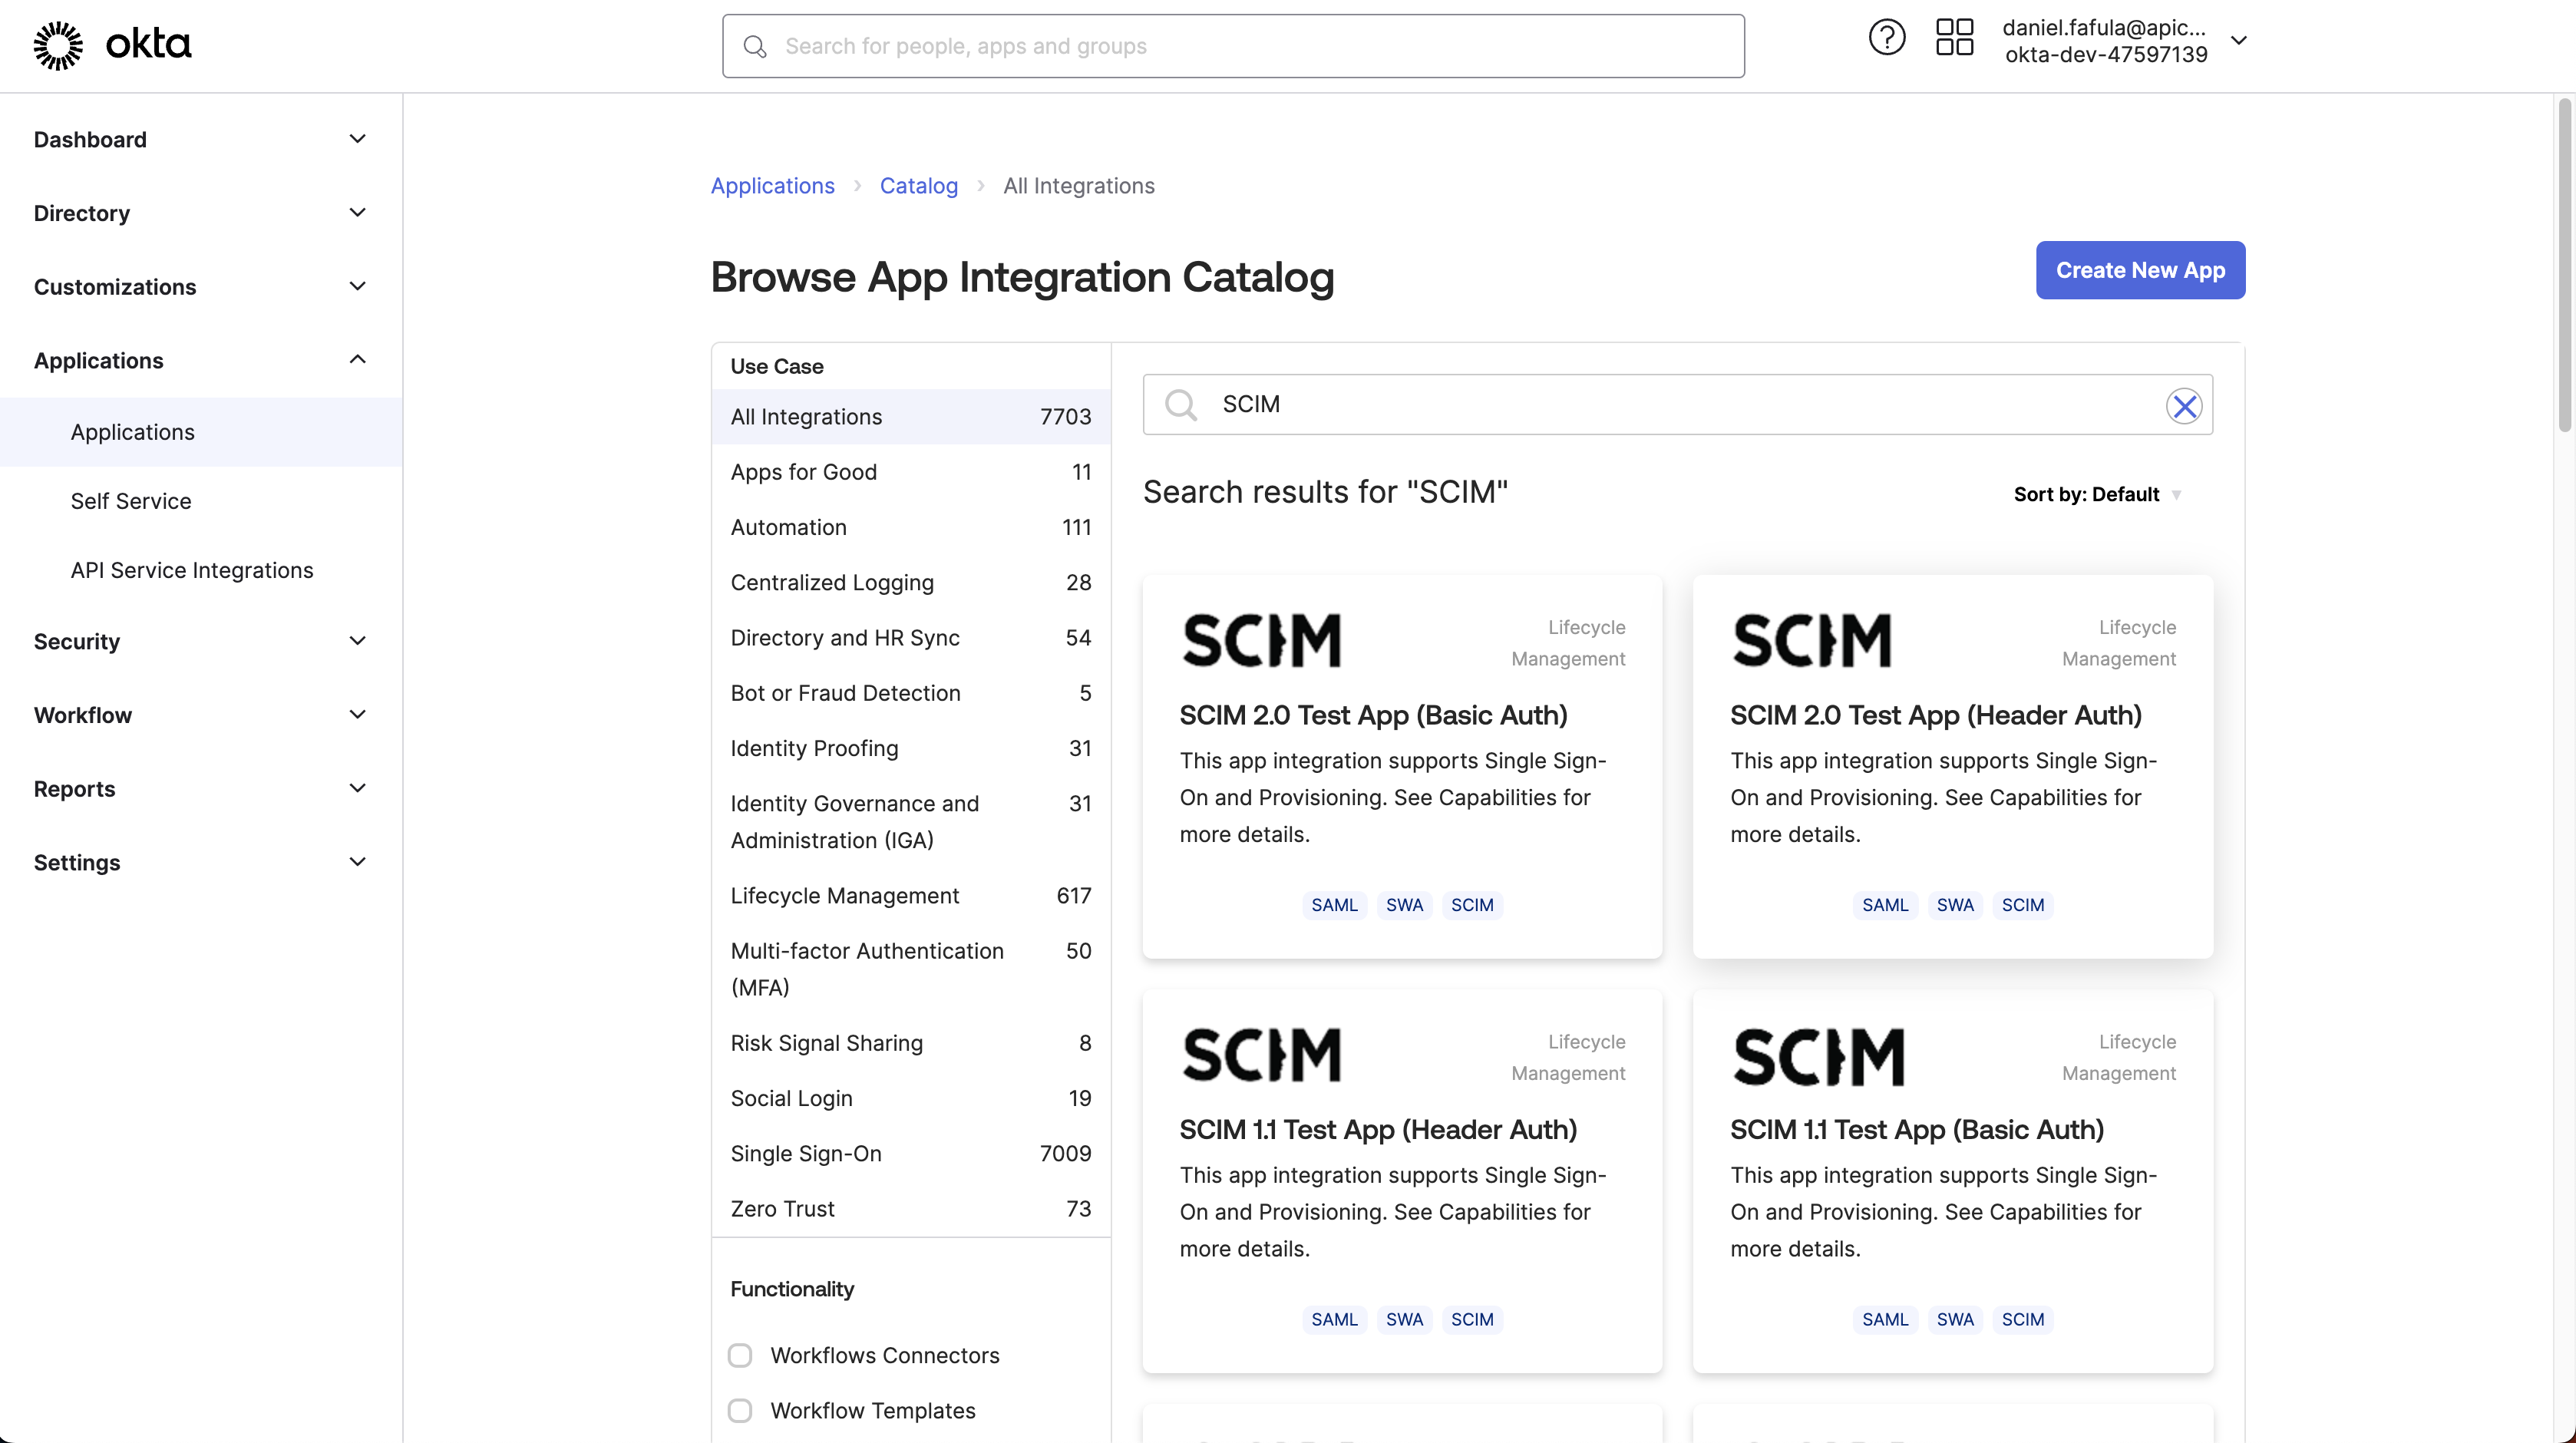
- In Okta, go to
Applications > Browse App Catalog. - Search for
SCIM 2.0 Test App (Header Auth)and select it.
You can rename the application: Flexopus SCIM App
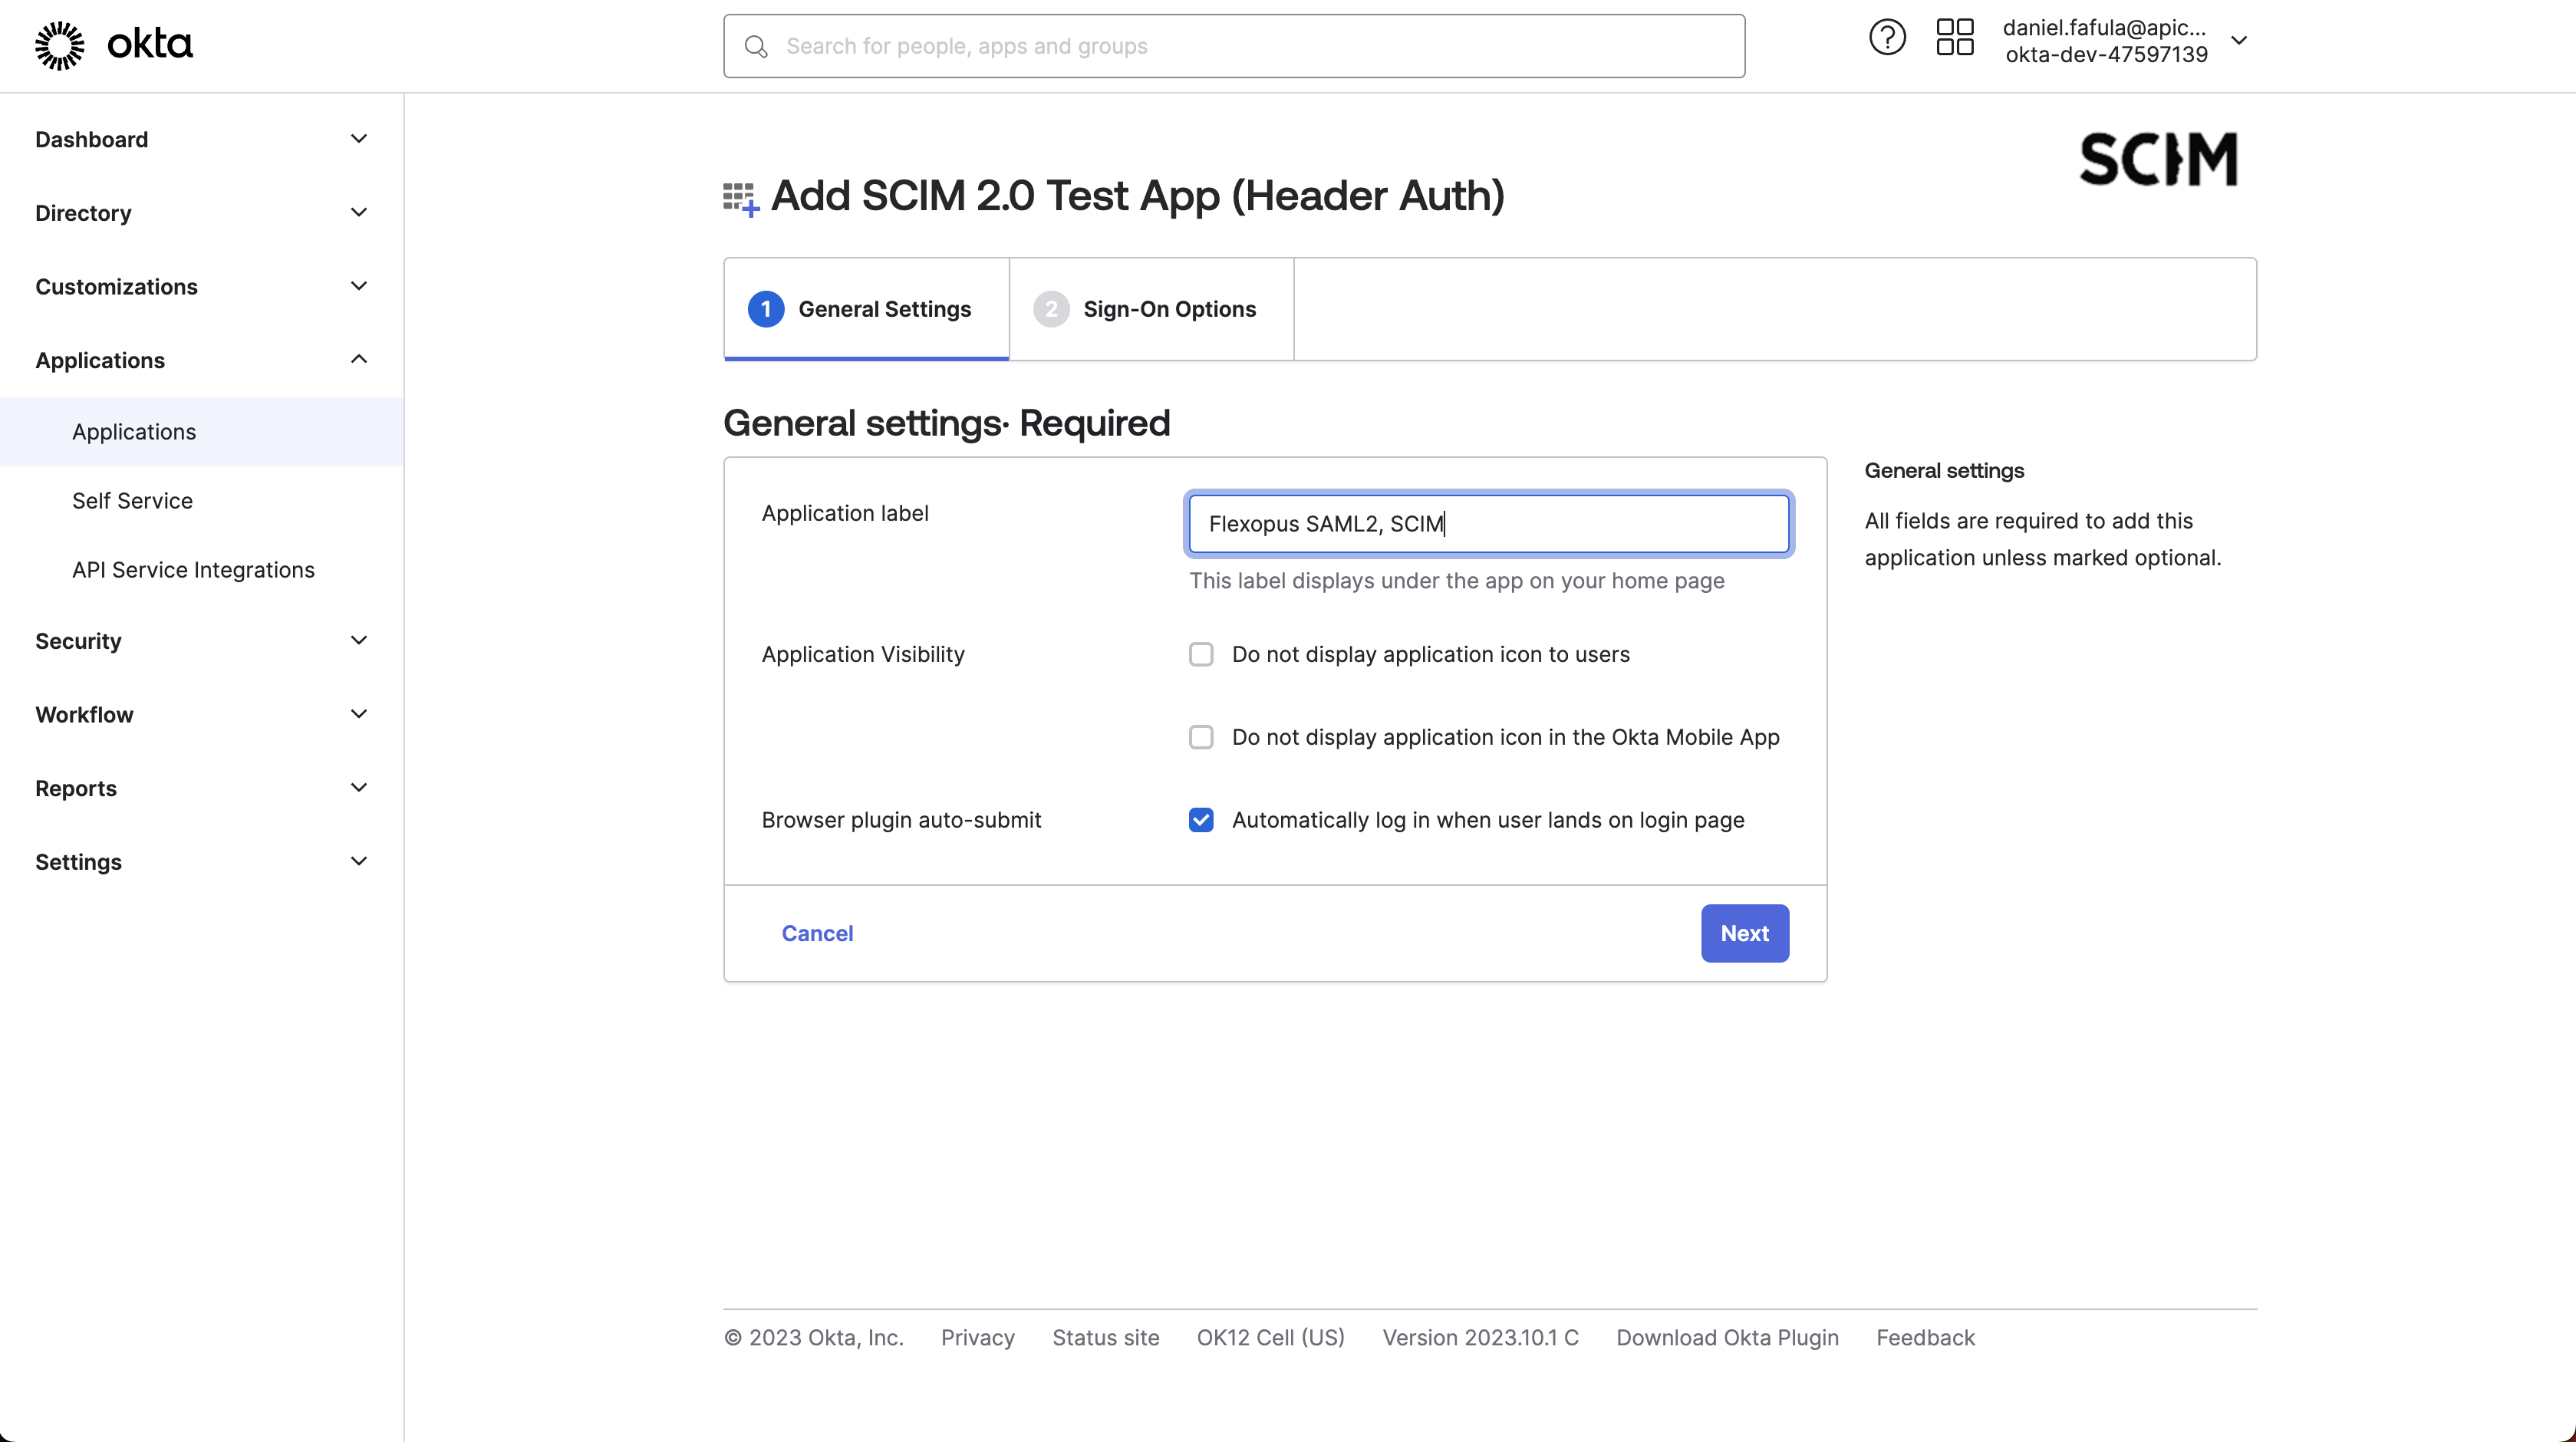
Unfortunately, SAML2 cannot be configured in this application, so you can skip the settings below with the Done button. We have already configured SAML2 with the other application anyway.

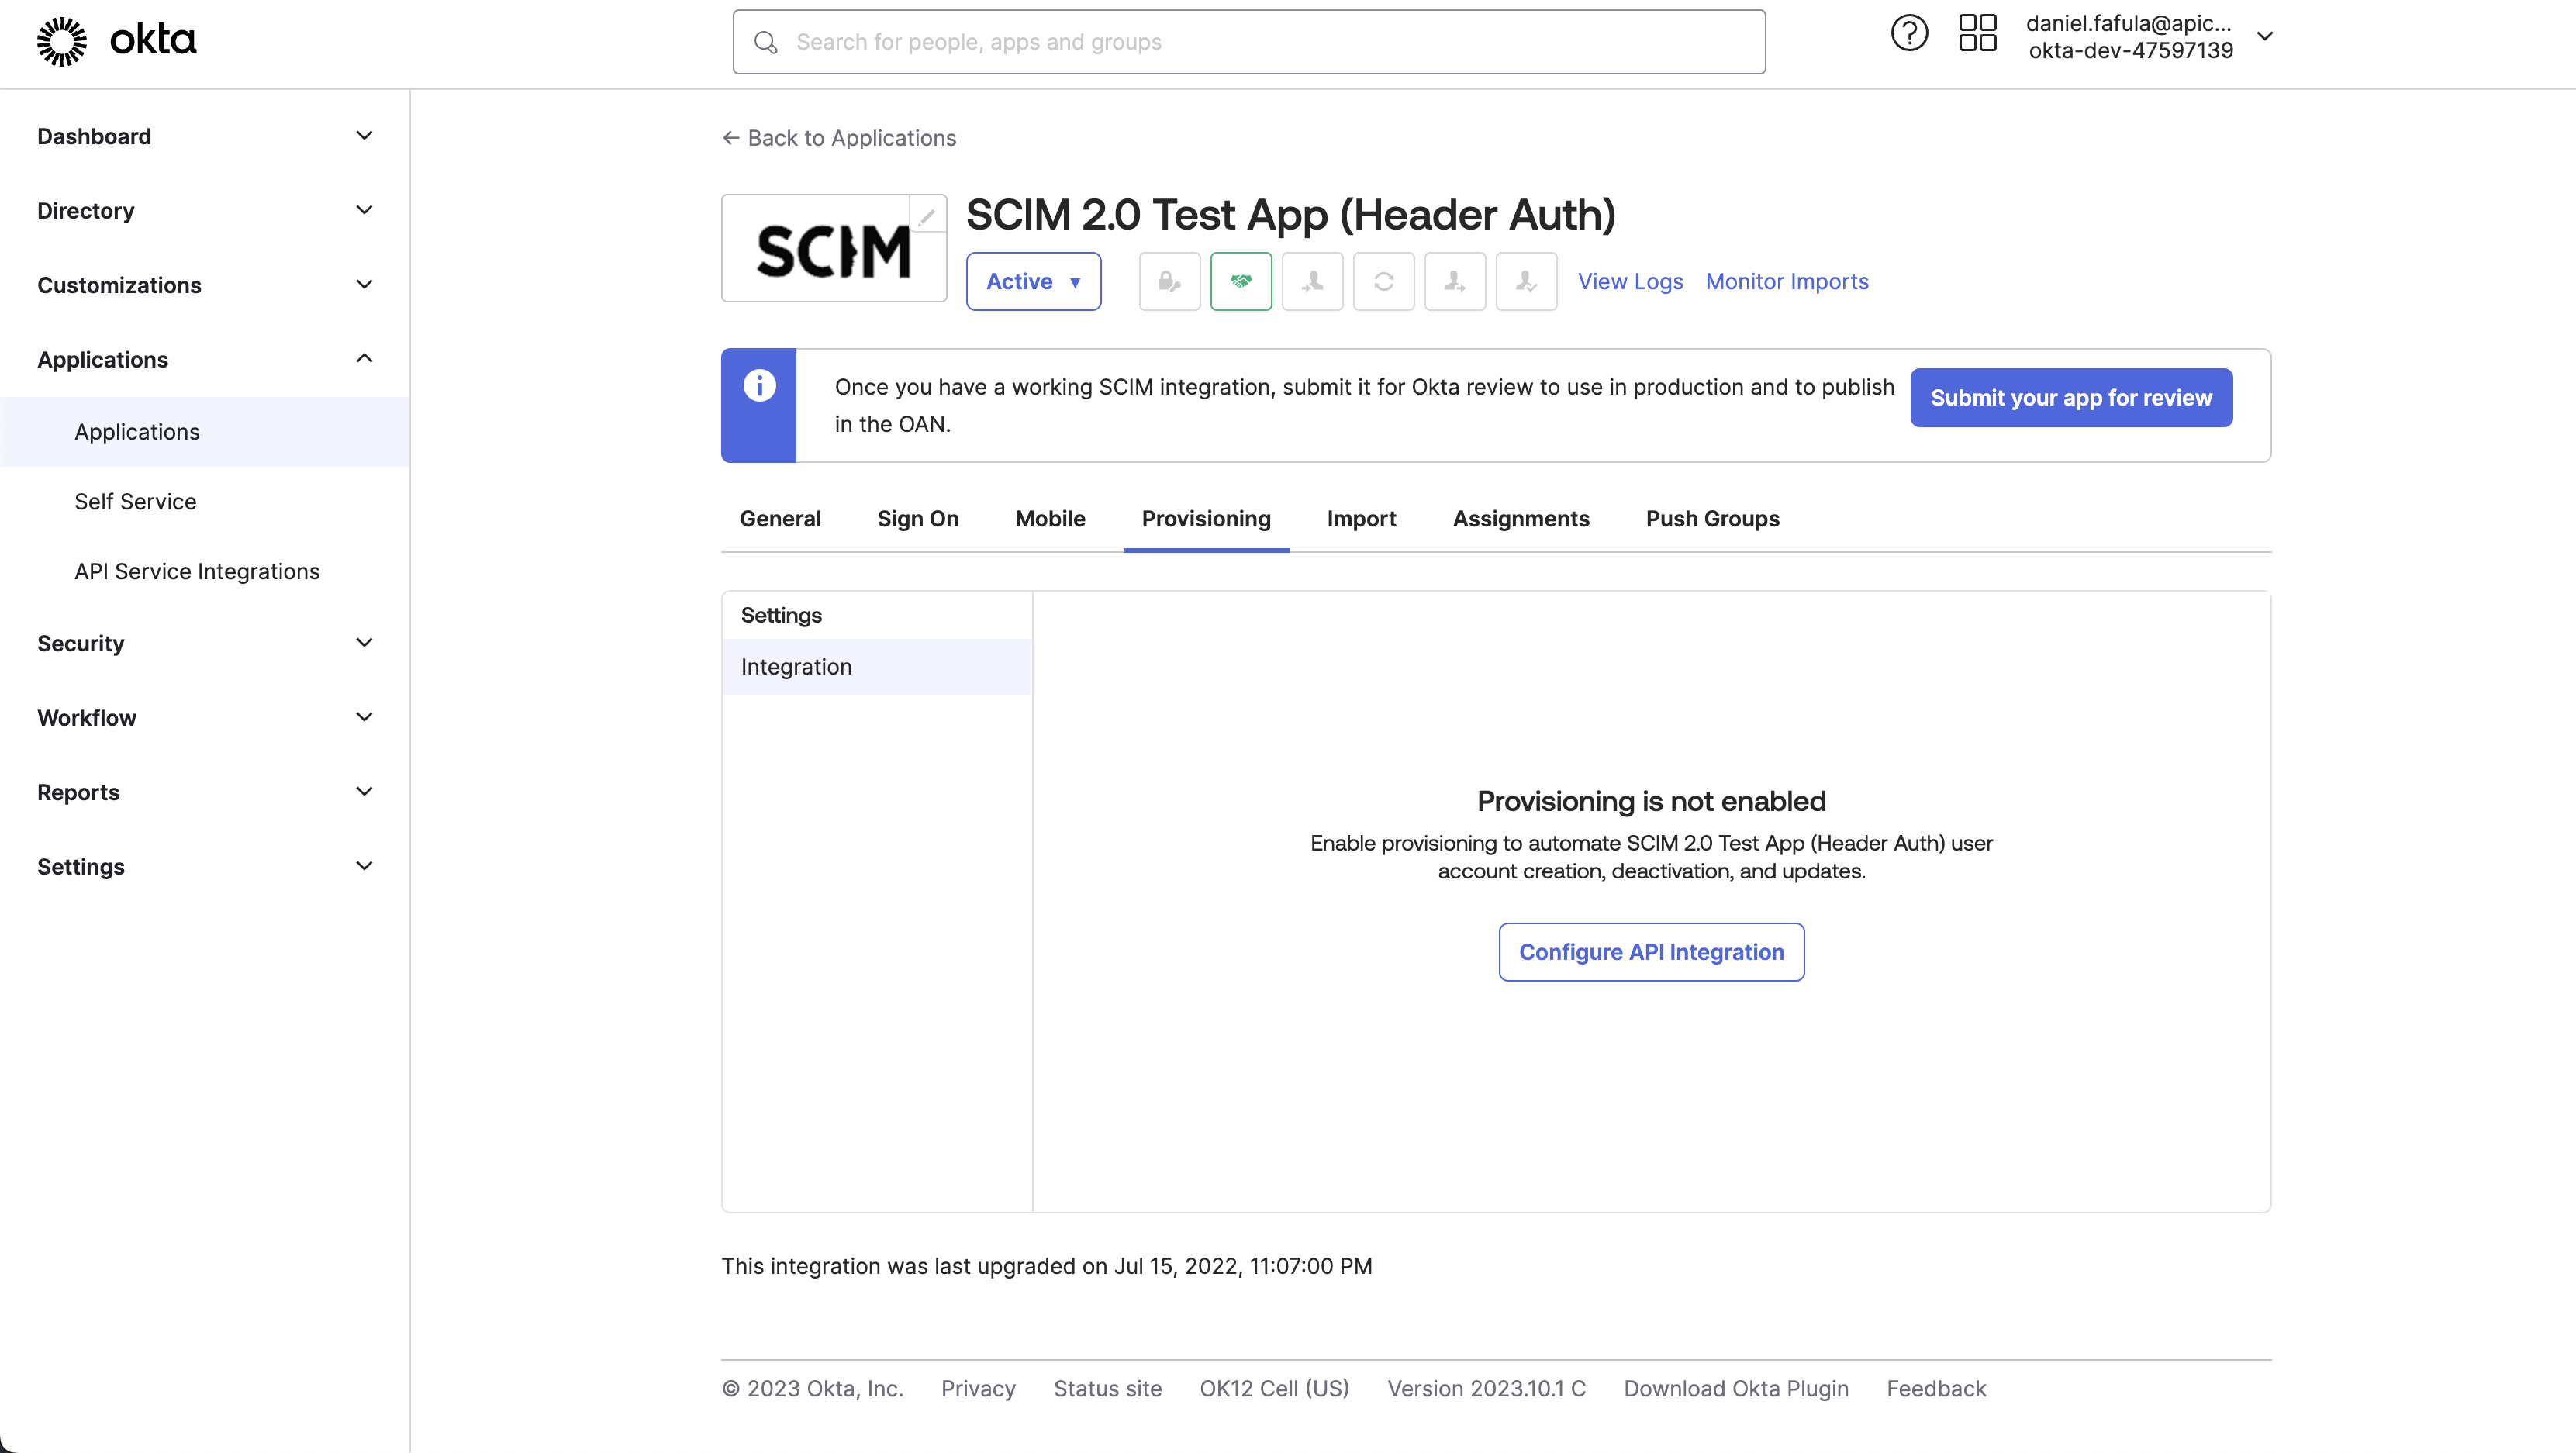
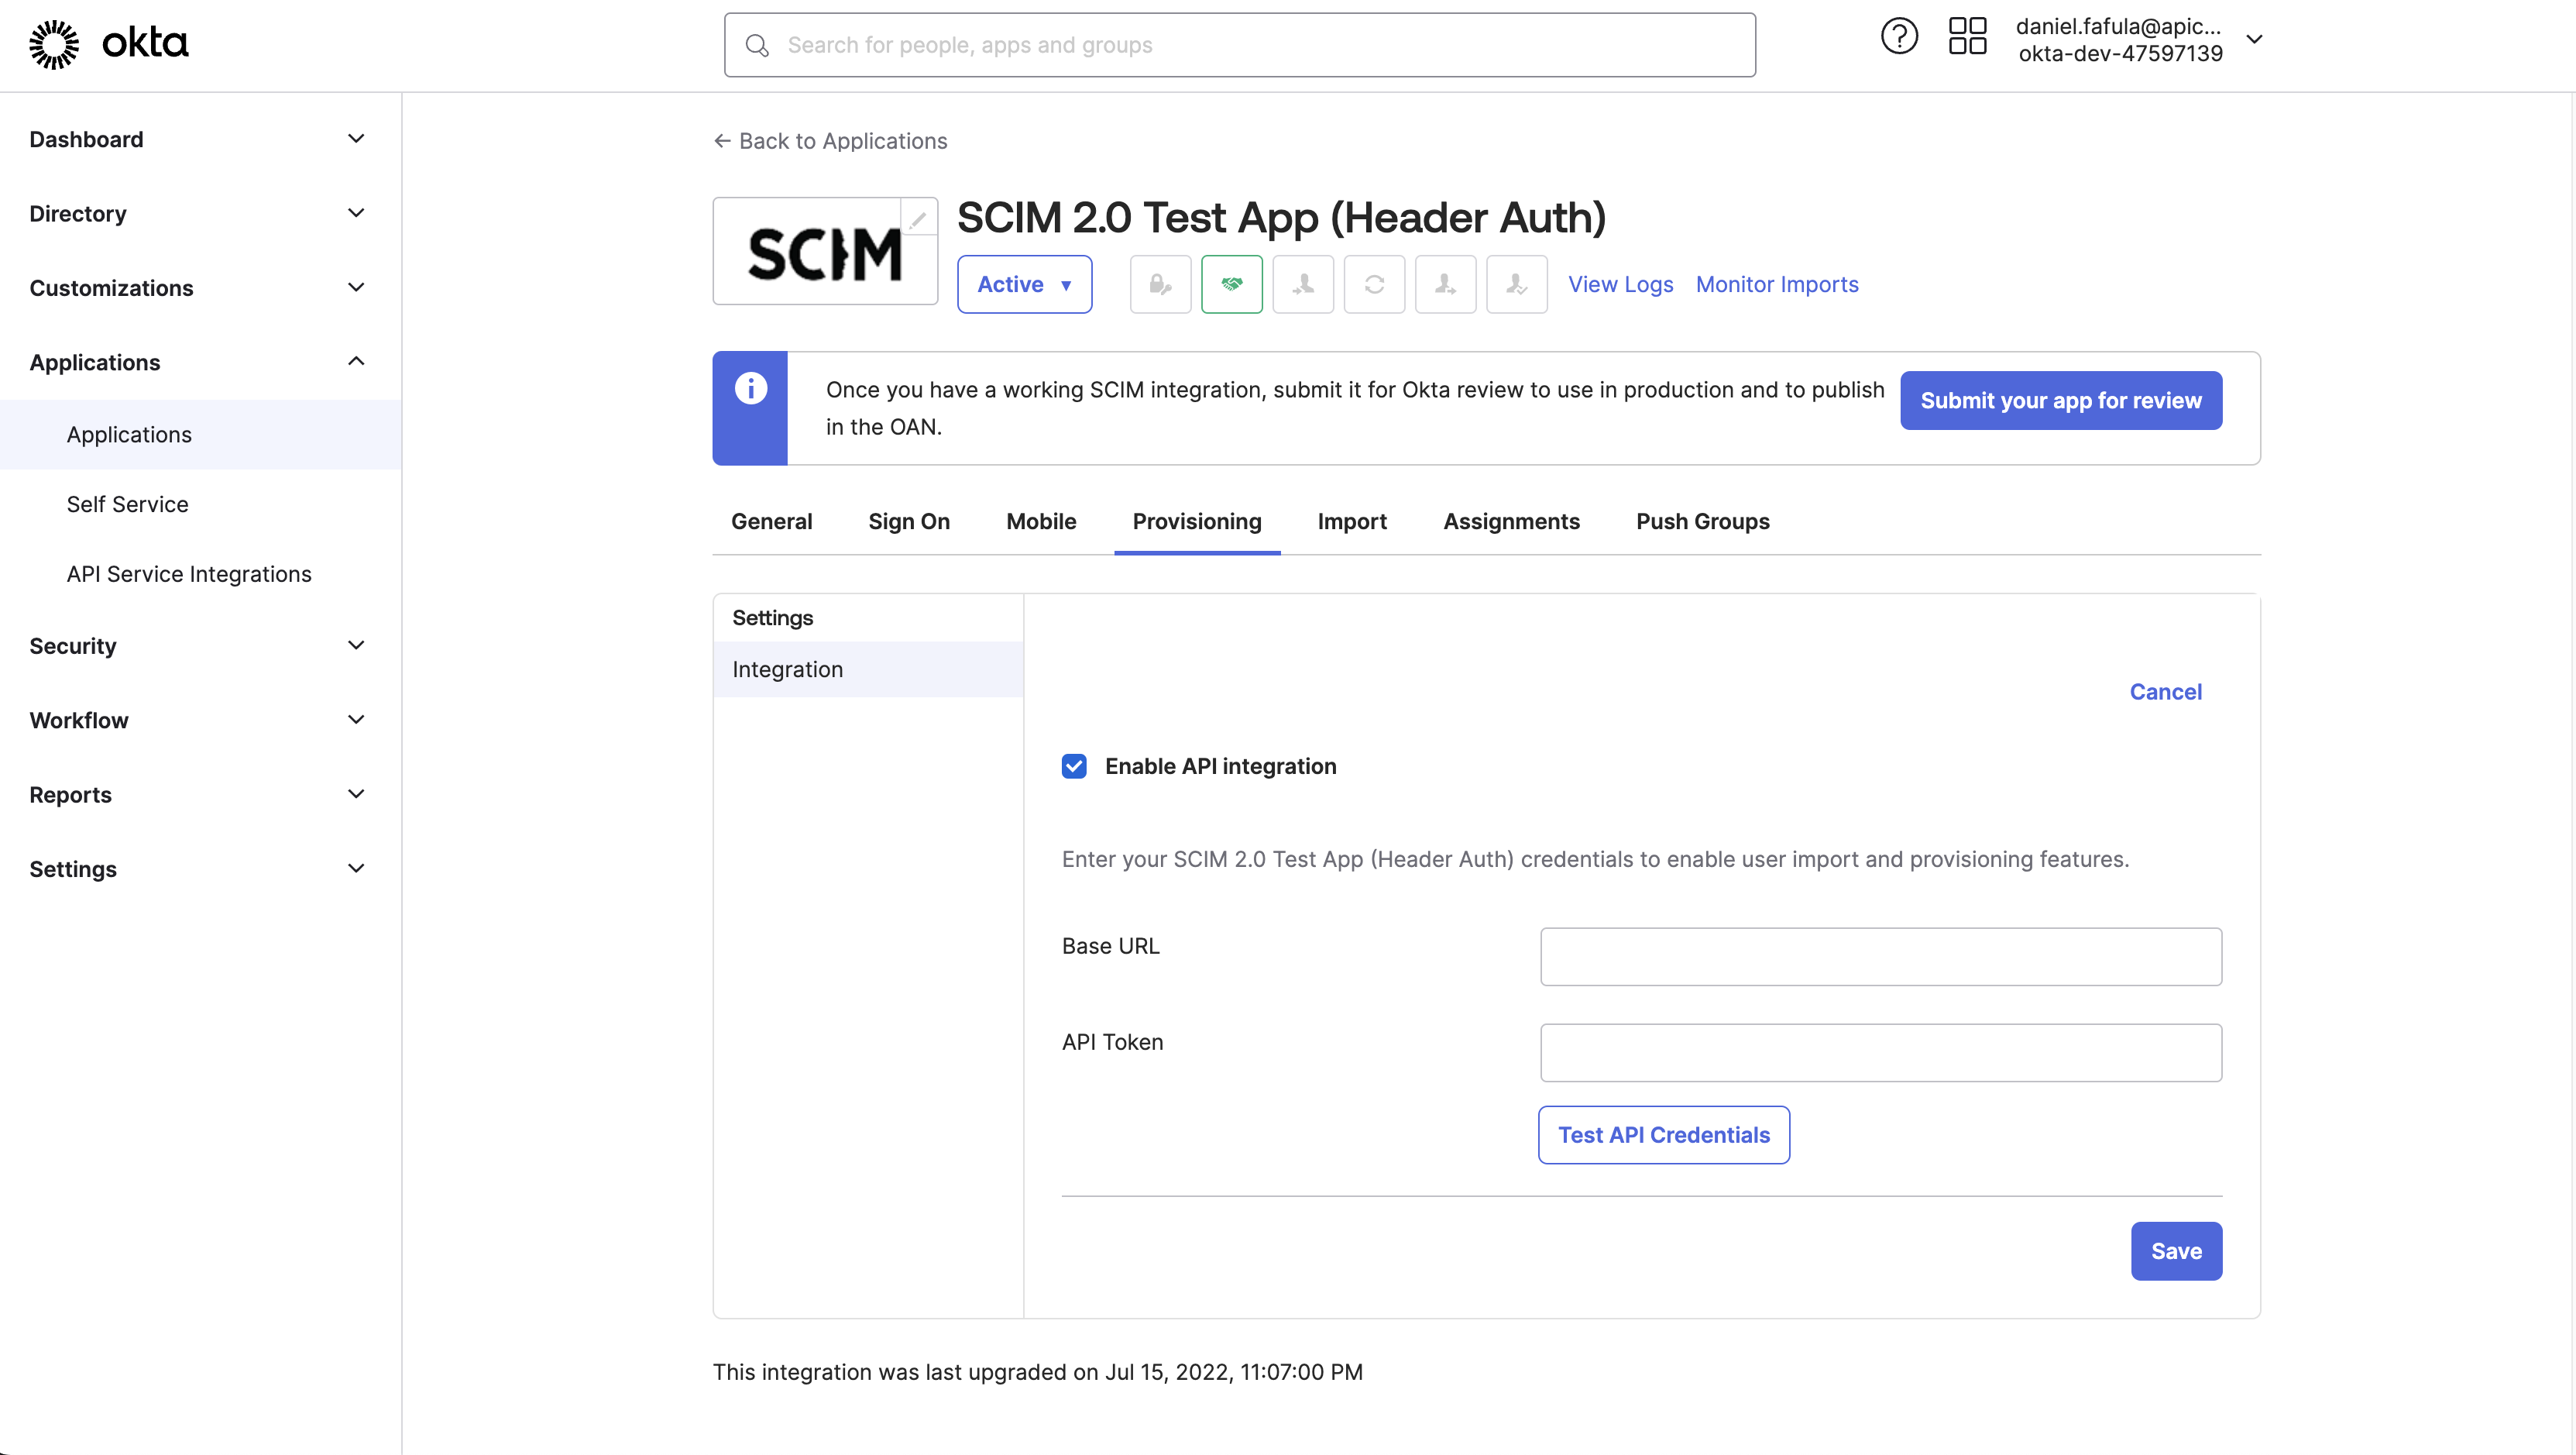
Click on Provisioning and start the settings with Configure API Integration
- In your Flexopus Dashboard, go to
Dashboard > Settings > Integrations. - Locate the
Base URLand clickGenerate API token. - Copy the Base URL and API token for use in Okta SCIM integration.
Base URL: Tenant URL
API Token: Bearer {api-token}
Click on Test connection
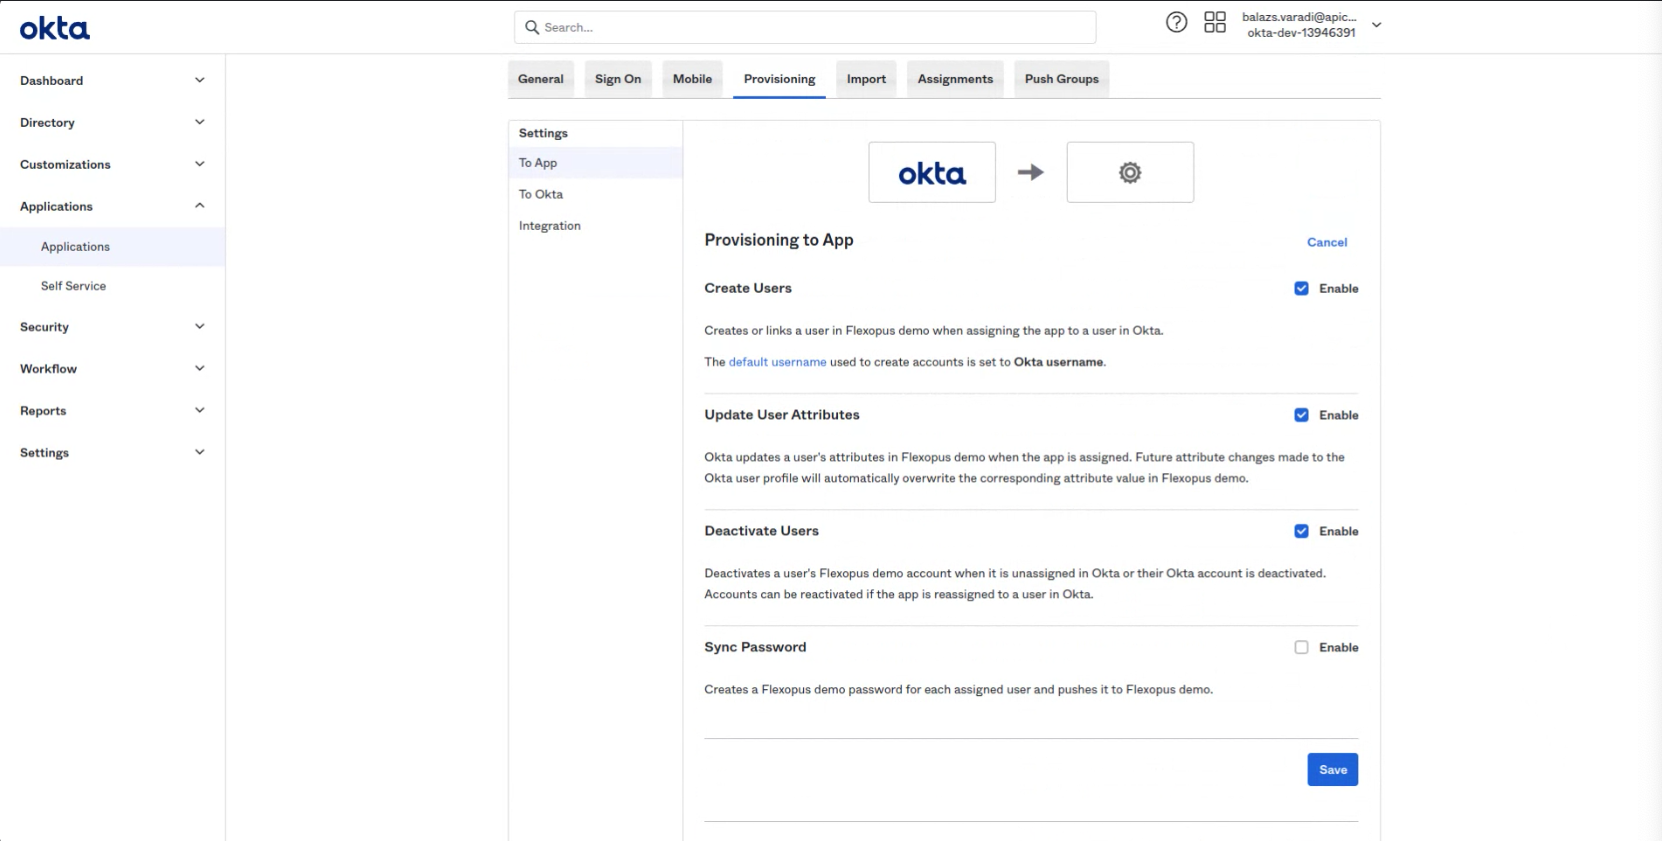
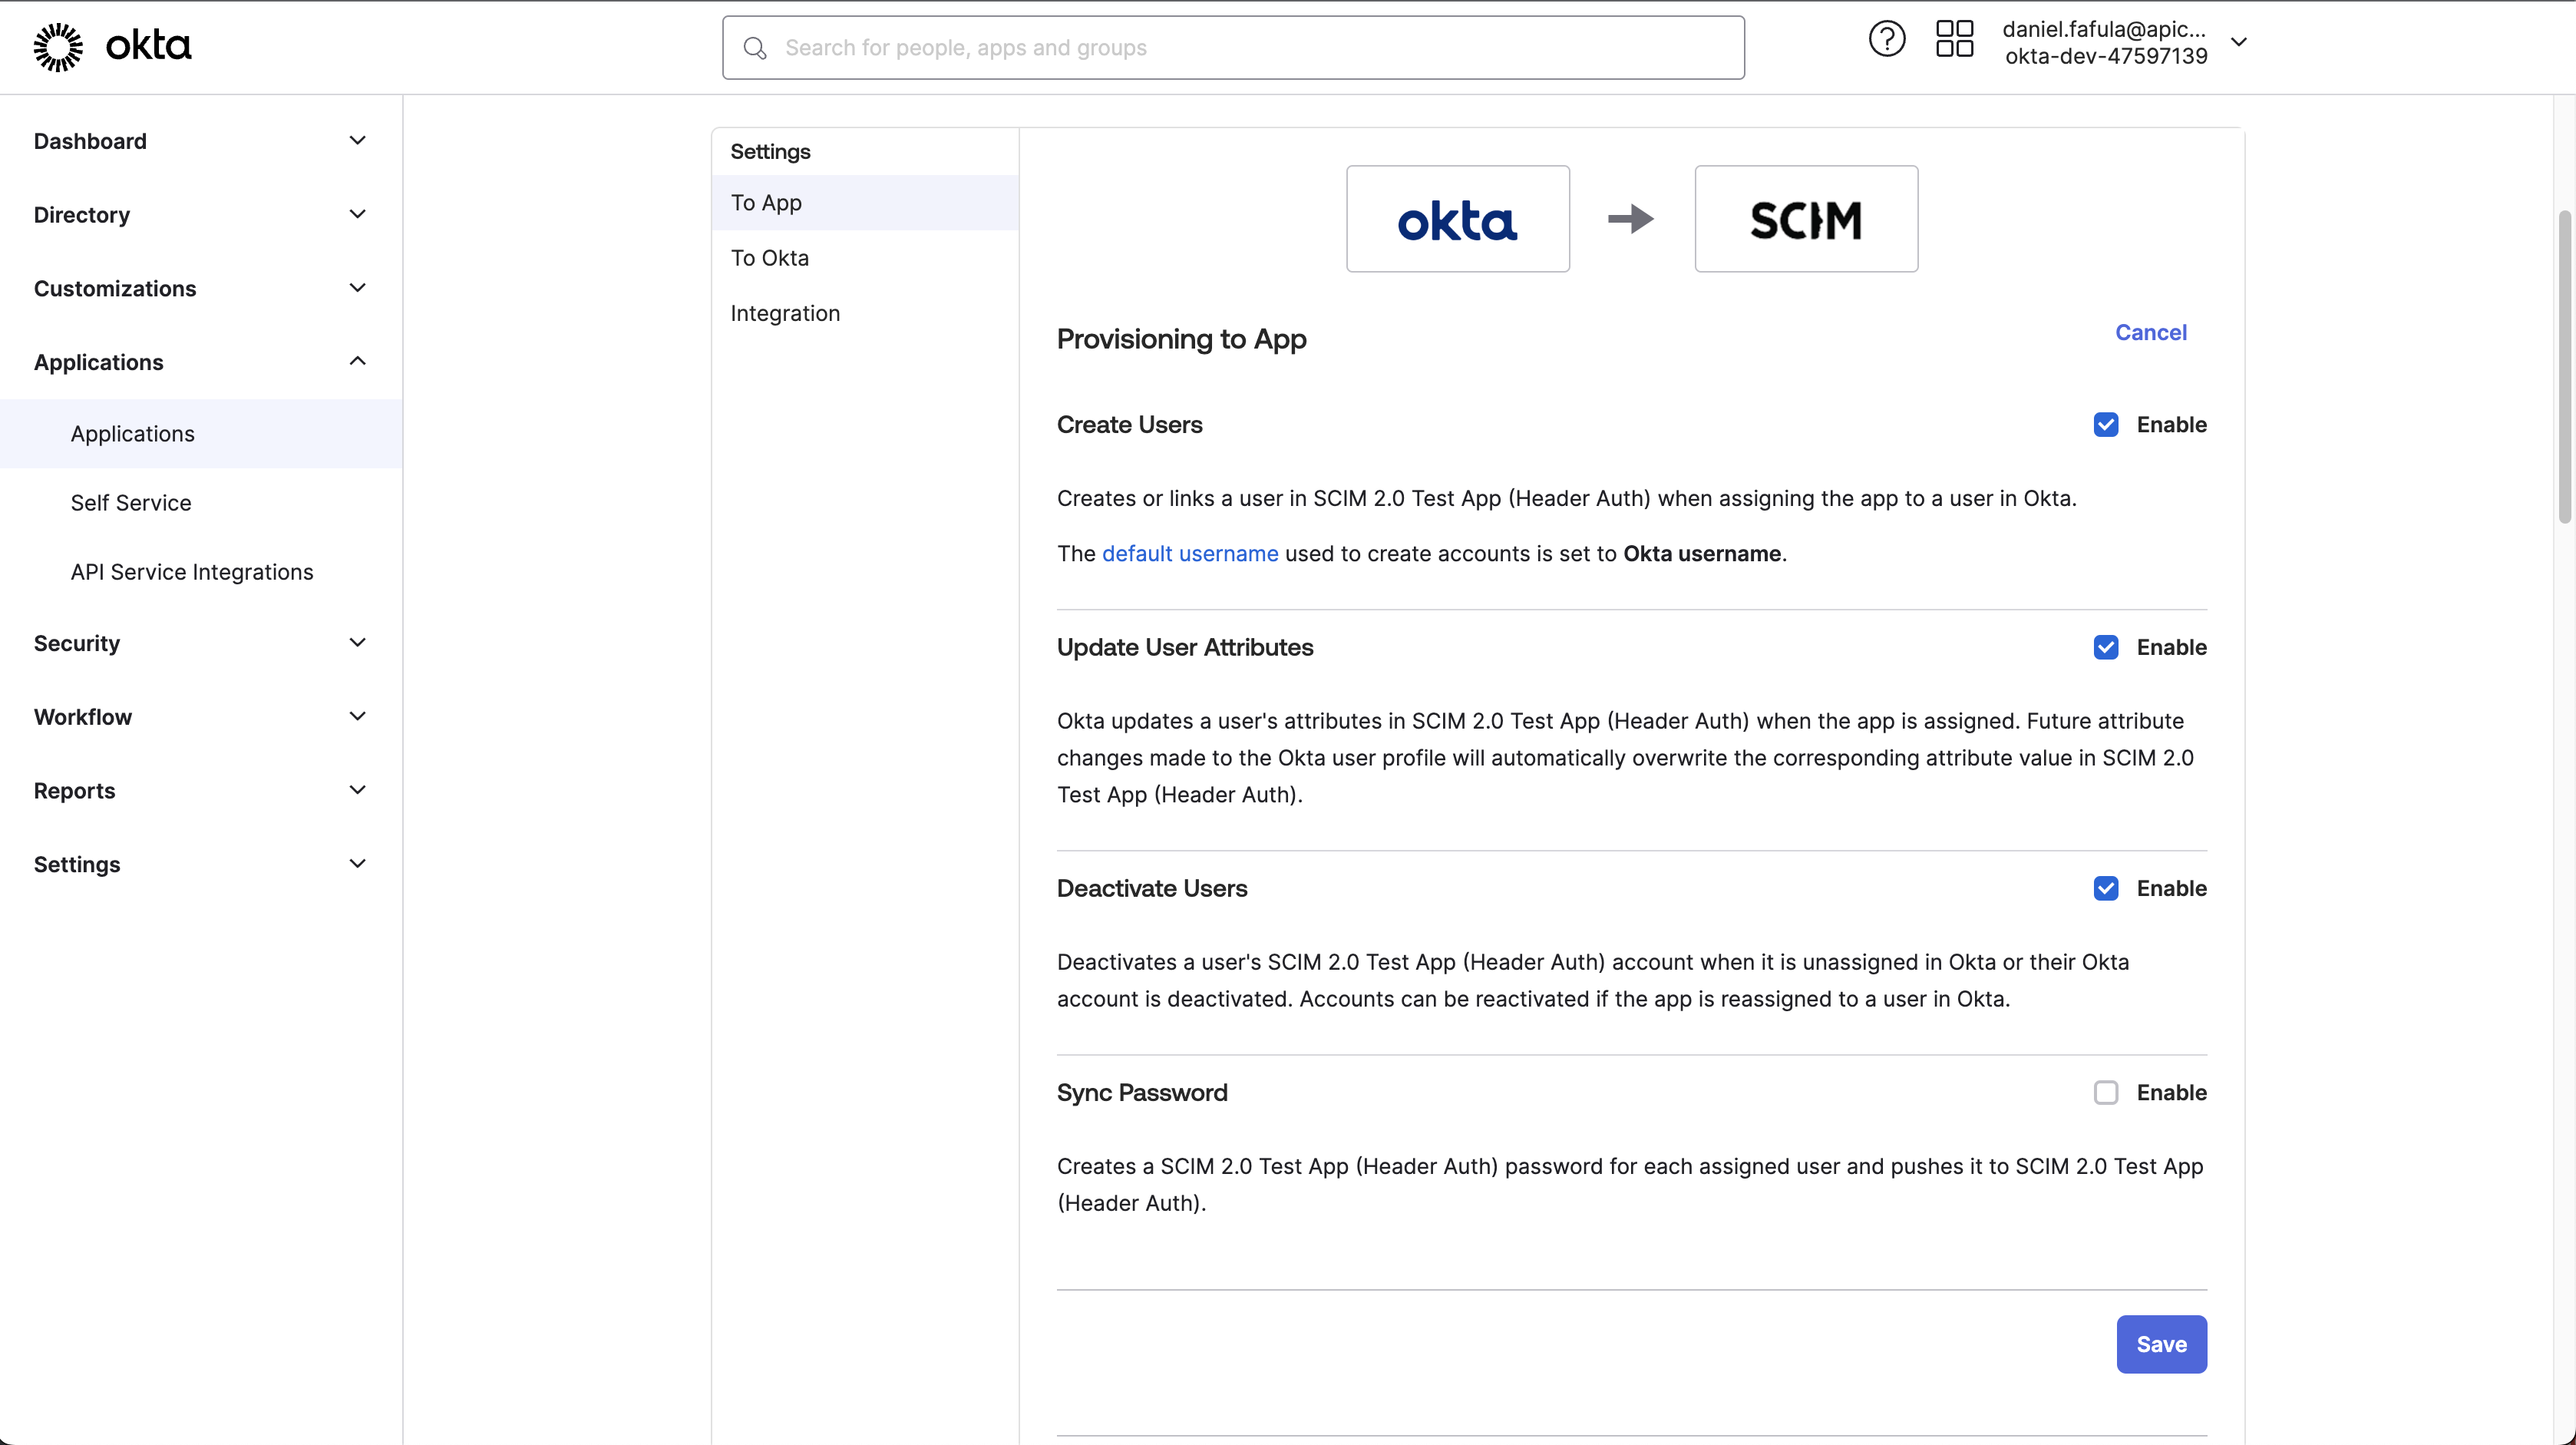
Enable: Select Create Users
Enable: Update User Attributes
Enable: Deactivate Users
The fourth option is not needed.
Edit the attribute mapping to send only the necessary attributes through SCIM to Flexopus. Only keep the following mappings:
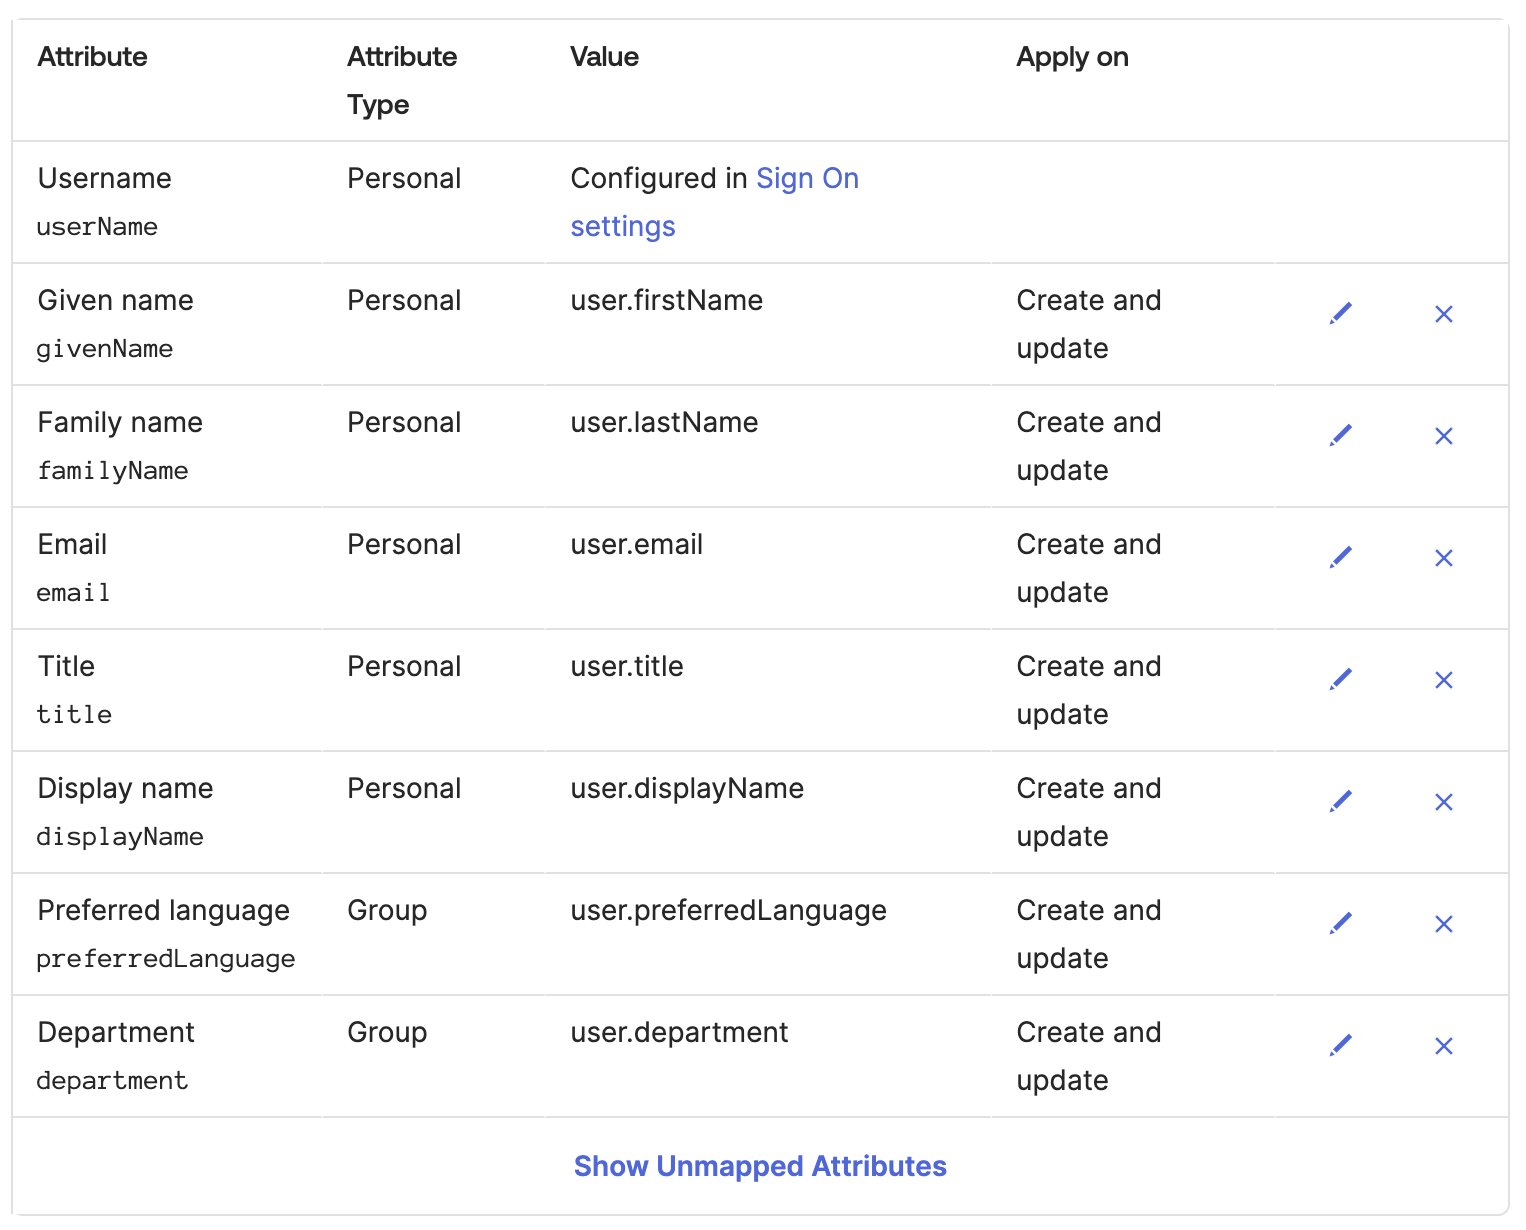
The Display Name need to be changed.
Attribute value: Expression
String.len(user.displayName) > 0 ? user.displayName : user.firstName + " " + user.lastName
Select option Create and update
Test the connection by assigning a group to Flexopus. The groups should be synchronized with Flexopus within a few minutes.
Assign groups and test
You can then link the groups to the application, to Assignment and to Push Groups.
Once you assigned a group and started the provisioning, you can expect the following changes in Flexopus. The groups will be provisioned with an external marking to Flexopus, which means that you can not edit the groups locally in Flexopus. You can not change the names, add users or delete users from the group. The single source of truth will be the group structure in your Okta Directory.
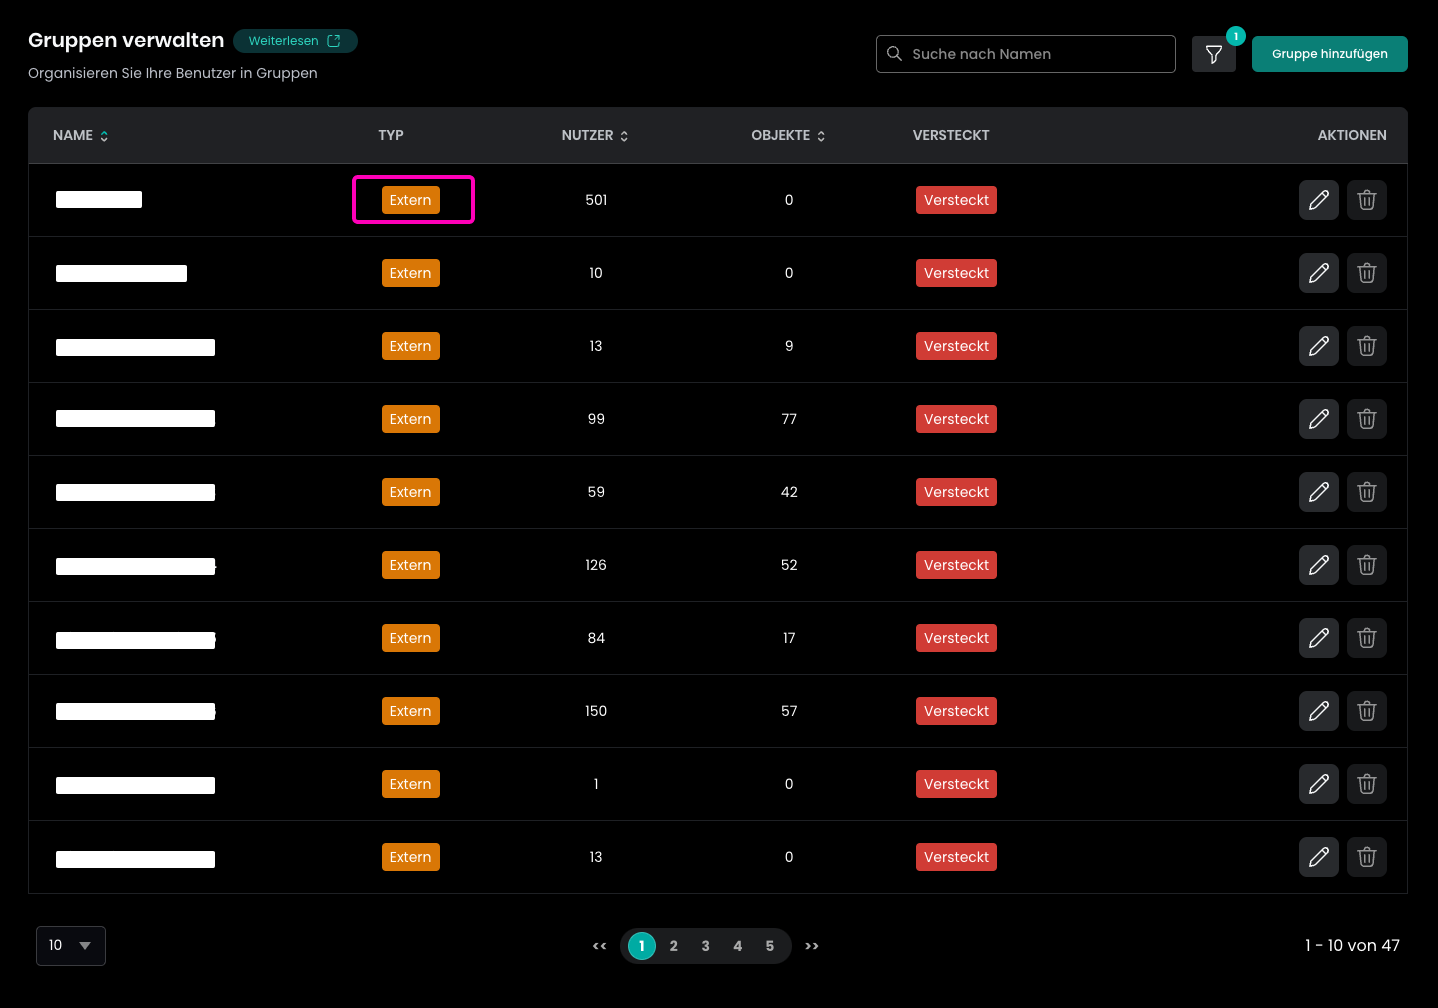
You can use the groups for access management within Flexopus similar to the other internal or system groups.
Best practices using SCIM
To optimize group management:
- Sync Only Necessary Groups: Limit syncing to groups in Okta that have a clear purpose in Flexopus. Avoid syncing groups solely for desk assignments; manage those directly in Flexopus.
- Centralized Group Management: Use Okta for broadly applicable groups (e.g., AllCompanyUsers). More specific groups (e.g., DepartmentAWorkstationGroup2) can be created and managed in Flexopus.
- Define Management Responsibility: Decide which department (IT, Facility Management, HR) is responsible for group assignments. Only those responsible should manage these groups directly.
- Minimize IT Dependence: Ensure group managers have direct access to manage relevant groups in Flexopus, reducing dependency on IT for adjustments and avoiding unnecessary support tickets.
Suggestion - One external group
To streamline user management:
- Create a Single Access Group (AllFlexopusUsers):
- Sync only the AllFlexopusUsers group, which contains all users requiring Flexopus access.
- Provisioning this group syncs all users within to Flexopus, even if they haven’t logged in yet.
- User Management in Flexopus:
- Flexopus admins can locally create and manage additional groups.
- Flexopus admins gain flexibility without needing IT for every change, minimizing admin workload.
- Use Cases:
- New Employee: Add new hires to AllFlexopusUsers in Okta during onboarding to ensure their Flexopus access from day one.
- Employee Leaving: Remove departing employees from AllFlexopusUsers or delete them from Okta. Flexopus deactivates their profile automatically, blocking login. See the deletion concept in Flexopus for automating user removals.
How can I disable the SCIM Integration?
To disable the SCIM integration:
- Go to Okta and turn off the SCIM integration.
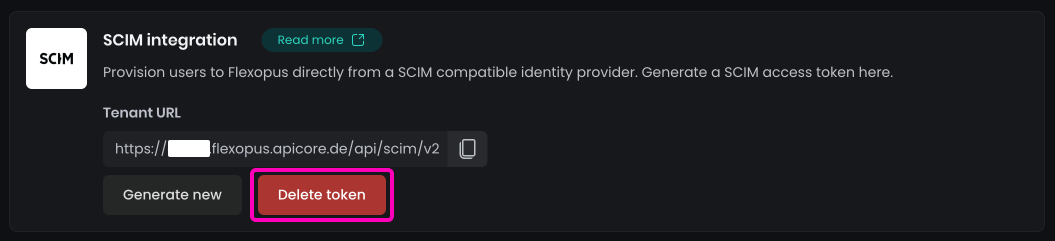
- In Flexopus, navigate to
Dashboard > Settings > Integrationsas an administrator. - Click
Delete tokento complete the deactivation.
When you click Delete token in Flexopus:
- A popup will appear, prompting you to
Detach the groups. - Enable this option to convert the current external read-only groups into internal groups, allowing you to edit them afterward.
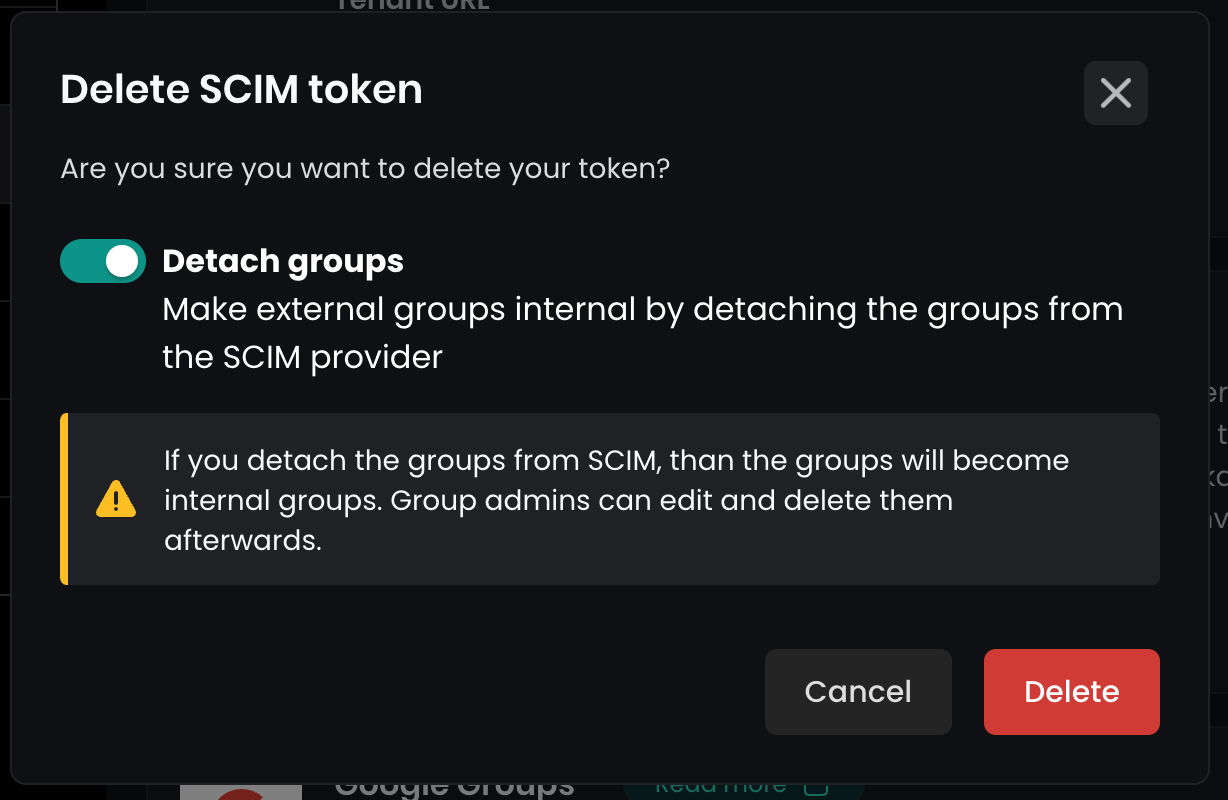
You are done. The SCIM integration is deleted.
Trouble Shooting / FAQ
I got a 500 Error during the login.
In case you get a 500 error, you may have misconfigured the URLs or the attributes. Check the settings based on the manual once again. If you can not find the issue, contact us via support@flexopus.com. We have server logs to see where the problem lies.
Can I change the UPN of the users?
As you may know, UPN stand for UNIQUE principal names. Unique attributes shall never change, especially the UPN of the user shall remain the same. It can be a number or anything else. External application are identifying users based on their UPN, if you change you may risk creating a new user within Flexopus. Still, you may have a reason to change the UPN. In this case, contact us via support@flexopus.com. We can assist you by deleting the UPNs and the External IDs of the user to allow you the change of the UPNs in your IdP.
Can I also synchronize the user profile pictures?
Unfortunately, the SAML2 SSO protocol is not supporting the synchronization of profile pictures. We are planning to develop a way via the API to synchronize the user profile pictures.
I saw an attribute costcenters. What is it doing?
Indeed, we have an additional attribute, which is called costcenters. The feature is currently in a BETA testing phase. More information will follow.
Does Flexopus support Identity Provider (IdP) Initiated Single Sign-On login?
Yes and No. We provide a workaround for the IdP initiated logins. You need to configure the initiate-sp-login parameter for the RelayState. This will convert the IdP initiated login request into an SP initiated login. In this way, we can ensure a secure login process.
Reason: A classical IdP initiated login would enable a man in the middle attack for hackers. Through an SP initiated login, we can avoid it. This article explains the reasons in more details: https://www.identityserver.com/articles/the-dangers-of-saml-idp-initiated-sso
What are nested groups, and why are you not supporting them?
Nested groups are groups that include other groups, that may include other groups. This could be theoretically an infinite data three. Supporting such a data structure through an automated interface like SCIM is a challenging development task. We are planning to face this development challenge, however we are not there yet.
Can I use SCIM without SAML2?
Yes, you can, but we do not recommend it. It can lead to many complex issues, since SCIM is writing important fields like: email, upn external id. In case you plan using SCIM without SAML2, reach out to us to validate your concept and reasons: support@flexopus.com
Can I generate a new SCIM token?
Yes, you can generate a new token at any time. Navigate to the admin dashboard and create a new token. A popup will ask you if you want to make the current external groups into an internal group.
How can SCIM identify the existing users to avoid double entries?
For user identification, Flexopus follows this priority:
- SCIM_ID: Checks if a user exists with the SCIM_ID.
- EXTERNAL_PROVIDER_ID: If no SCIM_ID match, it checks the EXTERNAL_PROVIDER_ID, a unique identifier set by the Identity Provider (IdP), such as Okta.
- UPN: If there’s no match with SCIM_ID or EXTERNAL_PROVIDER_ID, it checks the UPN.
- EMAIL: If none match, it checks by email.
If no identifiers match, a new user is created. Duplicate user creation typically happens only if attribute matching is inconsistent or if fields expected to remain unique are modified.
R0087