Visitor management
Overview / Features
Using the visitor management module, you can allow your colleagues to preregister a visitor or guest in your office in advance.
VISITOR MANAGEMENT FEATURES
Many features can be turned on and off. You can configure the user invitation experience based on your needs.
User invitation features:
- Preregister known visitors as employee
Create a personalized invitation using the name and email of the visitor - Preregister unknown visitors as employee
Some visitors are unknown in advance, such as the elevator maintenance service guy. - Invite the visitor again.
The system remembers the verified visitor, and you can invite them again. - See my created visitor invitations.
See all upcoming invitations I created. - Check in and check out my visitors (optional).
In case the feature is active and required, you can check in the visitor upon arrival. - Get notified when my visitor arrives (optional).
In case the feature is active and required, you can check in the visitor upon leaving.
Visitor remote features:
- Receive invitation email
Get notified by mail about the invitation and the reason. - Pre-verify profile using the invitation mail.
Fulfill the visitor profile before the arrival and accept the necessary visitor documents.
Visitor kiosk features:
- Visitor self-registration
The visitor can create a self-invitation on-site by selecting a predefined visitor category. - Use existing invitation
Scan the invitation QR code, enter the 6-digit PIN sent per mail, or use the personal email address to verify an existing invitation. - Self-check-in on site
The visitor can self-check-in on-site using the terminal upon arrival. - Self-checkout on site
The visitor can self-checkout on-site using the terminal upon leaving. - Verify visitor profile on site
Fulfill the visitor profile before the arrival and accept the necessary visitor documents. This step is not required if the visitor did a remote verification. - Sign required documents
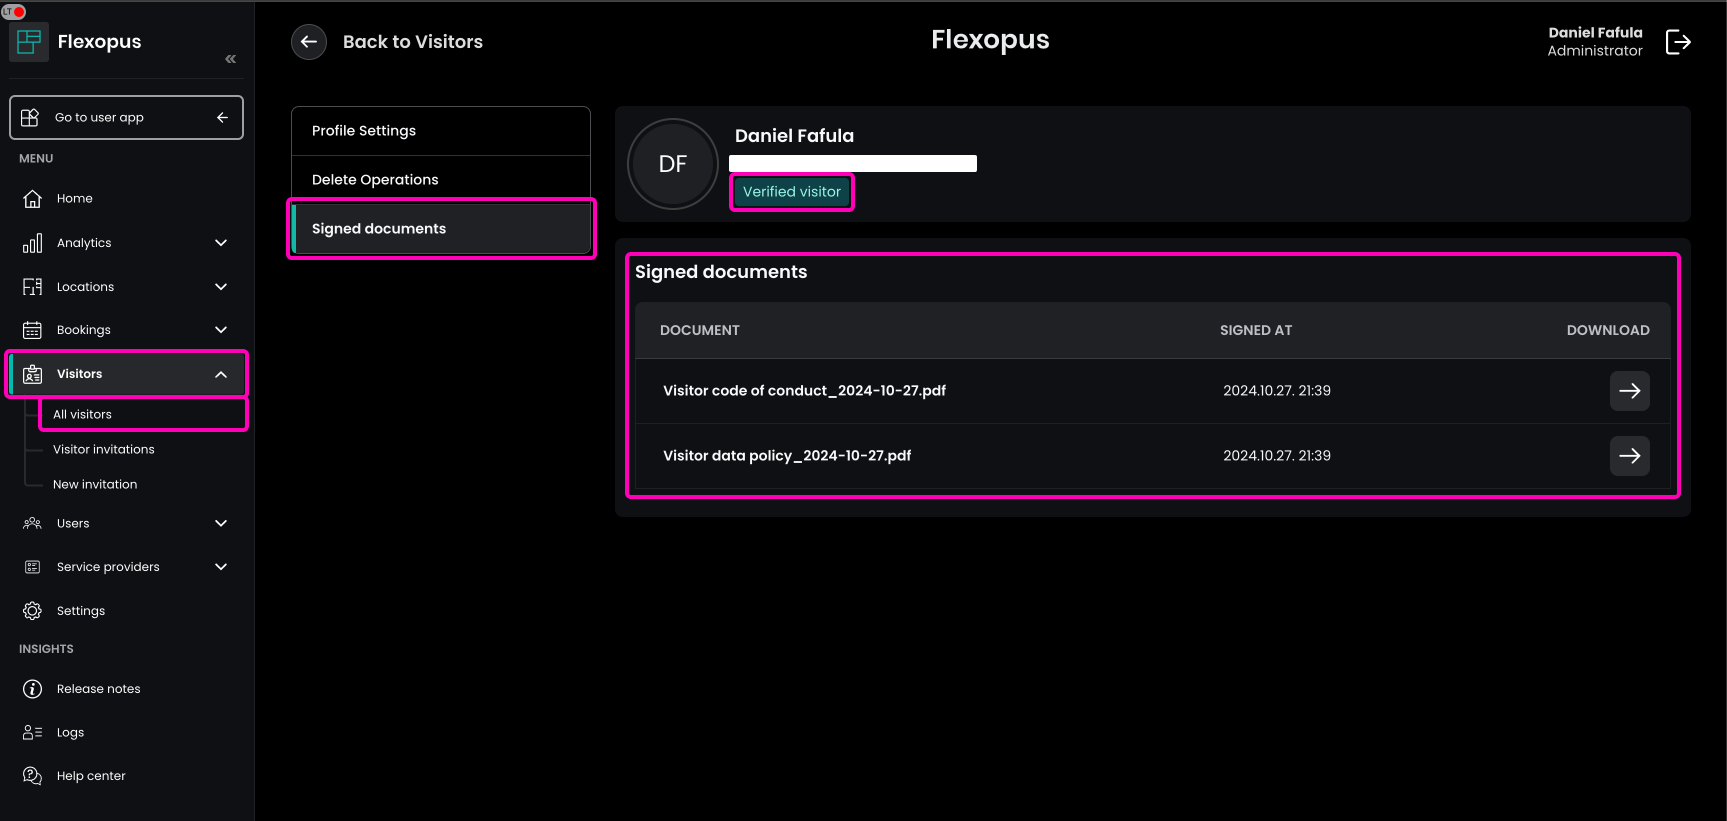
Digital signature. Such as visitor code of conduct, data privacy rules, etc. Signed documents are saved on the visitor profile. - Guest WiFi QR Code
Show Wi-Fi QR code after registration. - Print visitor badge on site
Visitor badges can be printed with the supported badge printer. - Touchless visitor registration
The visitor can scan a rotating QR code on-site and do all the steps on his phone. - Connect multiple kiosk terminals
Terminals can be connected per building. - Android Play Store App
- Black & White theme
- Show company logo
Admin features:
- Visitor manager role per building
Define who can manage visitor invitations per building. See, edit, and delete. - Preregister visitor as administrator.
Create an invitation for any user with any visitor profile. - Check in visitors
The visitor can be checked in upon arrival. - Check out visitors
The visitor can be checked out upon leaving. - Limit visitor invitation rights with user groups
You can define which users are allowed to invite a visitor. - Allow visitor management per building
Enable which buildings can be used to invite a visitor. - Create visitor types
Such as family & friends, freelancers, customers, etc. - Manage visitor document templates
Upload documents, which need to be accepted by the visitors. - Daily visitor summary
Receive a daily summary about the visitors with missed checkouts at the end of the day. - Visitor statistics per building
See how many visitors were invited, which company or visitor was invited the most. - Configure visitor profile attributes
Define which user attributes are required for a visitor profile verification. Such as name, email, phone, address, personal ID, company, company address, etc..
Data privacy features
- Anonymize invitations
Invitations can be anonymized after X days. This can also be noted in the data privacy text for the visitors. - Anonymize visitor profiles
Visitor profiles can be anonymized after Y days. This can also be noted in the data privacy text for the visitors. - See only my visitors
Users can be forced to see only their visitors, in case they re-invite somebody.
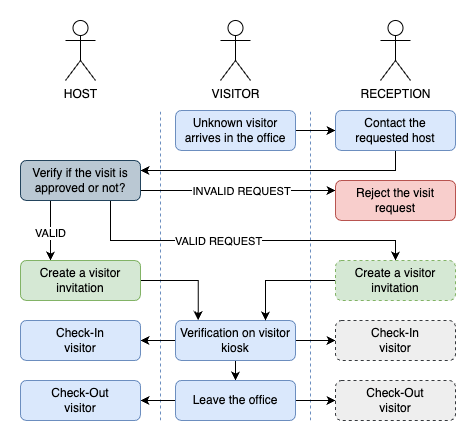
Visitor workflows
You can configure multiple visitor management workflows using Flexopus. In this section we explain the most commonly used workflows, which can be configured using Flexopus.
USE CASE A: SIMPLE SELF-KIOSK
You can configure Flexopus in a way that the visitors always need to create a self-invitation using the visitor kiosk terminal on-site. You are not creating visitor invitations in advance, and you are not using the check-in and check-out functions.
The employees are not involved in this process.
You use the system to protocol the visitors:
- The visitor profiles are documents.
- The time of their arrival is documented.
- The type of the visitor is documented.
Optionally:
- You can upload documents, which need to be accepted.
- Visitors can print visitor badges with their names.
- You can show the access to the guest WiFi.
USE CASE B: INVITATION-BASED VISITOR MANAGEMENT
You can involve the employees in the visitor management process. The employees can create visitor invitations in advance, and the visitors are getting an invitation email notification. This invitation email includes a link to verify the profile and to accept the visitor documents in advance. Visitors can also do these steps on-site by scanning the provided invitation QR code a 6-digit PIN, or by providing their email address.
Optionally, you can still allow the simple kiosk workflow.
USE CASE C: CHECK IN CHECK OUT
The preregistered visitors can accept the uploaded documents, such as the visitor data policy and the visitor code of conduct before they visit your office. Upon arrival and leaving, the visitor needs to be checked in and checked out. This way, you can trace which visitors are in your office sites and protocol their stay.
There are 4 options for the check in and check out:
- Setting disabled
No check-in and check-out is needed. - Self check-in and checkout
The visitor can do the steps alone using the visitor kiosk. The check in is done automatically upon arrival after using the kiosk. The checkout can be done by scanning the provided QR code or by scanning the QR code on the visitor badge. - Host and reception check-in and checkout
The host and reception (office assistant) are responsible for documenting the check-in and check-out times. The visitor cannot do it alone. - Receptionist check-in and checkout
For bigger offices, only the visitor management admins (receptionists, office assistants) can do the check-in and check-out.
Invitation flows
The visitor invitation process made by employees can be done as described below.
1 - Invite a new visitor
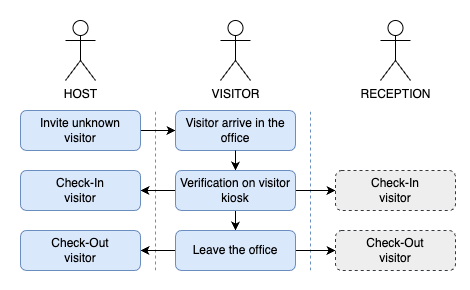
The most typical case is that you are planning to invite an external visitor to your office, knowing the visitor's name and email address.
This way the new visitor will be created as a new unverified visitor in the system, and the visitor gets an invitation email after the invitation is created. Using the invitation email, the visitor can verify himself before the visit by filling out the required user attributes and accepting the uploaded visitor documents. The accepted documents will be stored in the visitor profile.

In case the visitor ignores the invitation mail with the prior verification process, the visitor kiosk display can be used to verify the visitor on site.
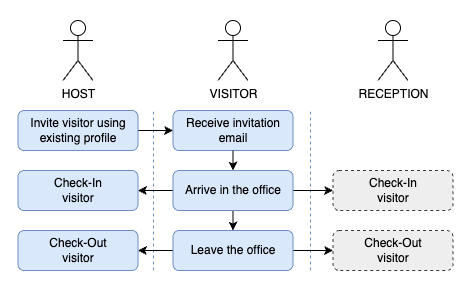
2 - Invite a verified visitor again
In case an already verified visitor gets invited into the office again, the visitor profile verification doesn't need to be re-done. The verification needs to be repeated only if the system administrator changes the requirements for the visitor verification. For example, by updating the visitor documents.
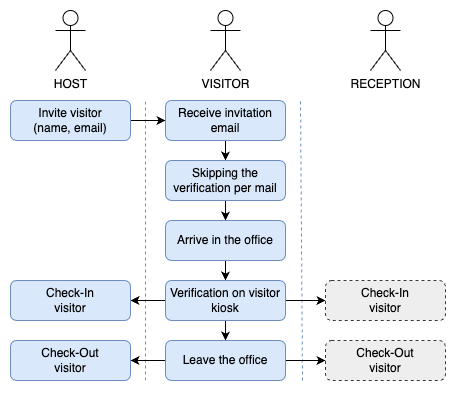
3 - Invite an unknown visitor
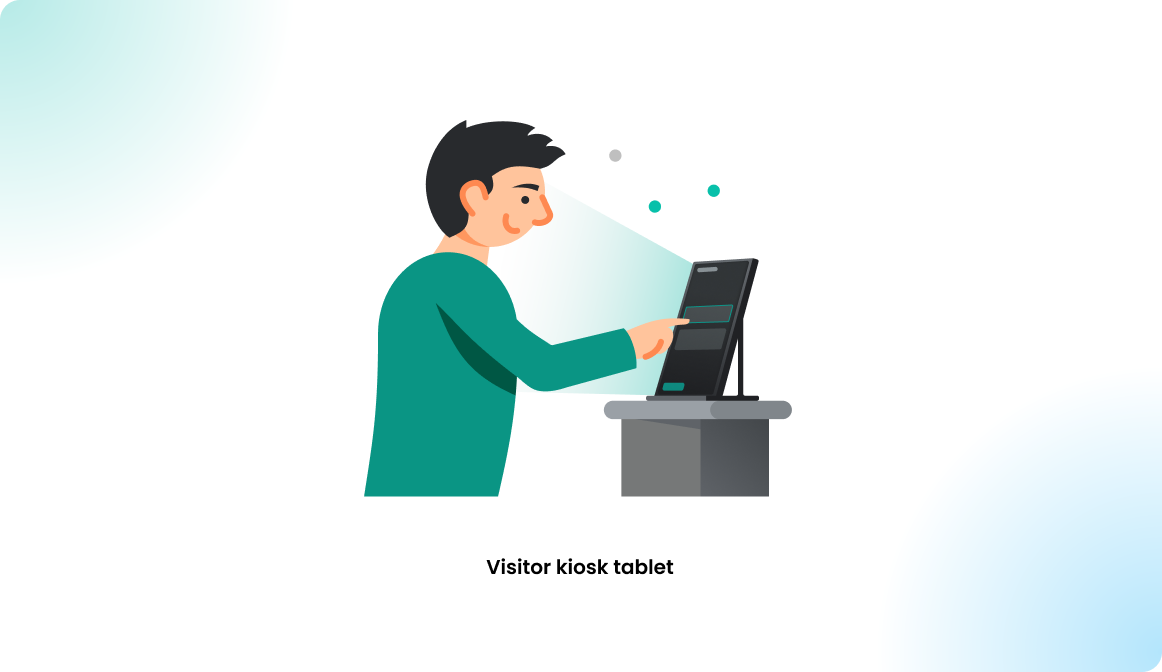
In cases where you have an unexpected or unknown visitor, such as a maintenance worker, the simplest approach is to provide them with a Flexopus visitor kiosk tablet upon arrival. The visitor can then fill out their profile and sign any necessary documents directly on the tablet, ensuring quick and efficient check-in.
4 - Visitors without prior invitation
If the responsible colleague forgets to create a visitor invitation, and the visitor arrives unexpectedly, the visitor kiosk display can be given to the visitor to create a verified profile on the spot. While the visitor completes this, the host can be contacted. Once the host confirms the visit, the receiving colleague can proceed to register the visitor with the verified profile created on the kiosk.
Configuration manual
To configure visitor management, go to Dashboard > Settings > Visitor management as an administrator. If this option isn't visible, please reach out to Flexopus support for assistance.

Enable visitor management per building
Administrators can control for which buildings the Visitor Management module is active. This is configured under Settings > Visitor Management > Visitor management buildings. The visitor management is disabled for buildings that are removed from this list. This setting is applicable for locations where visitor check-in via the module is not required.
STEP 1 - Configure fields
You can set the following profile attributes in Flexopus to tailor visitor profile requirements based on your organization's needs. While name and email address are mandatory, the following fields can be set as required or optional:
Additional visitor attributes:
- Visitor address
- Visitor phone
- Visitor ID number
- Visitor license plate
Additional company attributes:
- Company name
- Company email
- Company phone
- Company website
- Company address
This setup allows customization to meet specific organizational needs.
STEP 2 - Configure documents
In this configuration step, you can upload the document(s) that need to be signed by the visitors during the verification process.
We recommend adding two documents.
Data privacy policy for visitors
To ensure GDPR compliance and align with best practices, your visitor management document should include the following:
Data Processing Legal Information
- Purpose of Data Processing
Clearly state why visitor data is being processed, for example, “to manage office access and ensure safety and security during visits.” - Data Processed
List the specific types of data collected, such as visitor name, email, date of visit, and time of visit. - Data Retention Period
Indicate how long this data will be stored (e.g., “Visitor data will be retained for a maximum of 30 days post-visit unless specified otherwise for security incidents"). - Visitor Rights
Explain the visitor’s rights, including:- Right to access personal data stored about them.
- Right to request deletion or correction of data.
- Right to inquire about the purpose and extent of data processing.
Visitor’s Code of Conduct
In addition to data privacy policies, specify the conduct expected of visitors to ensure security and decorum:
- No Unauthorized Photography or Recording
Visitors are prohibited from taking photos or recording videos during their stay. - Avoid Removing Documents
Documents from shared office equipment (like printers) should not be removed. - Restricted Area Access
Visitors may not enter restricted areas without explicit host approval. - Emergency Procedures
In emergencies, such as a fire, visitors should follow host instructions. - Wear Identification
Visitors must visibly display their name tags at all times. - Damage Reporting
Any damage caused during the visit should be promptly reported to the host. - Guest Wi-Fi Access
Visitors are welcome to use the guest internet during their stay.
Note: Avoid including a Non-Disclosure Agreement (NDA) within the visitor management documentation. If an NDA is essential, it’s best managed separately before the visit.
STEP 3 - Display configuration
To proceed, enable the verification process for the kiosk display on a designated, preconfigured tablet. We recommend using a visitor kiosk display and activating the signature option for the kiosk. By enabling this, the kiosk registration code will appear during the visitor invitation process and will also be sent to the visitor via email.

Using the visitor kiosk, you can handle the visitors onsite faster and easier, since they don't need to use their private devices for the verification process. To configure a visitor kiosk display, please follow the instructions in the following article:
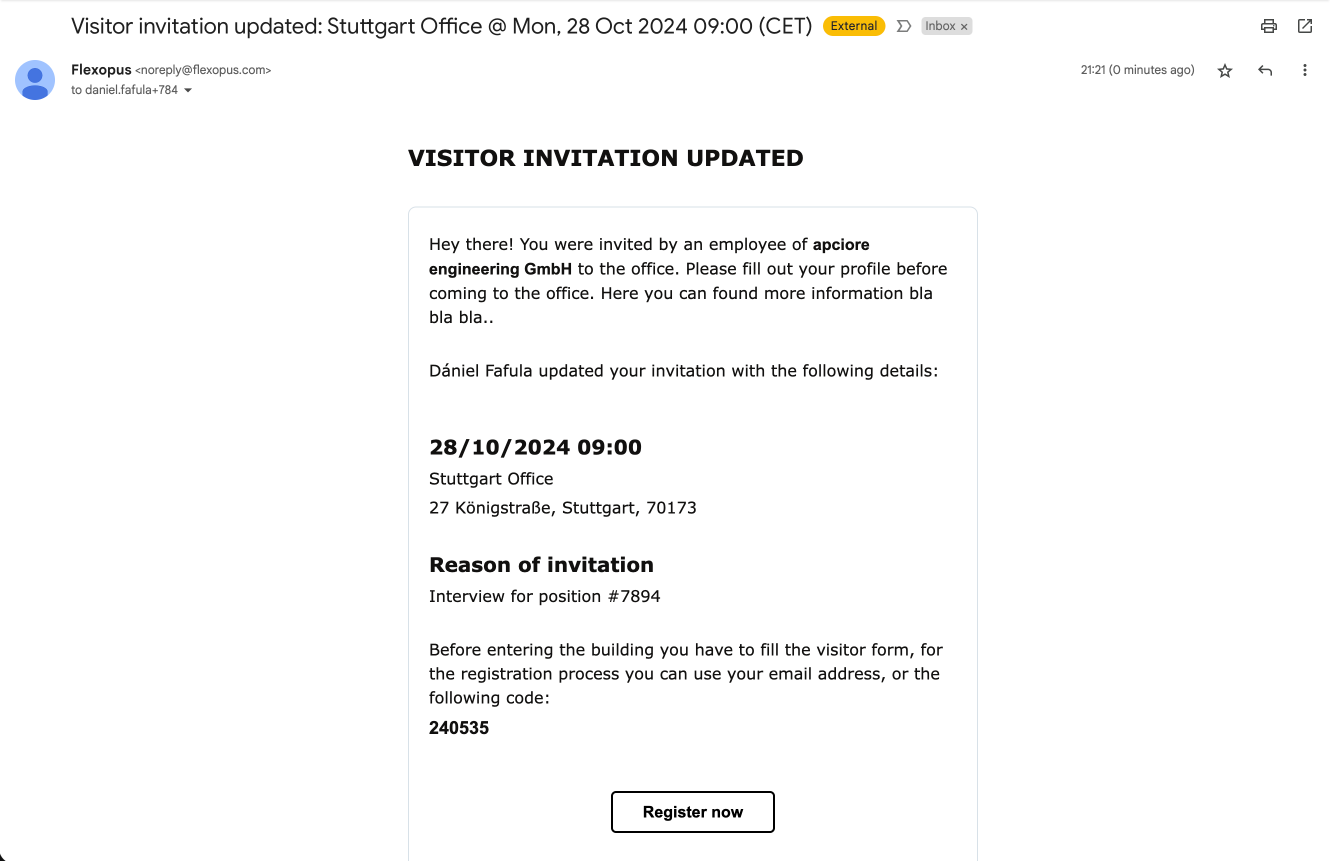
STEP 4 - Configure invitation email
You can customize the visitor invitation emails by providing a custom text, which will be displayed at the top of the email.
You can use the following template text as well:
You were invited by an employee of **Flexopus GmbH** to visit our office. Please fill out your visitor profile before coming to the office.

STEP 5 - Privacy configuration
As the last step, you can configure how to anonymize and automatically delete the visitors' data, such as the invitations and the user profiles.
Navigate as an administrator to Dashboard > Settings > Data Privacy Settings. Here you can find two settings, which you can set based on your data privacy policy, which you uploaded in STEP 2.
Visitor invitation anonymization
Anonymize past visitor invitations after the configured time. The invitation details (arrival time, check-in, building, etc.) are preserved, but the visitor profile is detached from the invitation. The anonymization is irreversible, as it is done to protect the users and visitors from data collection and behavior tracking.
Delete inactive visitors automatically
The system automatically deletes older inactive visitors. Visitors are considered as inactive if they have no upcoming invitations or no past invitations in the configured number of days. We recommend putting this setting to the same value as the visitor invitation anonymization.
The users can see all existing visitor profile settings found under Dashboard > Settings > Visitor management, controls visibility of visitor profiles. If disabled, users only see their visitors by default, which helps prevent sensitive situations, such as accidental re-invitations of rejected candidates. However, when creating a visit, if an email address matches an existing visitor, that profile will be suggested, allowing the user to add the visitor without requiring profile re-verification.
By default, this setting is disabled to maintain privacy and prevent potential mismanagement of visitor information.
Visitor registration process
In this section, we describe the visitor registration process.
STEP 1 - Configure invitation
Both regular users and administrators can register a new visitor in Flexopus, with similar steps. However, administrators have the option to create an invitation for a different host. To do it, go to Dashboard > Visitors > New invitation and specify the host's details during the invitation process.
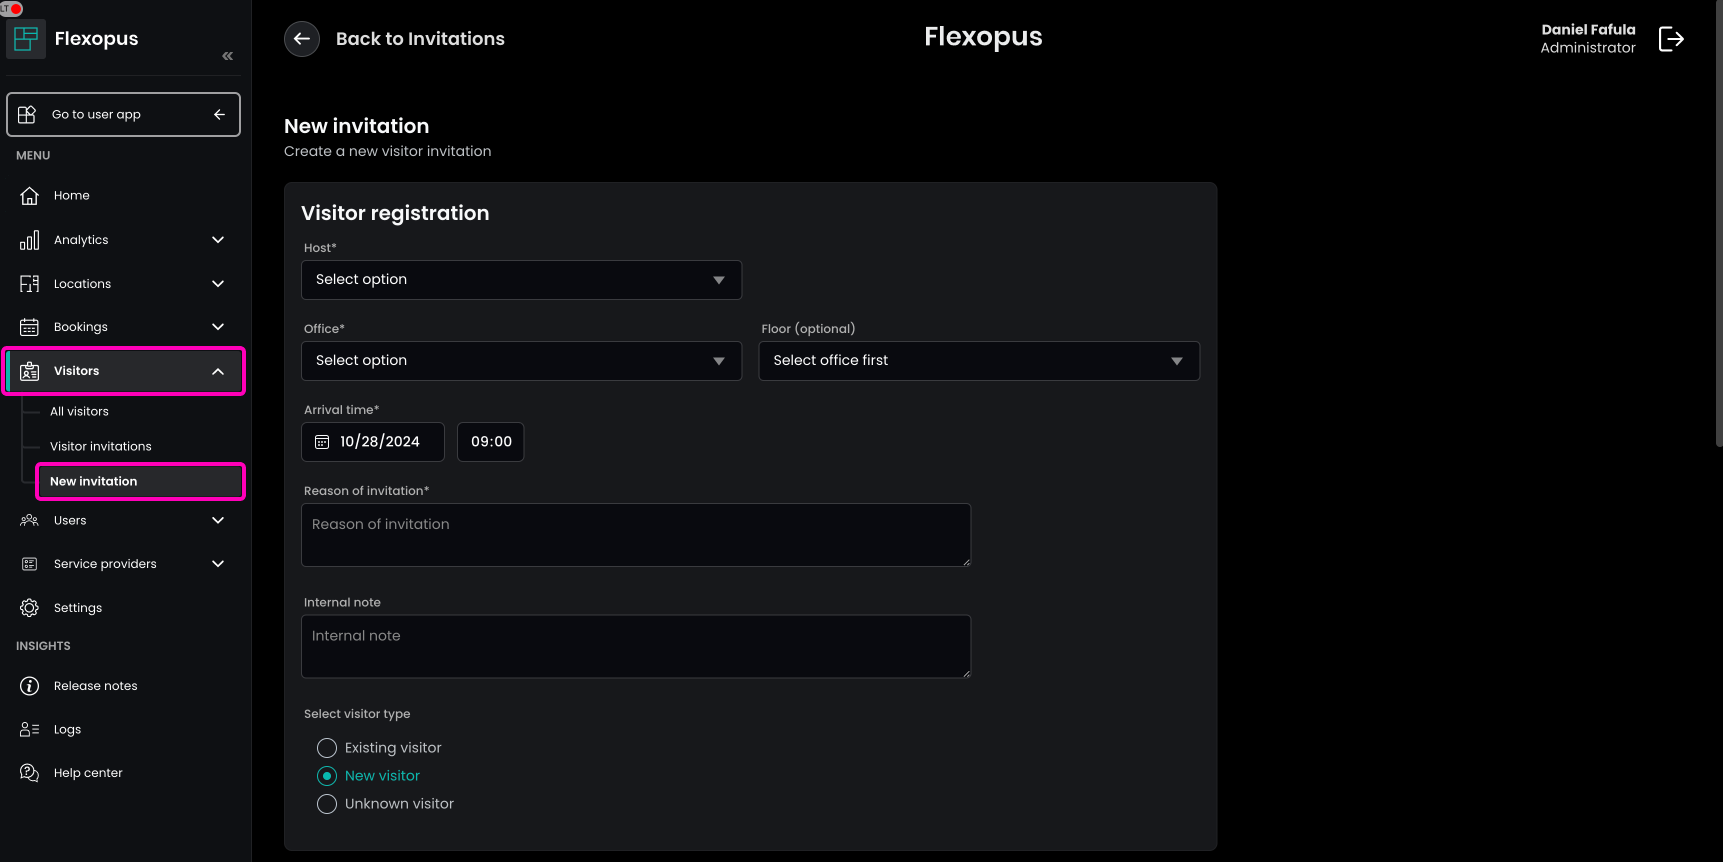
When creating a visitor invitation, you can set the following parameters:
- Host: Select the user responsible for the visitor. Administrators can create invitations for other colleagues.
- Office & Floor: Specify the office for the visitor's arrival, especially if managing multiple offices. The floor selection is optional.
- Arrival Due Time: Enter the expected arrival time, even if the visitor may arrive slightly earlier or later.
- Reason for Invitation: This is a required field for internal tracking and communication, such as specifying if it’s for an interview or a social visit. Both the visitor and administrators can view this reason.
- Internal Note: Optionally, add an internal note related to the invitation.
STEP 2 - Select visitor
To complete a visitor invitation, choose a visitor type from the following:
- New Visitor: Requires only the name and email fields for invitation creation. Additional fields are optional and can be filled in advance to assist with the visitor's verification process. Required fields must be completed by the visitor to finalize verification.
- Existing Visitor: Select a previously verified visitor from the list to bypass the verification process. Administrators can access all existing visitors, while regular users can only view their own visitor profiles by default. Using an existing profile is recommended whenever possible.
- Unknown Visitor: Use this option for anticipated but unspecified visitors, such as maintenance workers. It’s recommended to include a detailed internal note for clarity on the expected visitor’s purpose.
STEP 3 - Invitation
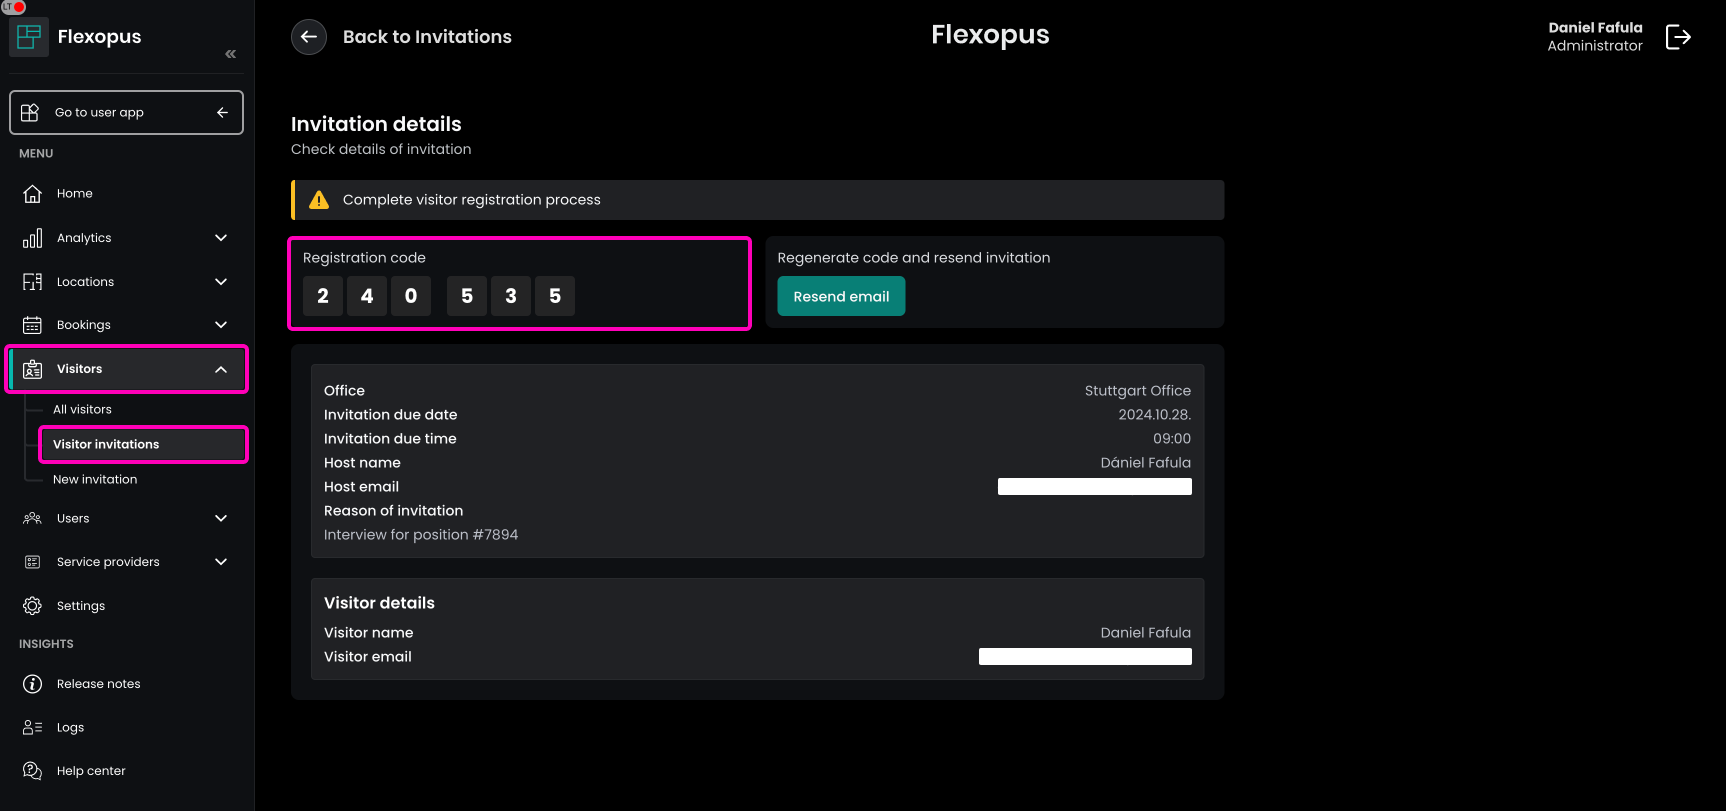
After setting up the visitor invitation parameters and data, finalize the invitation. The visitor will receive an invitation email, and the invitation will be listed in the system. To view all invitations, go to Dashboard > Visitors > Visitor invitation > All visitor invitations.
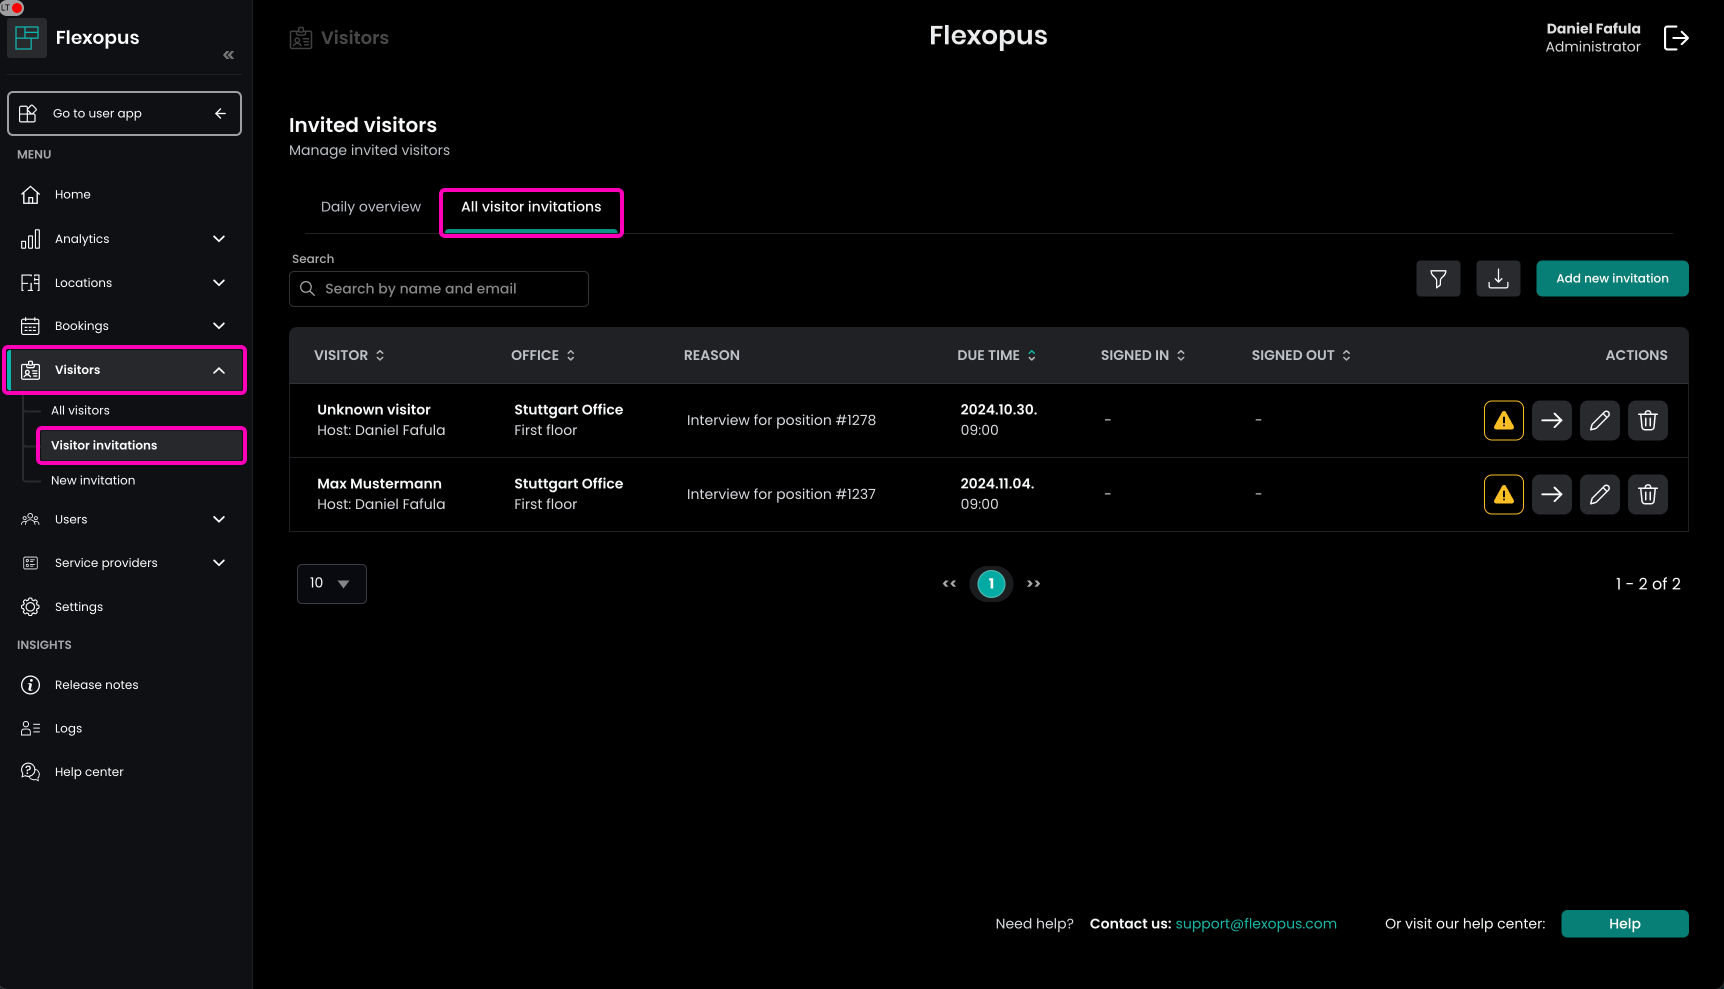
In case the visitor is not yet verified, you will see an orange disclaimer next to the invitation. This means that the visitor cannot be checked in yet, since the verification process is pending.
STEP 4 - Verification options
The verification process is where the user fills in their visitor profile based on the configured requirements and accepts the configured visitor documents. Without a proper verification, a check in is not possible. There are two ways to do the verification process:
- Verify visitor profile using the link in the invitation email
- Verify visitor profile on site using the visitor kiosk tablet
Verification using the invitation email link
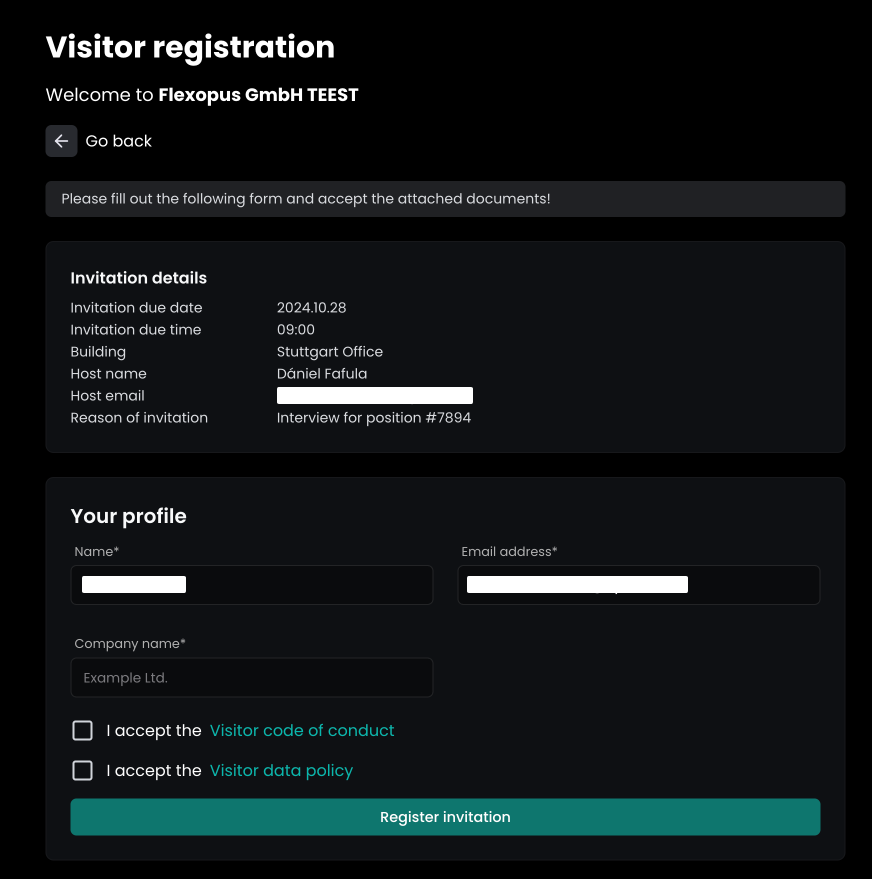
The invitation email includes a unique invitation specific link, which leads the visitor to a verification form. On this form, the visitor can enter the missing profile attributes and accept the documents.
Verification using the visitor kiosk tablet
If a visitor forgets to complete their profile verification before arrival, they can do so on-site using a preconfigured visitor kiosk tablet. The host, admin, or visitor can simply enter the 6-digit code associated with the invitation on the kiosk to begin the verification process.
STEP 5 - Verification
No matter which option is chosen for the verification, the same form will open:
- The first section shows the invitation details.
- The second section shows the attributes that need to be filled out.
- The third section shows the documents that need to be accepted.
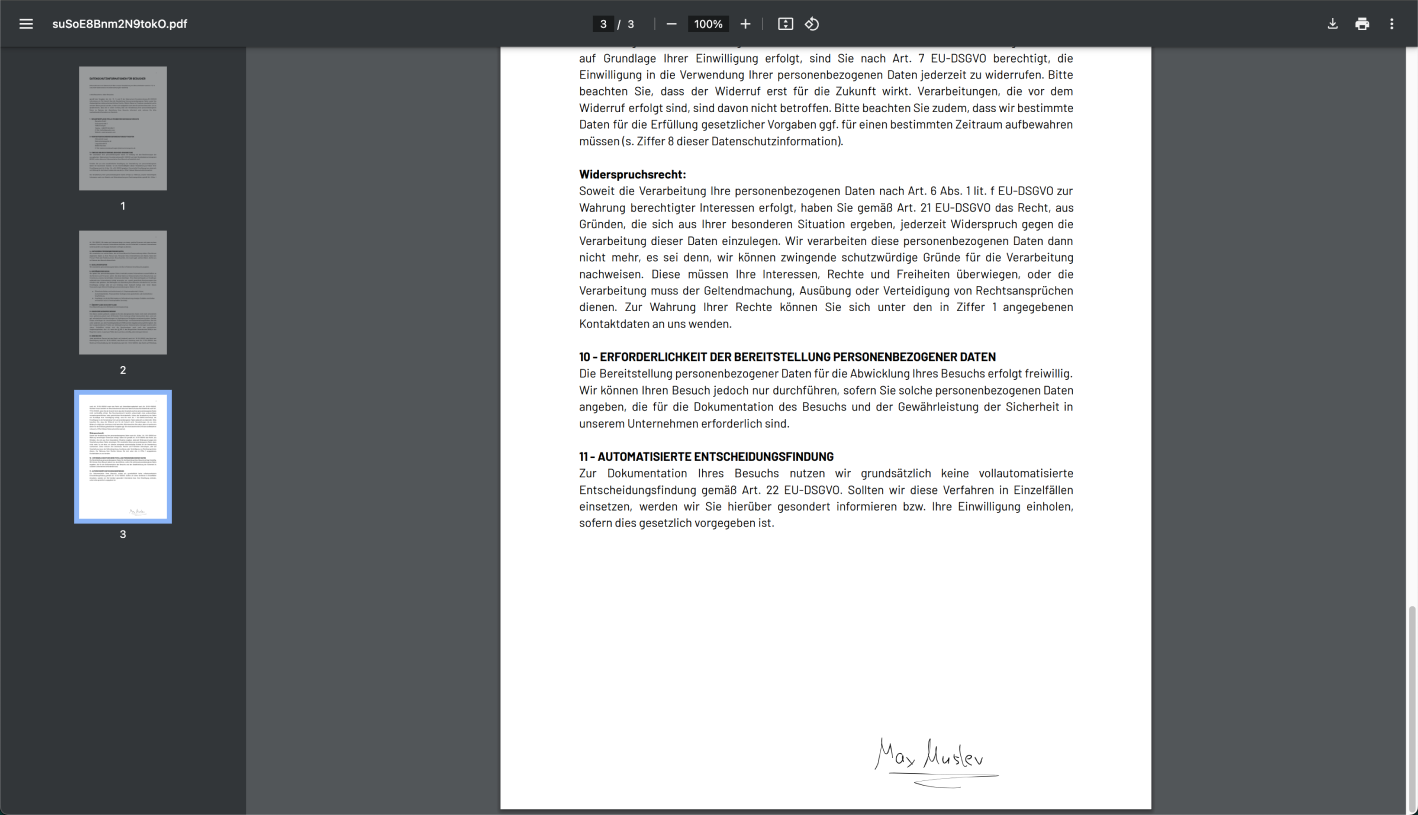
Optionally, a signature can be requested from the visitors, which will be copied to the last page of the required documents:
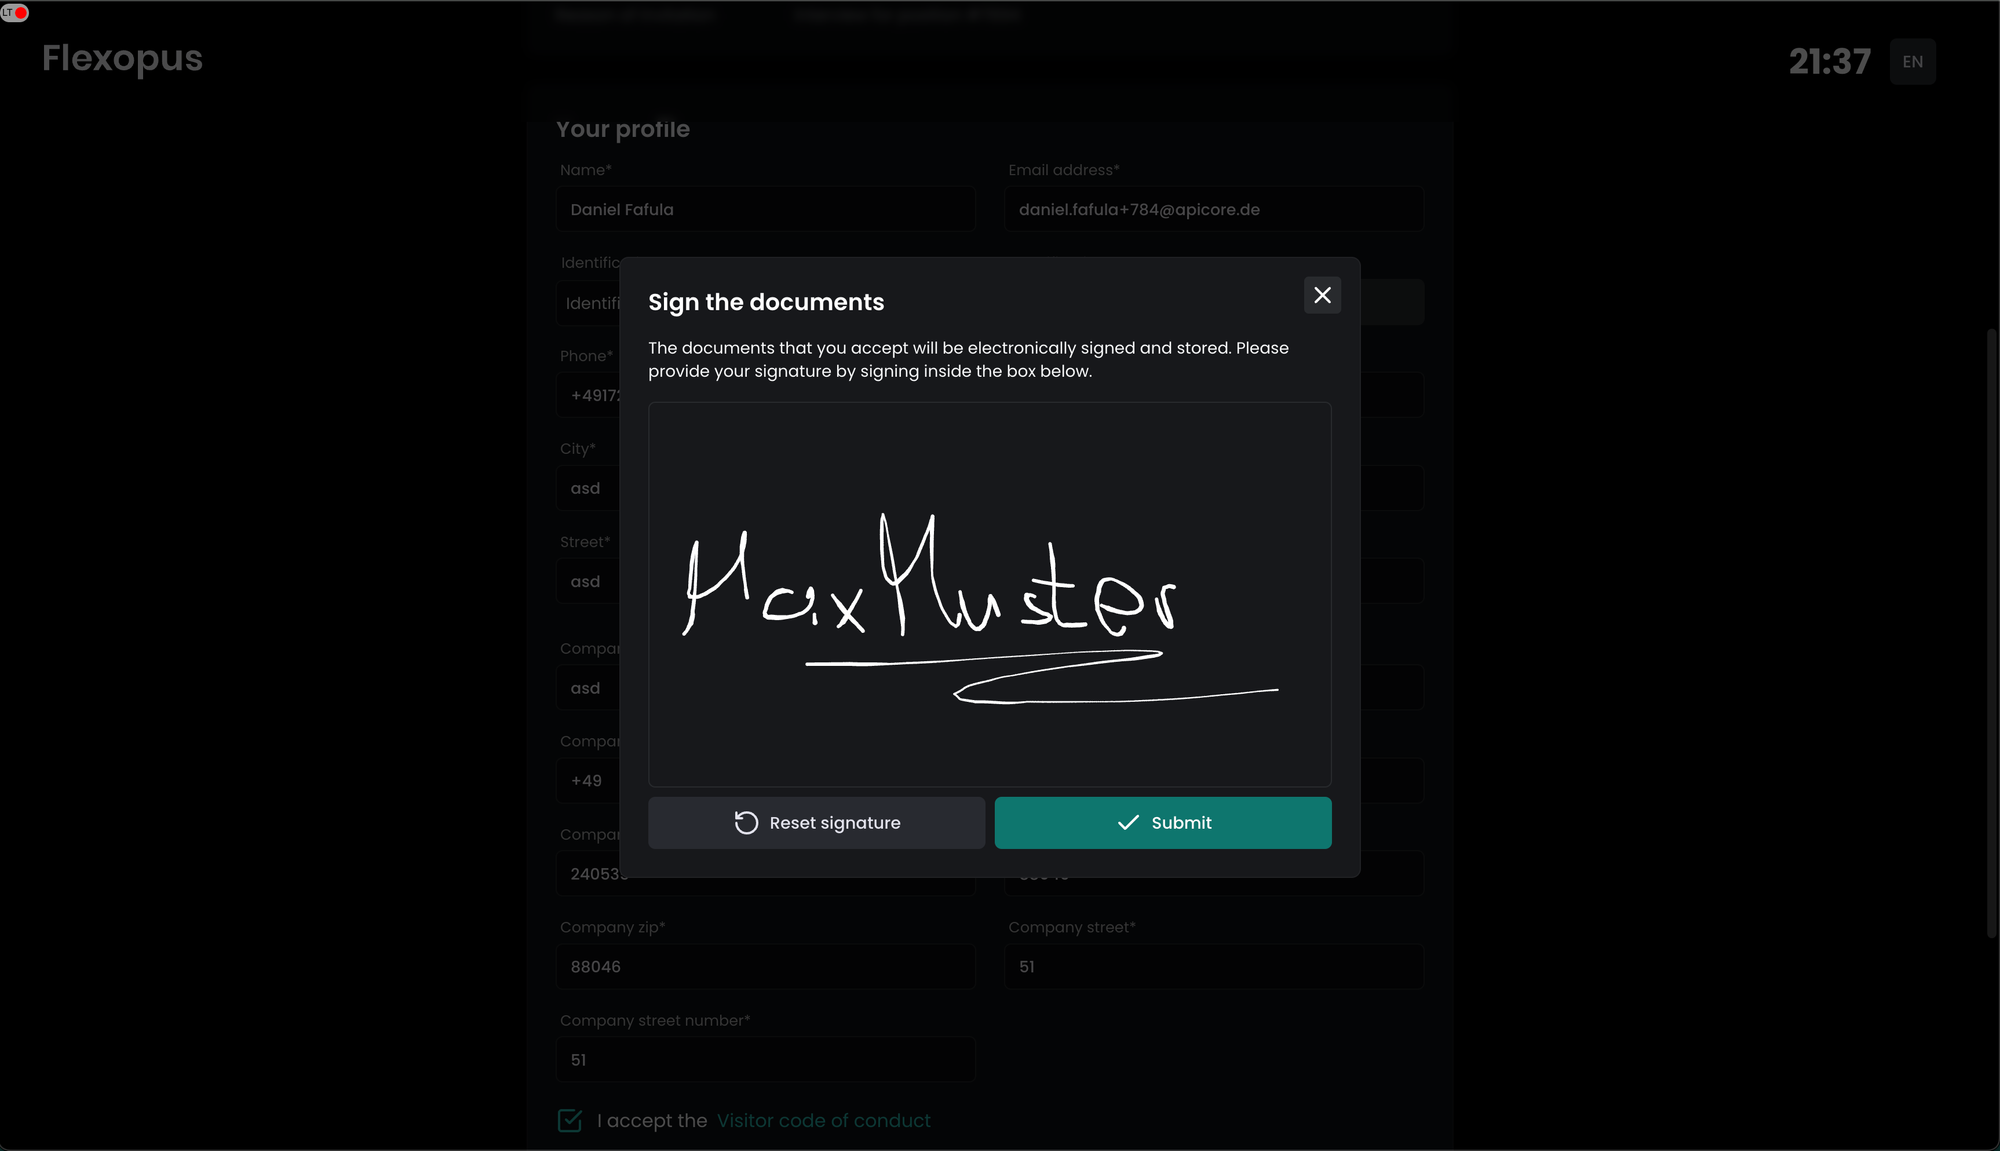
The signature will be copied to the last page on the documents.
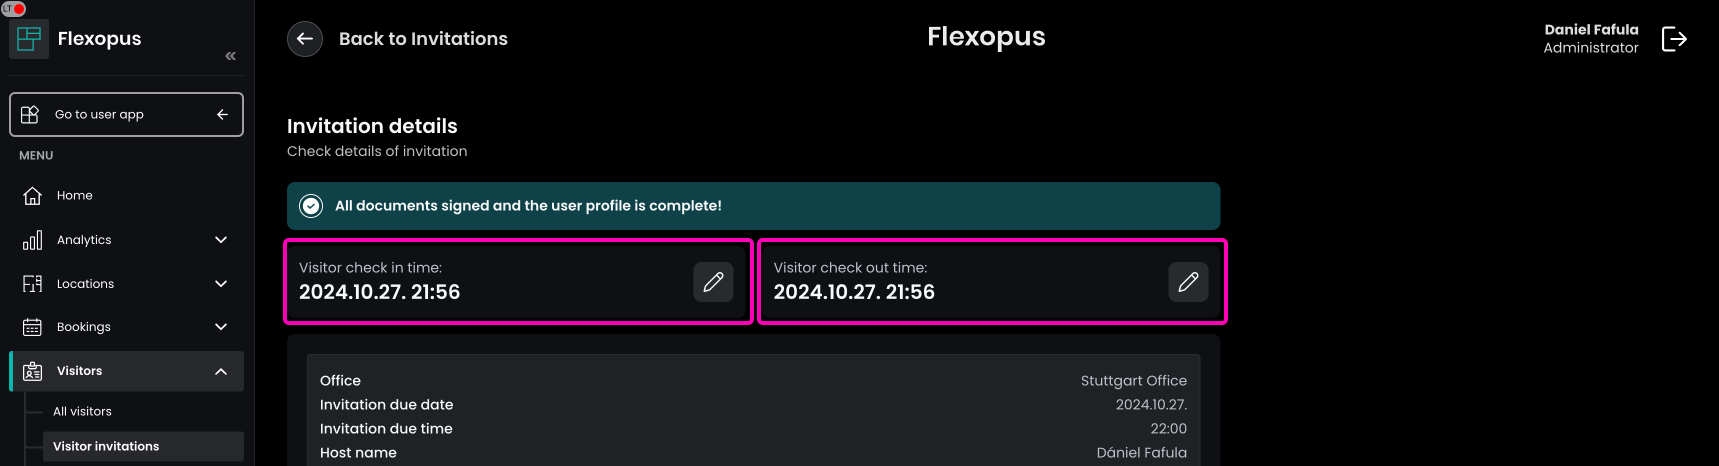
STEP 6 - Check-in / Check-Out visitor
Once the visitor verified their profile, the host, or the visitor administrator can check in the visitor on the target day.
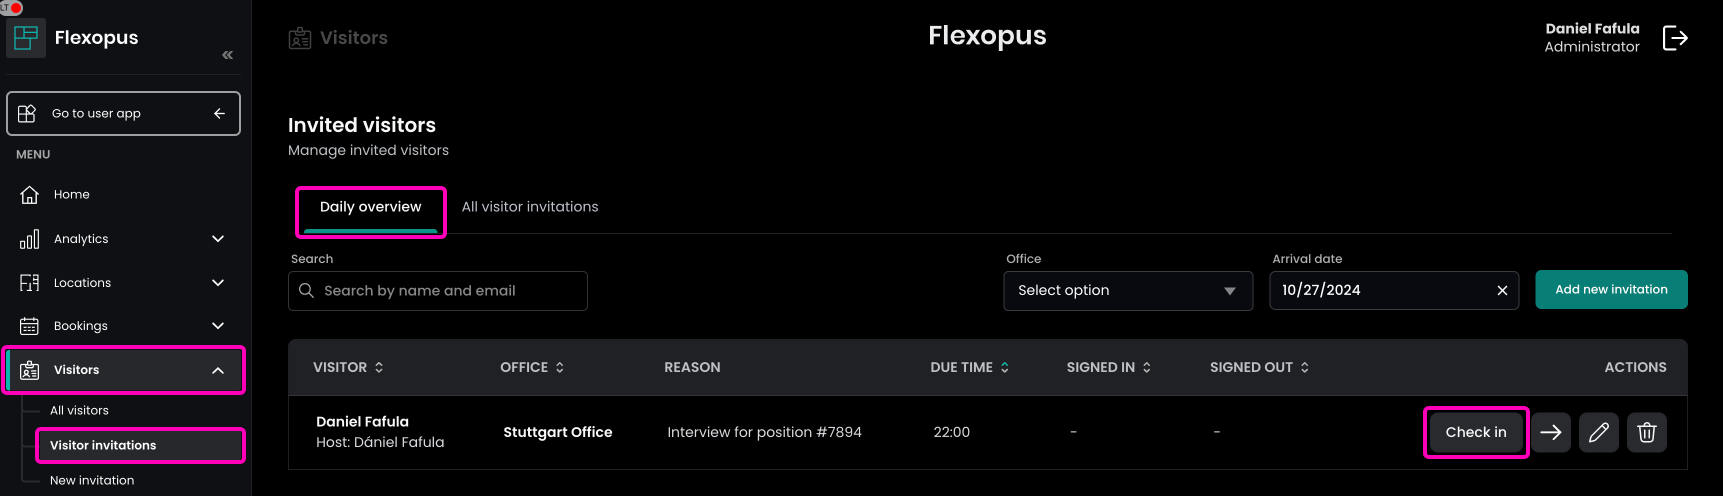
Clicking on the check-in button, the current time will be documented.
If configured in the admin settings, a custom step (e.g. ID verification) can be made mandatory before check-in. This behavior can be configured in the admin area under Settings > Visitor Management. The corresponding setting is named "Check-in confirmation required".
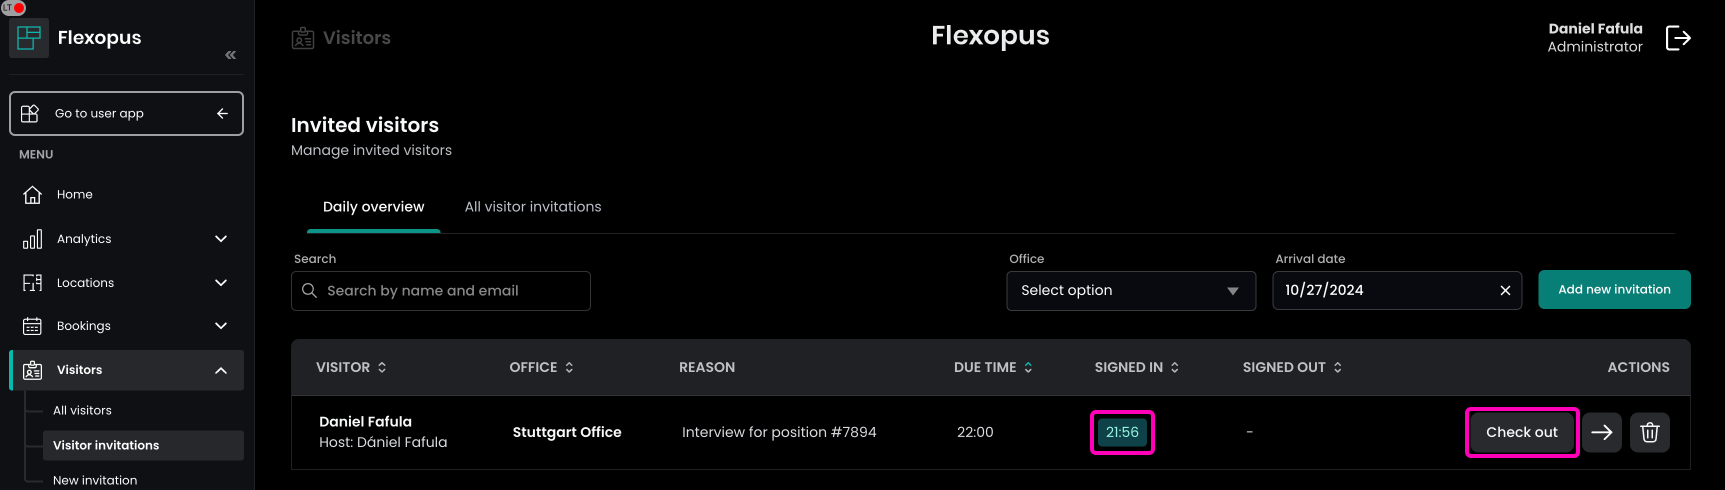
After the check-in, the check-out button will be displayed. Clicking on the checkout button, the current time will be used.
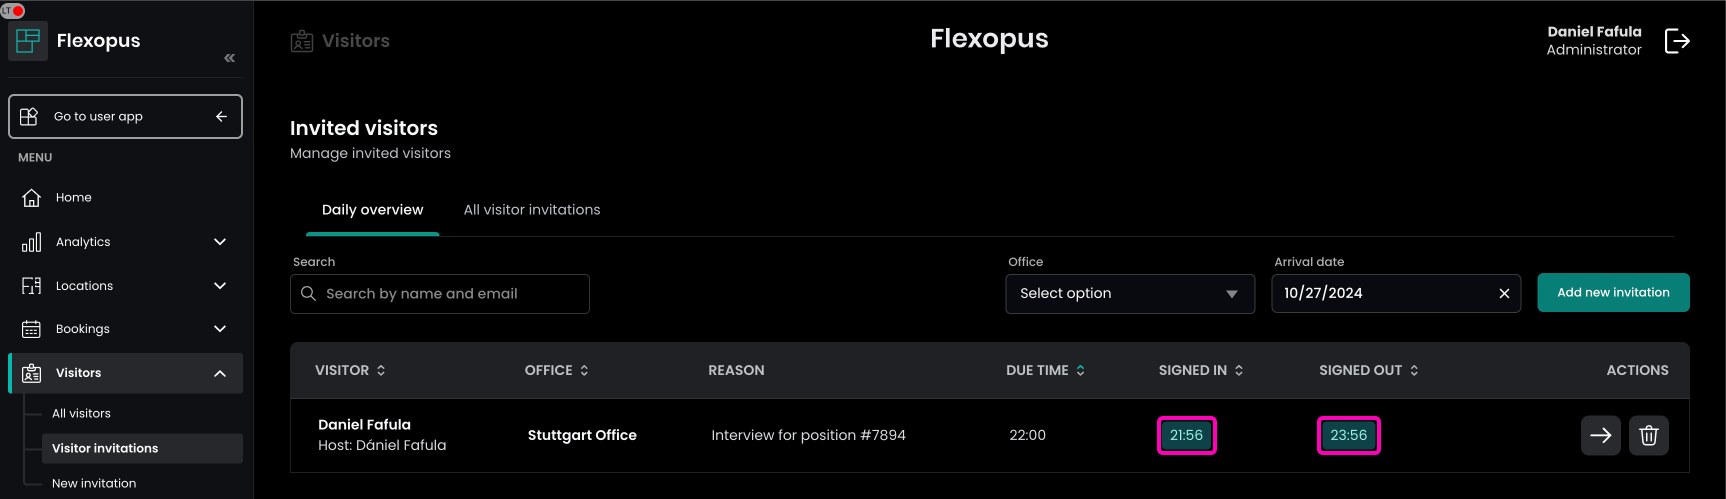
The check-in and check-out time can be edited afterwards based on the settings you configured for the visitor management. In some cases, the documentation of the arrival or the leave will be forgotten.
The visitor protocol is done.
Why use visitor management?
Visitor management is crucial for safeguarding information and knowing who is on-site in emergencies. Here are two key examples:
Example 1
Protecting Information (Theft of Company Property)
When a company laptop or critical documents go missing, visitor management helps to identify who accessed the office at the time. This allows the security team to investigate further and work with information security to minimize potential breaches.
Example 2
Emergency Evacuation (Building Fire)
In emergencies like a fire, the fire department needs to know if anyone is still inside. Visitor records provide quick insights into who might still need assistance, avoiding delays from checking with each employee.
In addition to internal security, visitor management often fulfills external requirements for information security:
- Information Security Certifications
Certifications like ISO27001 or TISAX mandate knowledge of office visitors to safeguard access to company premises. Many clients require these certifications for security compliance. - GDPR Compliance
Under GDPR Article 32, companies must document measures to secure data access, including physical space access control, which is part of any Data Processing Agreement (DPA) shared with clients.
These examples highlight that visitor management is often less about internal preference and more about meeting critical security and compliance requirements.