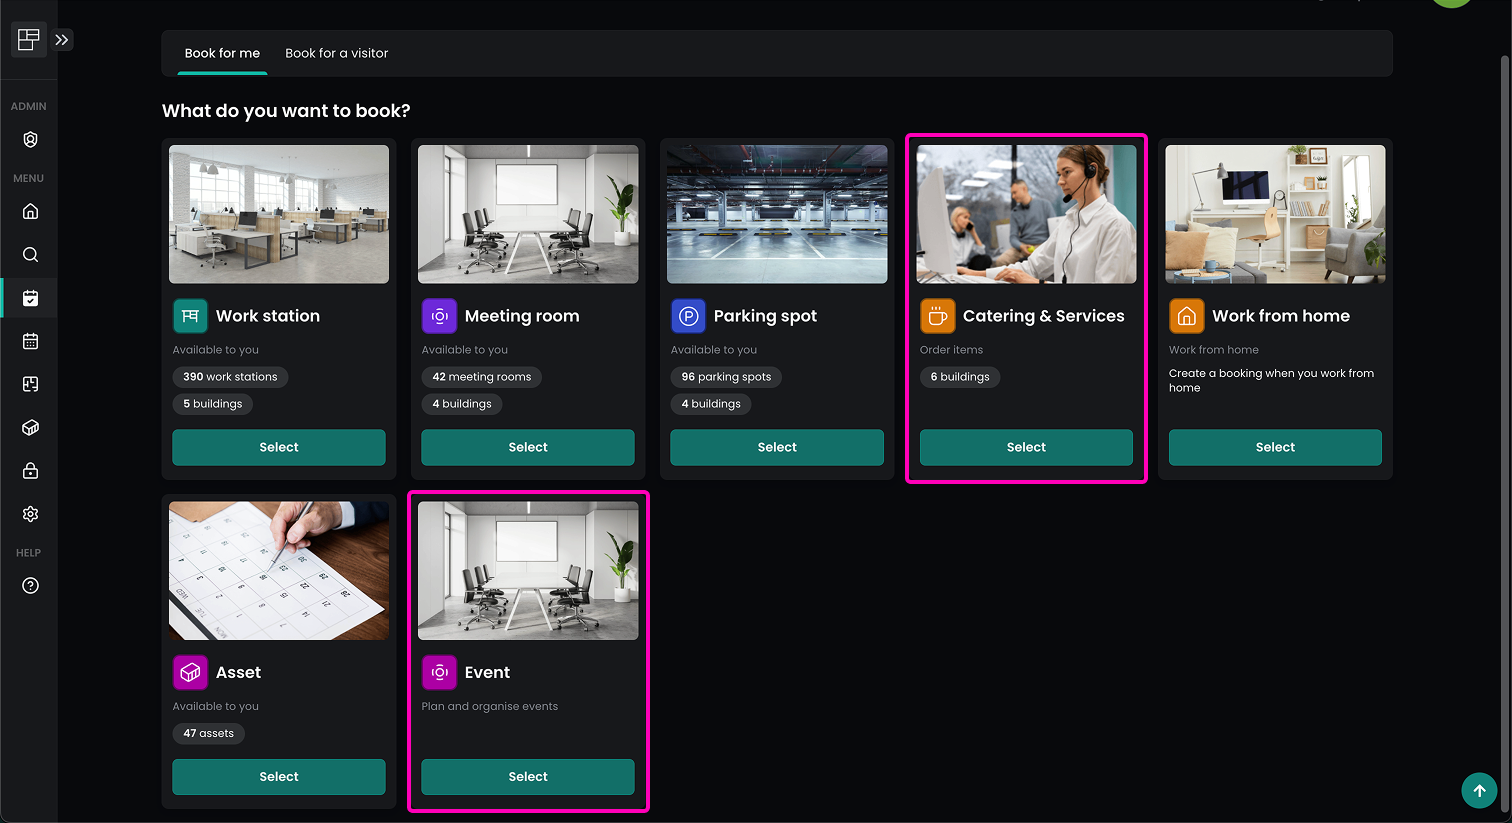
Catering and Service Providers

Overview
Define service providers for your managed buildings and let the users order items from the service providers. A service provider can be an internal or an external party that provides services. These services can be ordered by the users.
A service provider can be, for example:
- Catering service provider
Provides food and drink services, that can be ordered by the employees for a meeting or a special event. Typical services are soft drinks, sandwiches, cakes, coffee, or tea. - Facility service provider
Provides services that can be delivered by the office management upon request. Typical services are the preparation of the meeting rooms in a special way, such as a seating re-arrangement. - Cleaning service provider
Provides cleaning services, which is normally done through regular cleaning cycles. However, in some cases an extra cleaning service is required. Colleagues could order a service such as empty the trash, clean the window, clean the coffee machine or coffee on the carpet.
You can define any other service provider based on your needs as well and configure the service items.
Internal / External provider
A service provider can be an external service provider, but it can be an internal service provider as well. Let's take the catering service provider as an example. An organization with 2 offices: Big Office and the Small Office.
The Big Office has a cafeteria, which is managed by an external service provider called Provider EXT, and therefore we can create a service provider with items that can be provided by the external service provider. These service items can be delivered only in the Big Office building and not in the Small Office.
The Small Office also requires catering service; however, there are not enough employees to outsource it to an external. The office manager or the assistant is responsible usually for the catering service. This way, the provider will be an internal provider called Provider INT. The items provided will be most probably the items from the next bakery near the office. The orders will be managed internally by the office managers. The provider will be linked with the Small Office and not with the Big Office.
Both providers can have different limitations applied to their services.
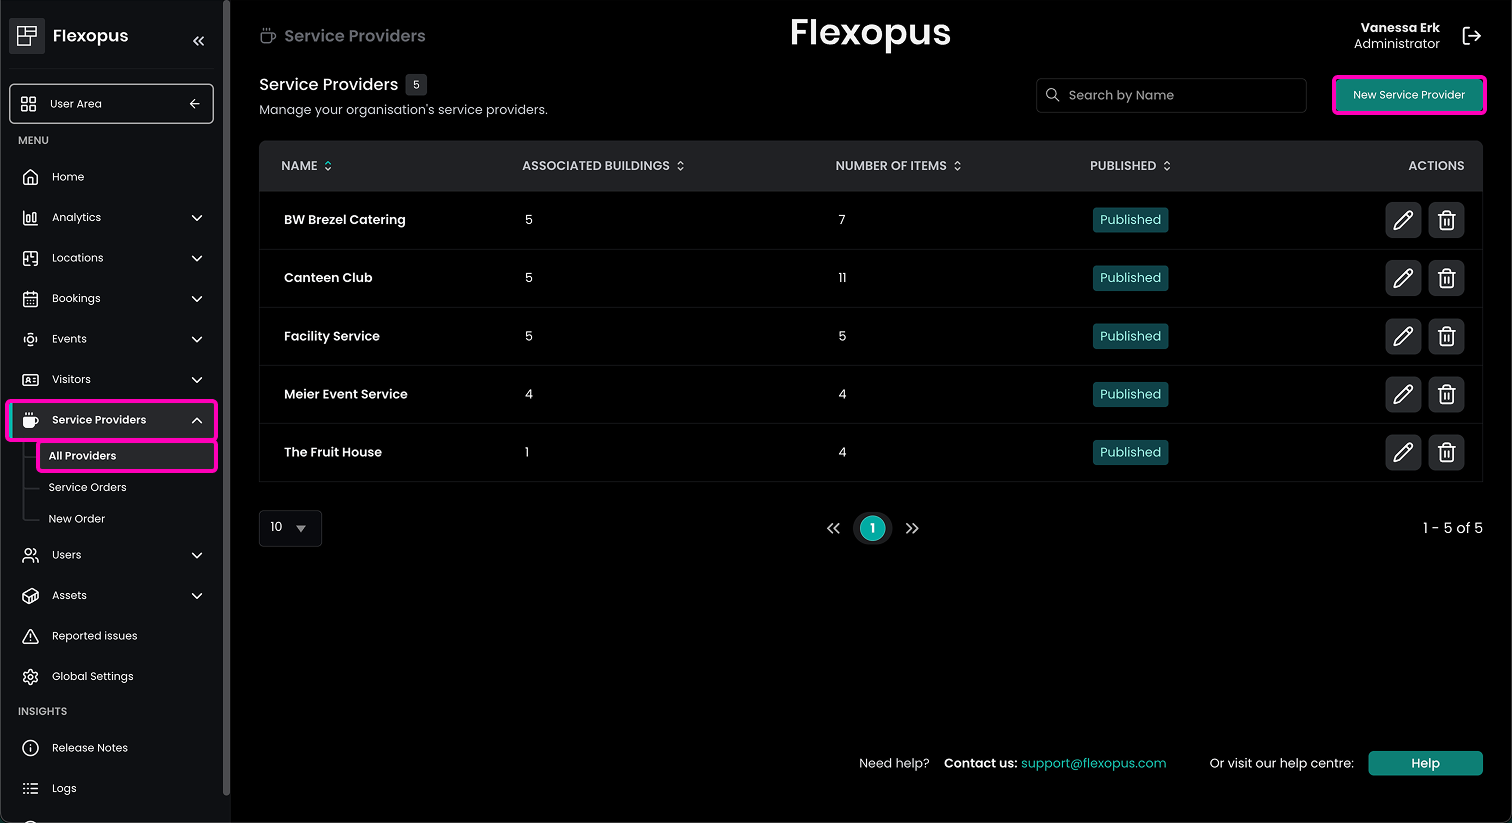
Service providers
You can manage the service providers as administrator by navigating to Dashboard > Service Providers > All providers. From there you can open a single service provider by clicking on the pencil icon next to it.
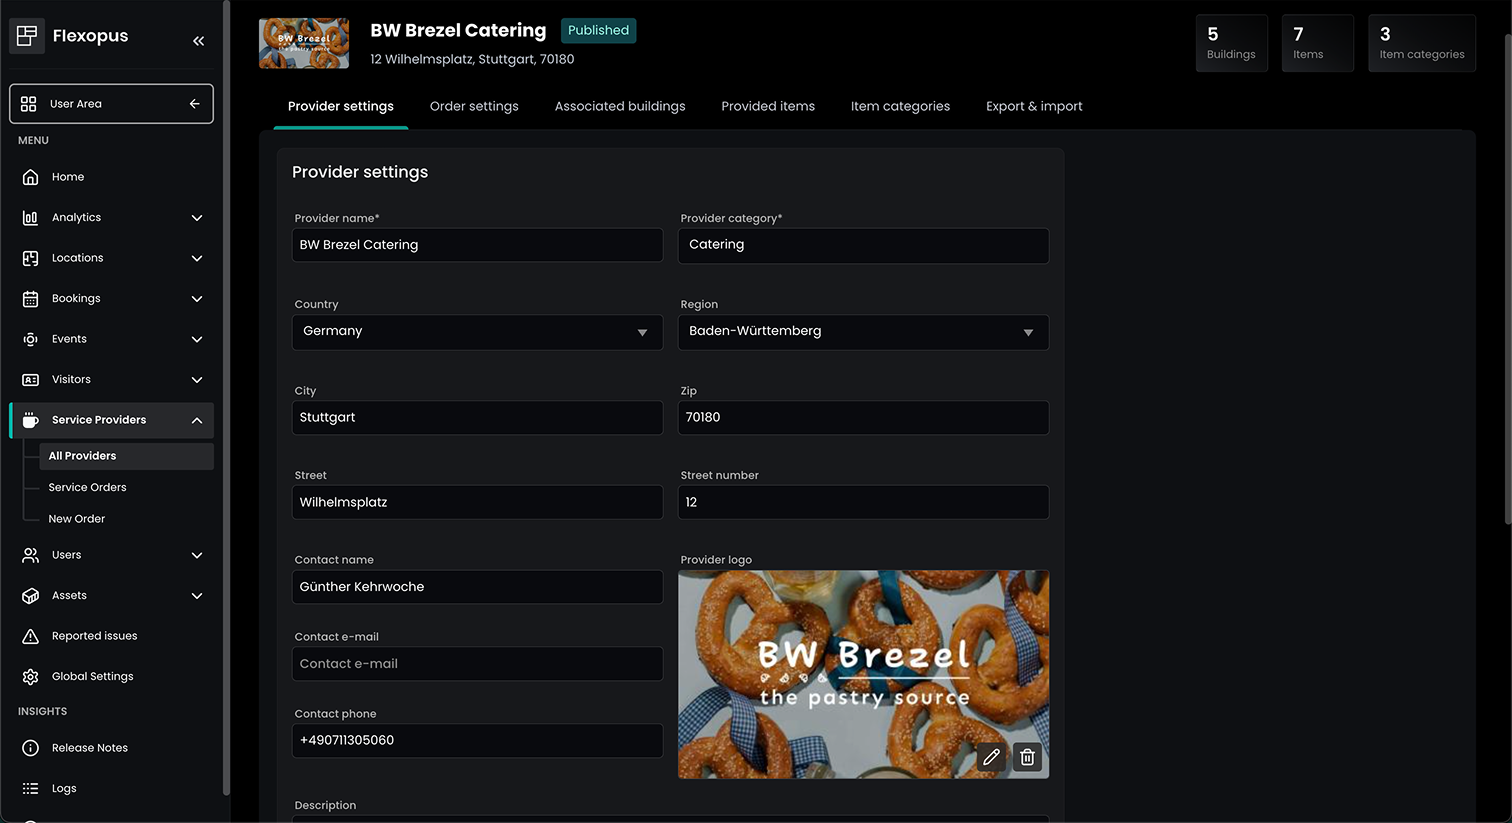
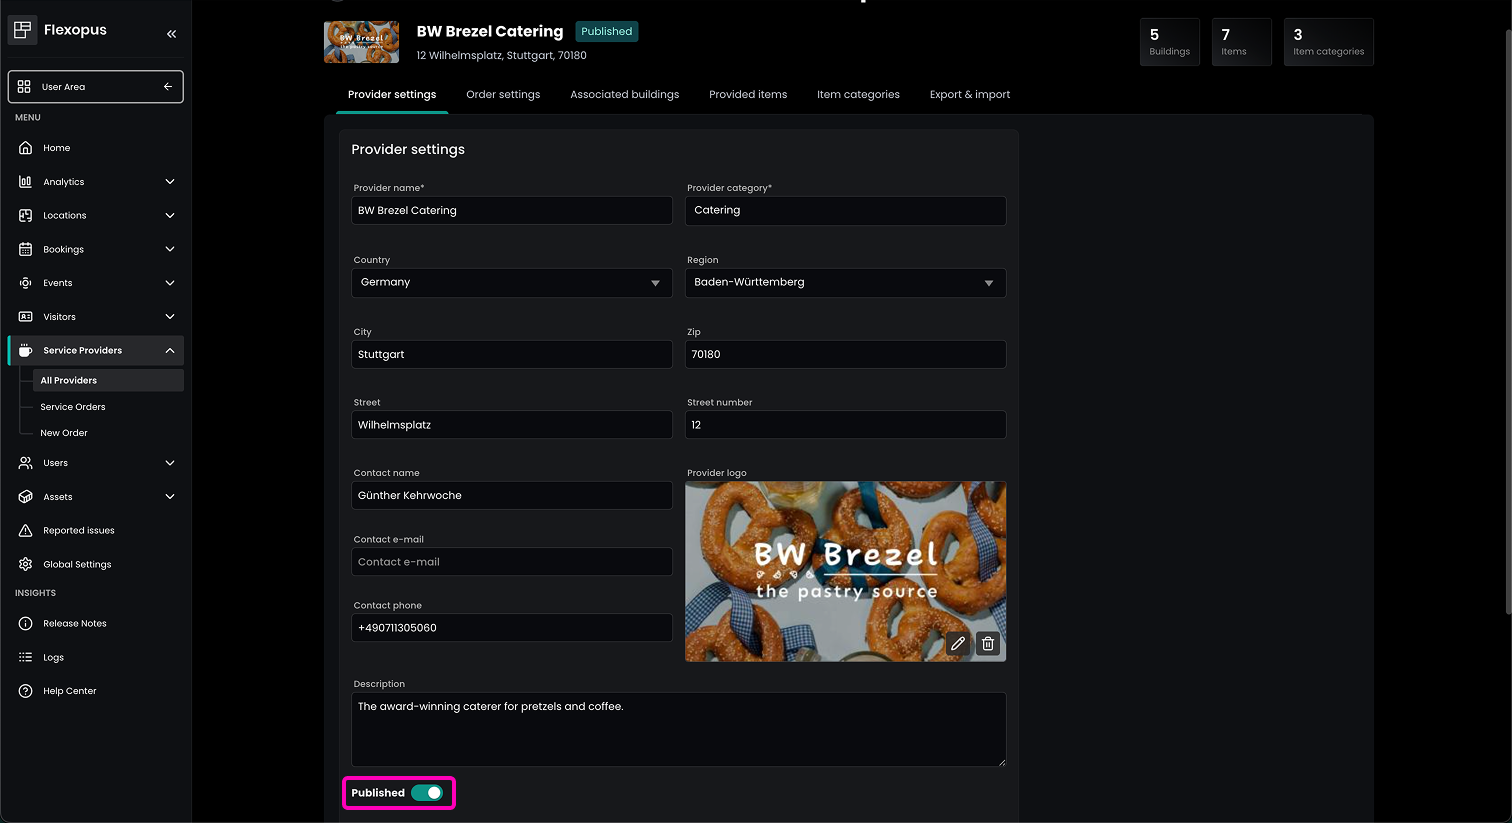
Provider settings
A service provider can be configured using the following attributes:
Provider name: The name of the service providerProvider category: The category of the service providerAddress: The address of the service provider: country, region, city, zip, street, street numberContact name: The contact person for the service providerContact e-mail: The contact e-mail of the service provider. This email will also be used to send the orders and the order summaries to.Contact phone: The phone number of the service provider.Provider logo: The logo of the service provider. In the case of an internal service provider, you can us your company logo or any other abstract visual illustration as well.Description: The brief description of the service provider.
Order settings
In the order settings, you can define global configurations for service provider items.

In the order settings, you can manage things like currency, toggle manual order acceptance, set order limits, or activate service reminders.
Associated buildings
You can configure, which service provider is responsible for which building in your organization. Smaller offices may not have any services offered internally. Assign the buildings in the service provider profiles:
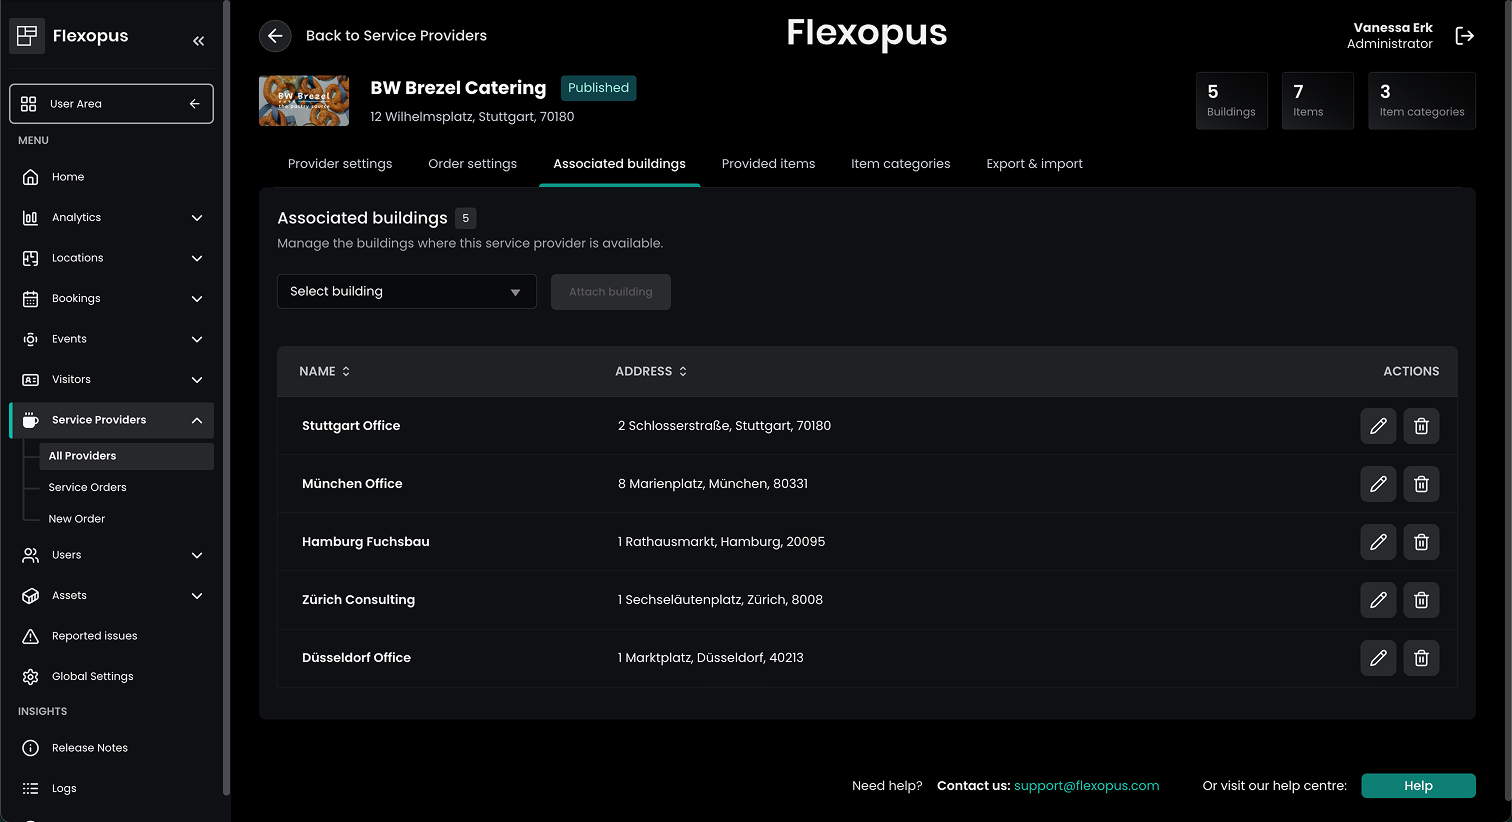
You can add a building to the service provider at any time. If you delete a building, then the upcoming service orders will not be touched. You need to reject them one by one, in case they cannot be delivered.
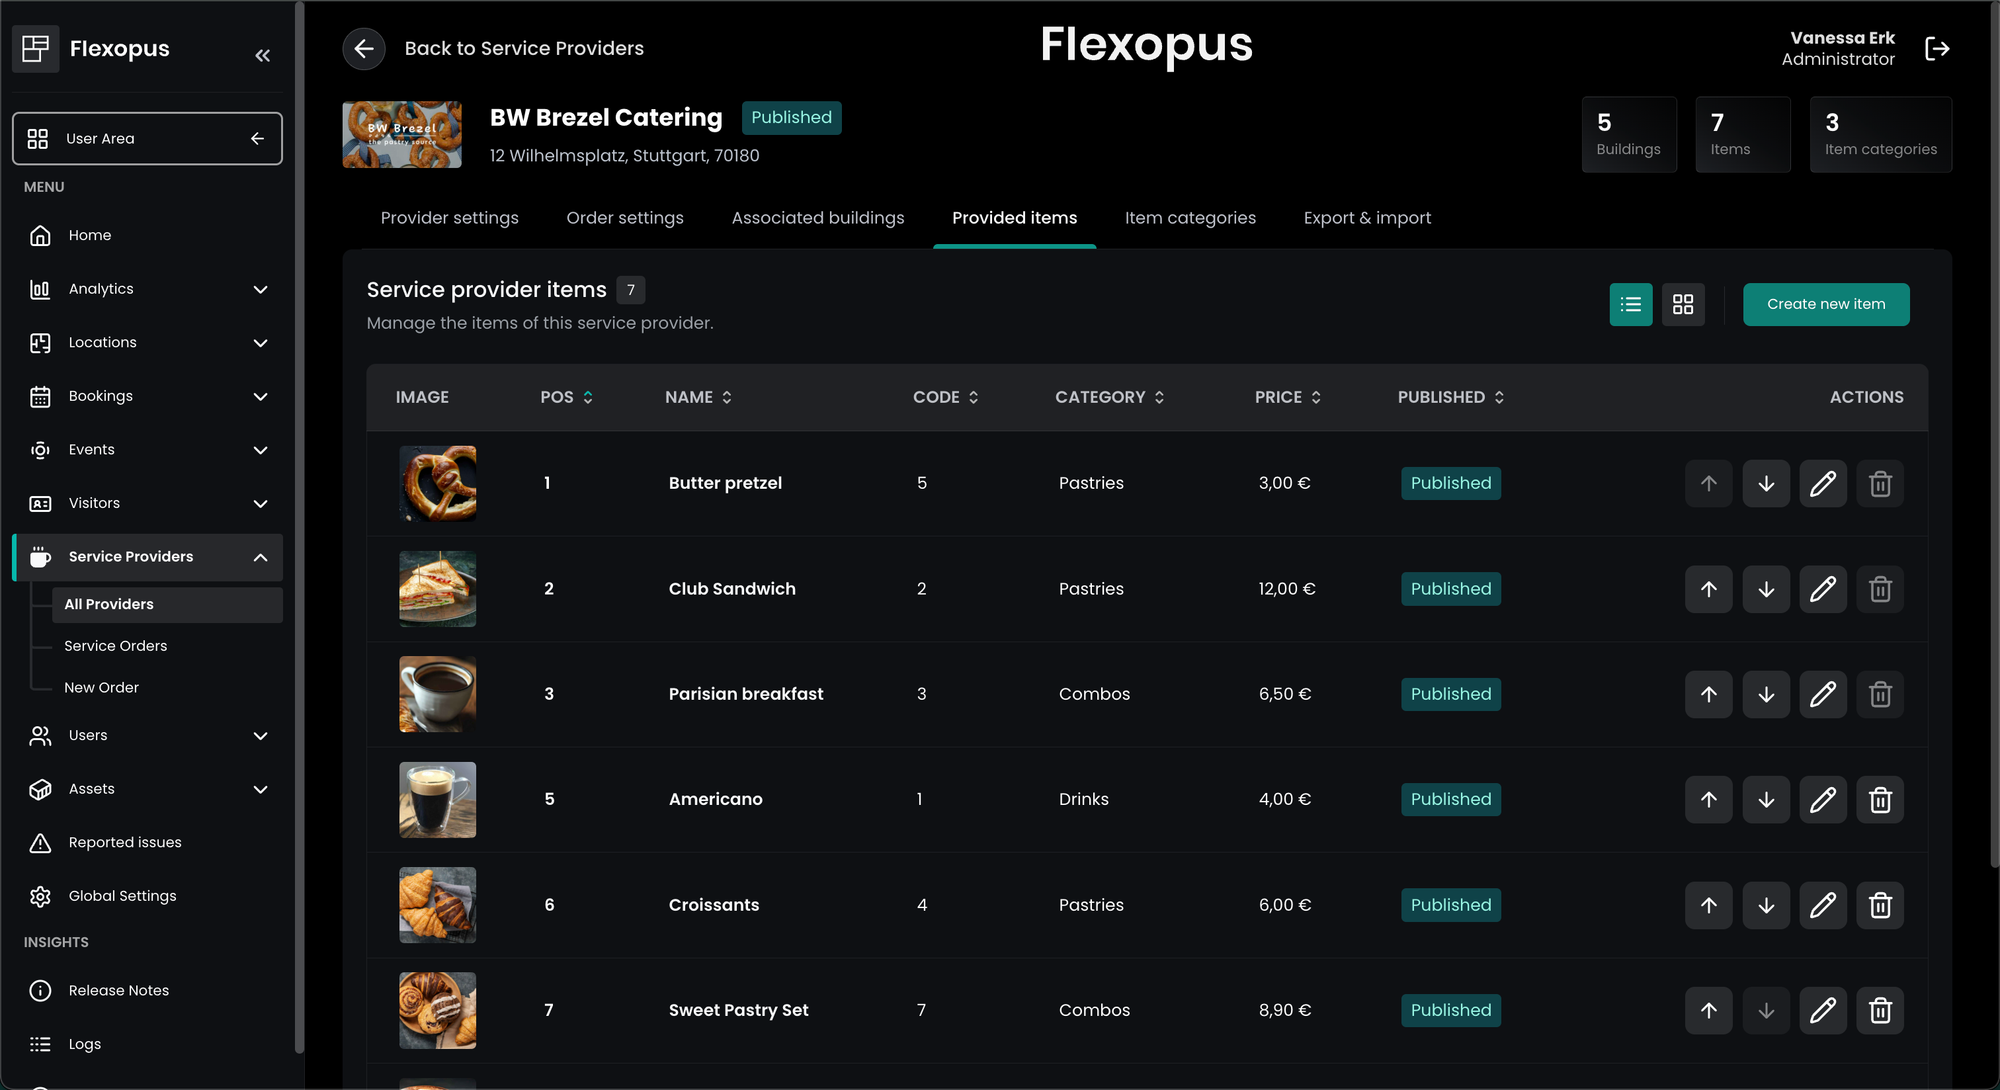
Provided items
Each service provider is supposed to offer items as services. The items can be ordered by the users. You can create the items manually one by one or you can also import the items into the system.

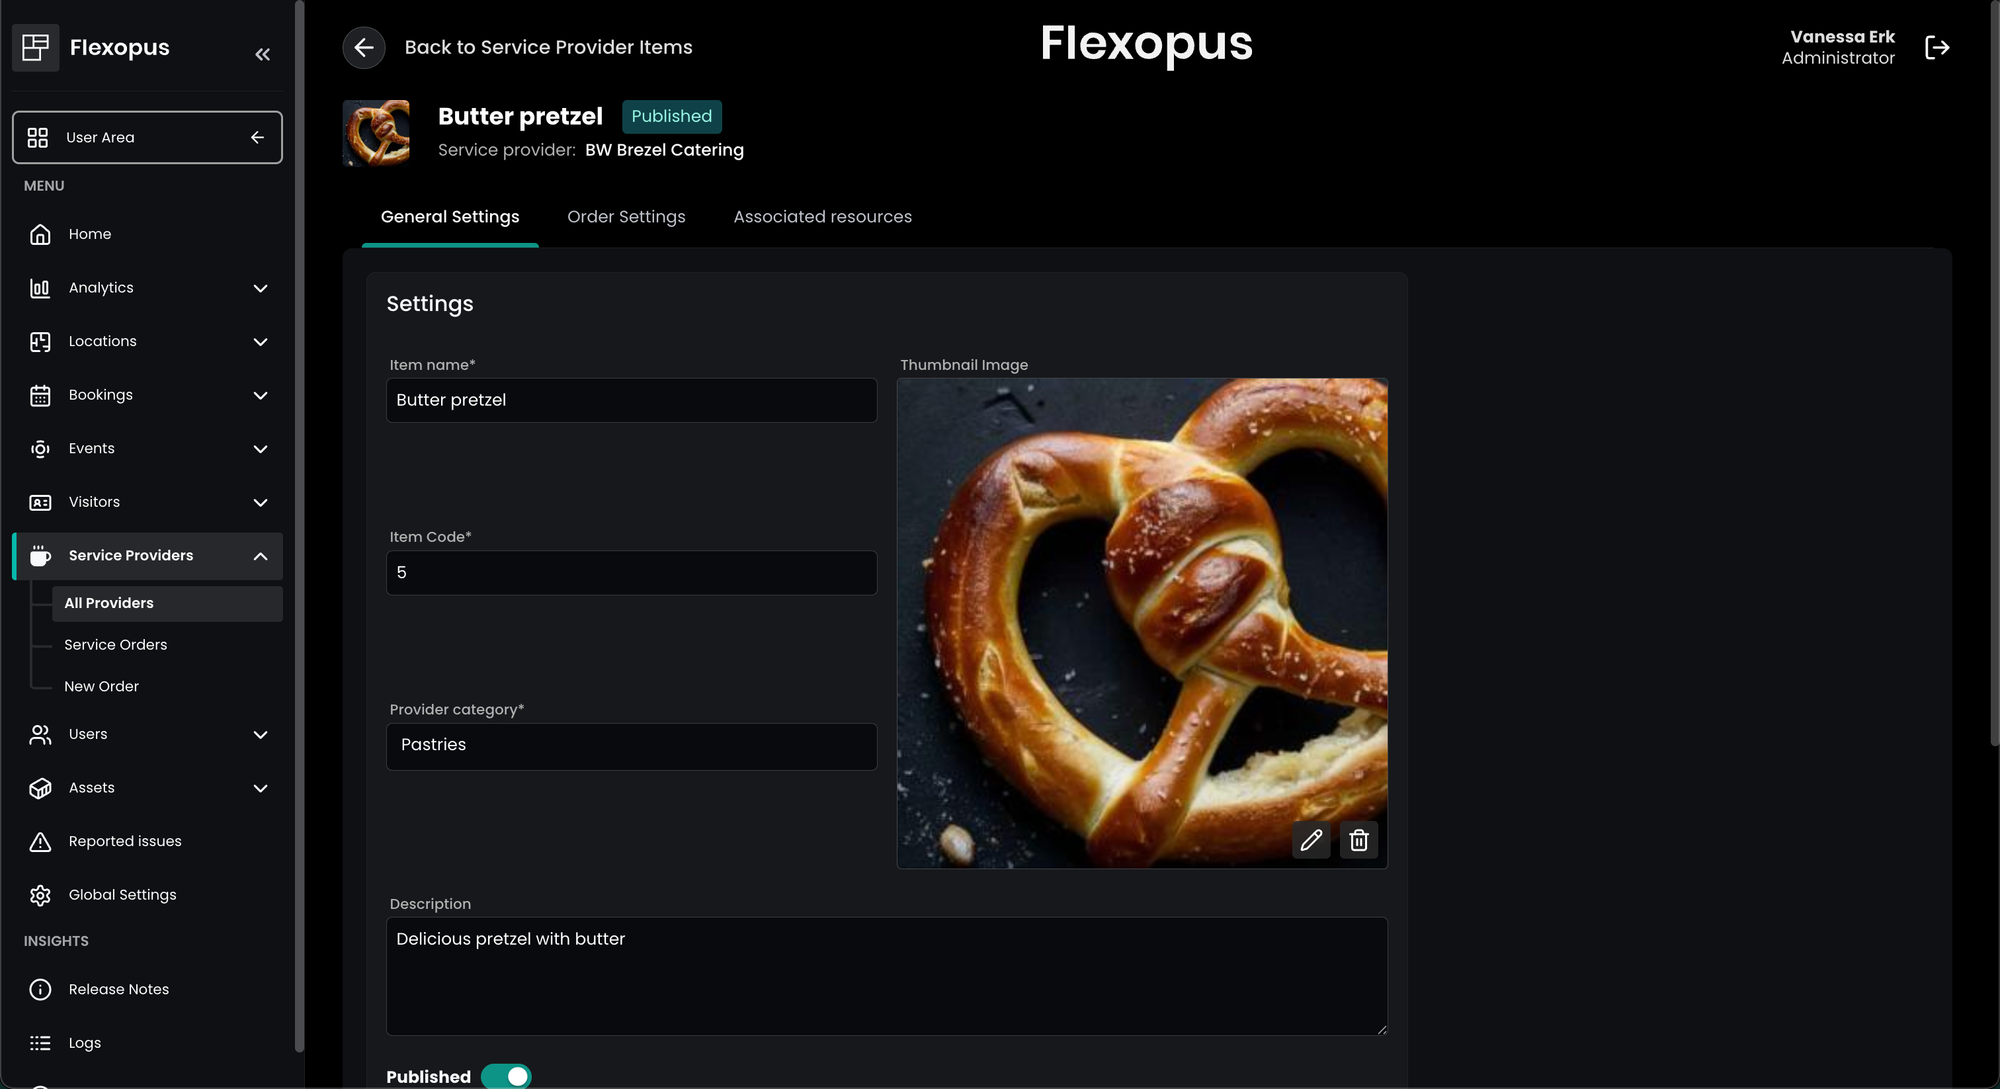
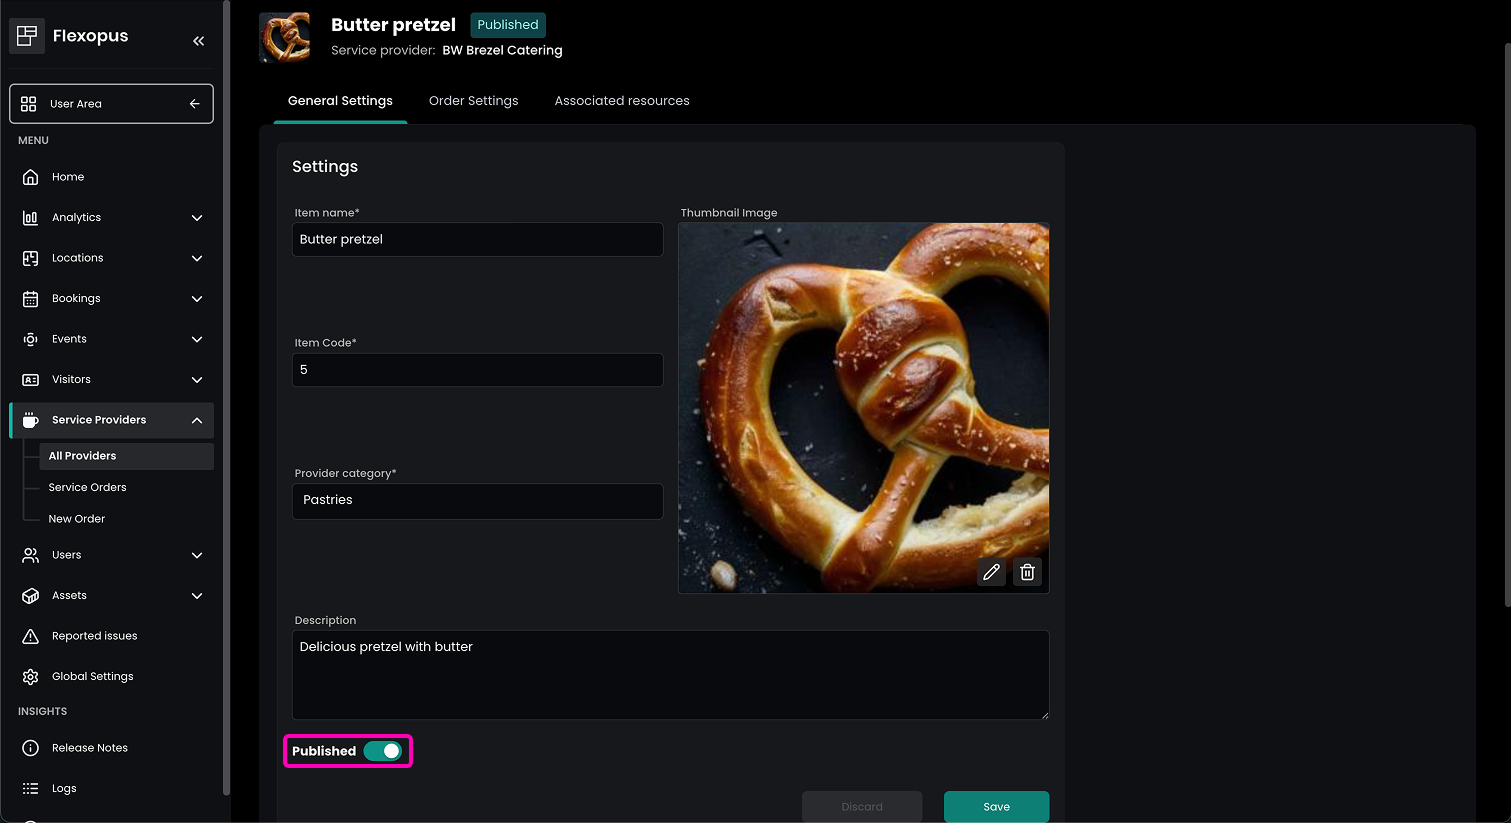
Each item has the following general attributes:
Item name: The name of the service itemItem code: The internal identifier of the catering service. This helps to identify the object better in case the name is changing, also you can use this later for statistics or accounting. Example: F-00001Provider category: The category of the item. Example: soft drinks, hot drinks, snacks, foodDescription: The description of the item. Example: 0,33 soft drink, vegetarian food etc…Published: Can users order this item or not.Thumbnail Image: An image of the item. You can use an image also from the internet, it's not really necessary to make a picture of each element.
Item categories
Service items can be grouped in different item categories, that can be managed in the Item categories tab. Each category can have its own grace period, allowing service providers to offer multiple item types with different processing needs.
Export & Import
To quickly upload new or update existing service items you can use the export & import functionality. To do so navigate to the Export & Import tab in the service provider overview. Follow these steps to ensure a proper import:
First, download the list of all existing items and their attributes as an Excel file XLSX or as a CSV file. You can use this file as a template for further steps.
Open the file using your spreadsheet editor. The first row of the document contains the names of the columns: item_code, name, category, description, order_limit, published, price. The item_code column is required for every row in the import. This parameter is used to identify the item. Above that name, and category field is also required, each item should be named to be usable in the dashboard and should have a category as well. Every other column is optional and can be deleted if not needed.
Leave only the columns you wish to edit. Attributes (columns) not present in the import will not be changed.
You can also delete rows you wish to leave unchanged. Items not present in the import document will not be changed. Deleting items from the import document will not delete them from the system!
After cleaning up the rows and columns, update the fields you wish to change. Here is short description of acceptable values for some editable columns:
description
Any text is acceptable. We recommend using less than 200 characters.
category
Enter the category you would like to associate with the item. A category that does not exist will create the given category in the system.
published
Specifies the published status: use 1 for true and 0 for false.
Once you finished editing the document and saved it, press the Select File button at the bottom and select your updated file. After that, a green Process File button appears, which you have to press to upload and process the file. The system will check your file for errors. If there are any problems, they will be listed in a table below. If the file has no errors, the system will update your service provider items.
General Settings for Service Items
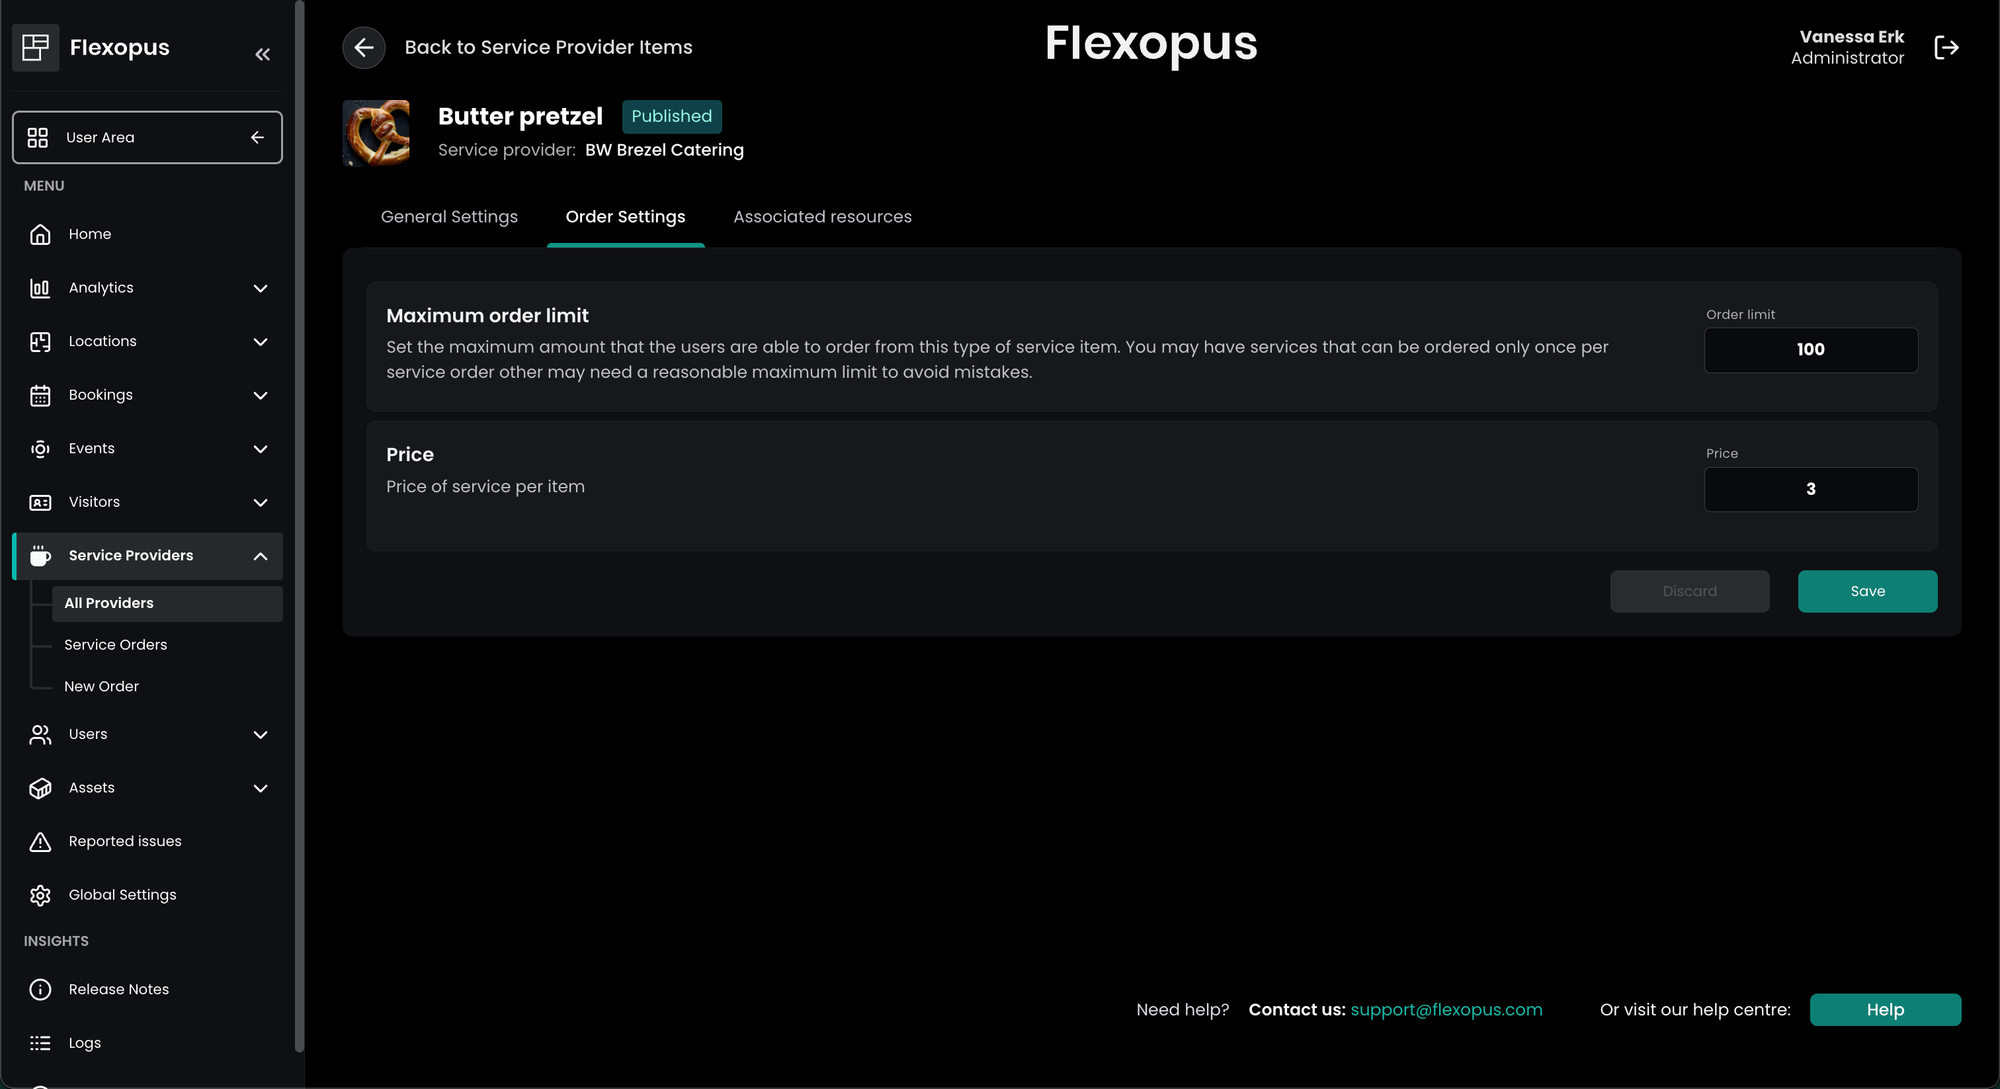
You can also specify order settings per service item. Those include the price of the item as well as the maximum order limit. You can find more information about prices and order limitations in the next sections.
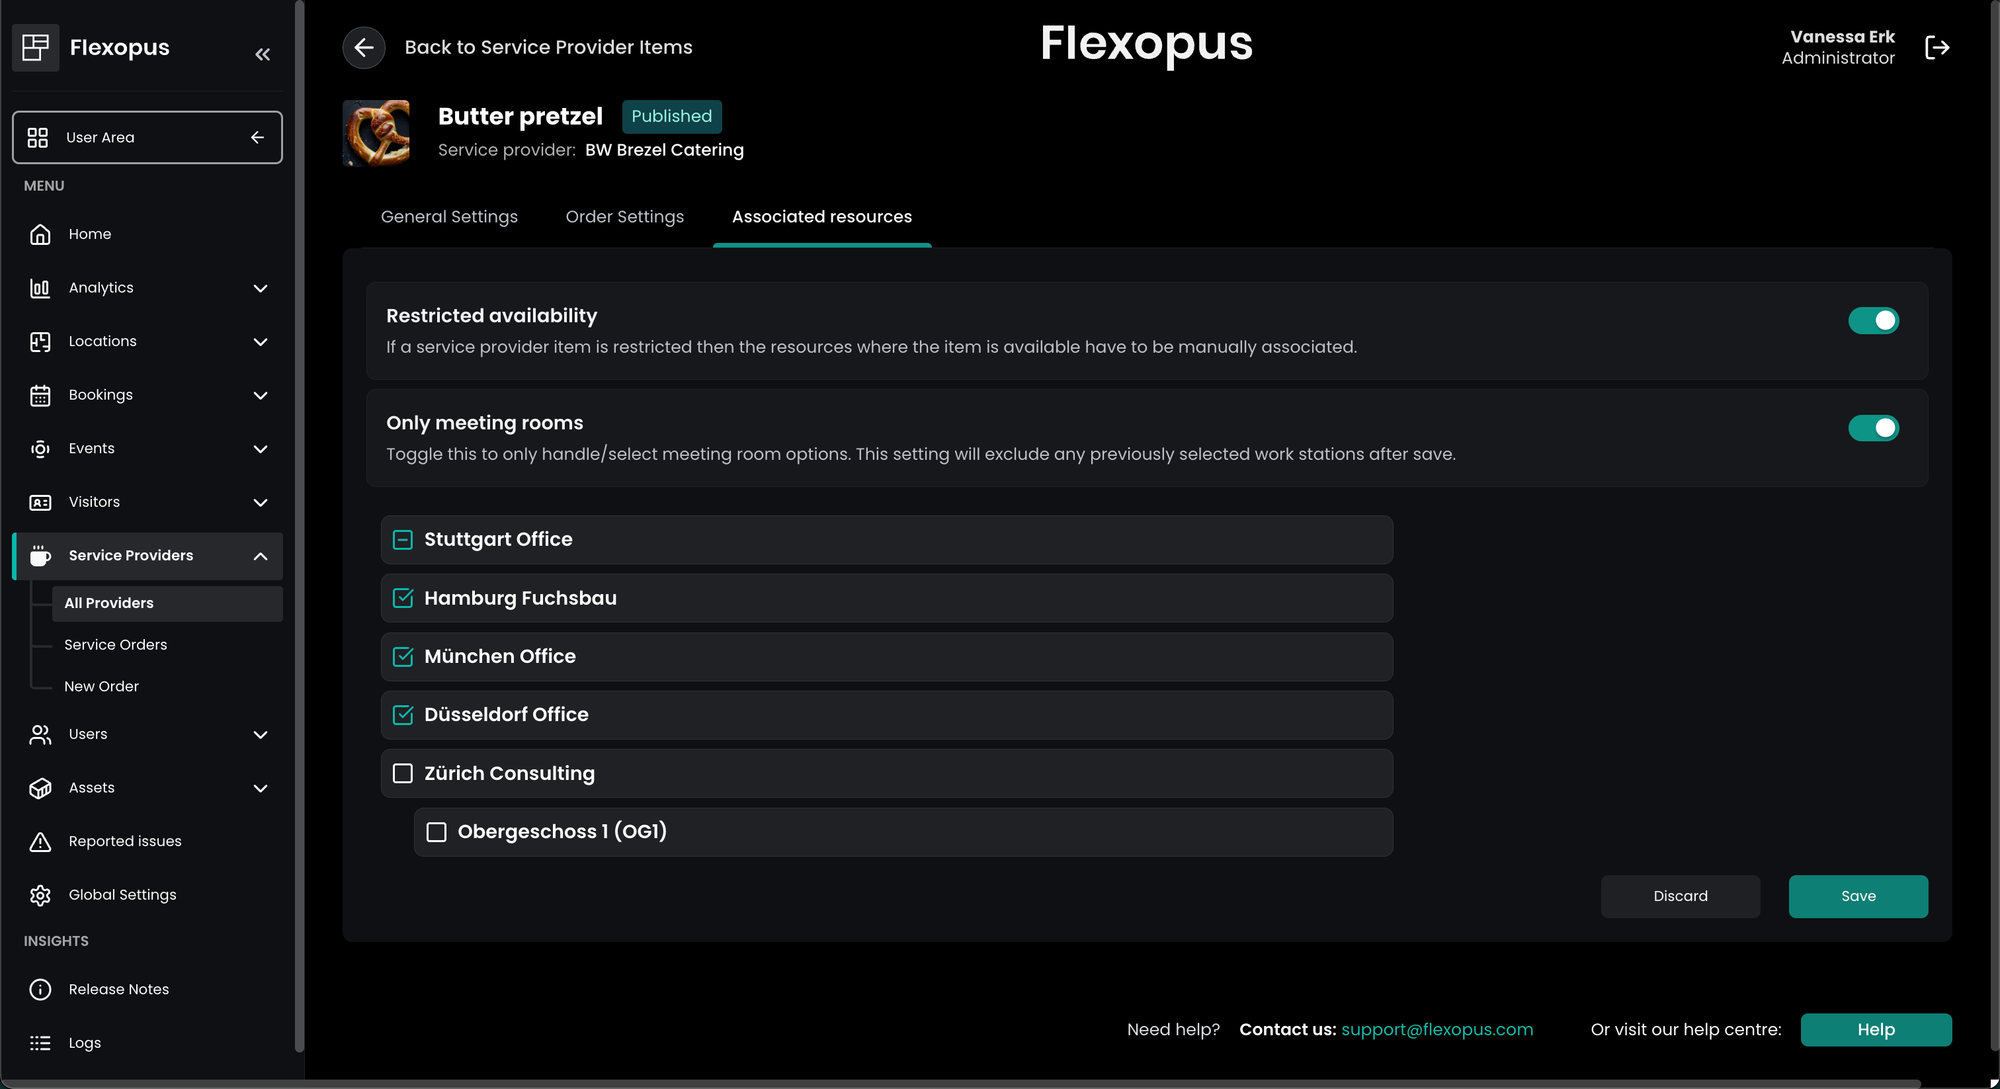
Sometimes specific service items, e.g. seating arrangements by a facility manager, are only available for specific meeting rooms and not a whole building. Those restrictions can be managed under Associated resources.
Service item prices
You can configure the prices for each item. We recommend doing it for each item. This information indicates for the users that the ordered service items are not for free for the company. It should help them to see, how much is the costs of the ordered service in total. This way, they may reduce the order volume or think more responsibly about the orders and cancel the orders in time if the order is no more needed.
| Service item | Amount | Item price | Sum |
|---|---|---|---|
| Item A | 5 | 5 € | 25 € |
| Item B | 10 | 10 € | 100 € |
| Sum | - | - | 125€ |
Based on the order values, we can calculate a statistic for the past to see how much money was spent for catering orders in the past.
Additionally, you can set an order limit for the users for the automated order approvals. Orders above this value limit need to be accepted by a catering administrator.
Order limitations
A service cannot be ordered ad-hoc and in an unlimited way, they need to be prepared, delivered or executed. Flexopus offers multiple ways to limit the service orders for the users. One example was described below, with the building associations, to limit the places where the service order offers the service. There are other configurations to limit the orders on the order level.
For the sake of simplicity, we will explain the limitations in the case of a catering service provider; however, it can be any other service provider as well.
The following limitations can be set:
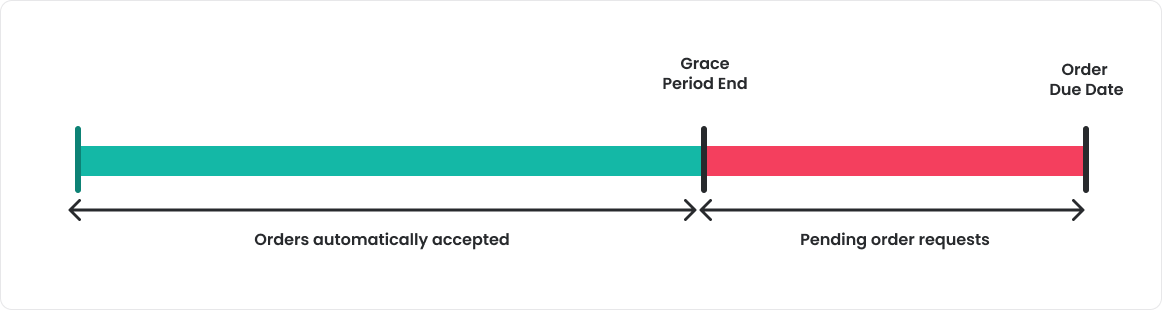
Time limitation
Ordering a service ad-hoc is not possible, there needs to be a time grace period that has to be respected to order a service. In the case of a catering service, it should be at least 1–2 days ahead. With the time limitations, you can decide how many days are required as a grace period to automatically accept an order. You can either define that all service orders require manual approval by activating the service provider setting under Order settings > Manual acceptance requiredor define a grace period in hours under Order settings > Grace period for service orders (in hours). Possible settings:
empty or 0: No limitation will apply6 hours: Orders until 6 hours before will be pending reservation48 hours: Orders on the same day and the day before will be pending reservation48+ hours: Same logic as before. You can set any limit.
Number of items (maximum per order)
The users should not be able to order unlimited service items. Ordering 10 cakes or 100 cakes can make a huge difference if the order is automatically accepted. There are also services that may be ordered only once per order. You can set a limit per order item in the service item settings.

Order value limitation (maximum)
The order value can also be limited. You can set a value per item. The order value will be calculated based on the item values in the order. The total value of the order cannot exceed a certain value limit, which is configured for the service provider. If the value is higher, the order will always be a pending order request. Orders above the limit will not be accepted automatically. They will be pending orders, that need to be accepted by an administrator.
Limitation of automatic approval
Service providers can be managed in a way that all service orders associated to that provider require manual acceptance. Every order will be created in pendingstatus needs to confirmed manually.
Group-based limitation (under development)
Define, with user groups, who can or cannot order automatically accepted service orders.
Order processes
Users and administrators can create service orders. There are multiple ways to create a service order:
- USER - Order without event in Flexopus
This is described in more details in the user article. - USER - Order with event in Flexopus
This is described in more details in the user article. - USER - Order with event in Outlook
This is described in more details in the user article. - ADMIN - Order without event in Flexopus
The admin order process is described in this article.

ADMIN - Order without event in Flexopus
As an administrator, you can create service orders by navigating to Dashboard > Service provider > New order. The service orders created by the administrators are always accepted by default, the limitation does not apply for these orders. Only the associated building limitation is checked here.
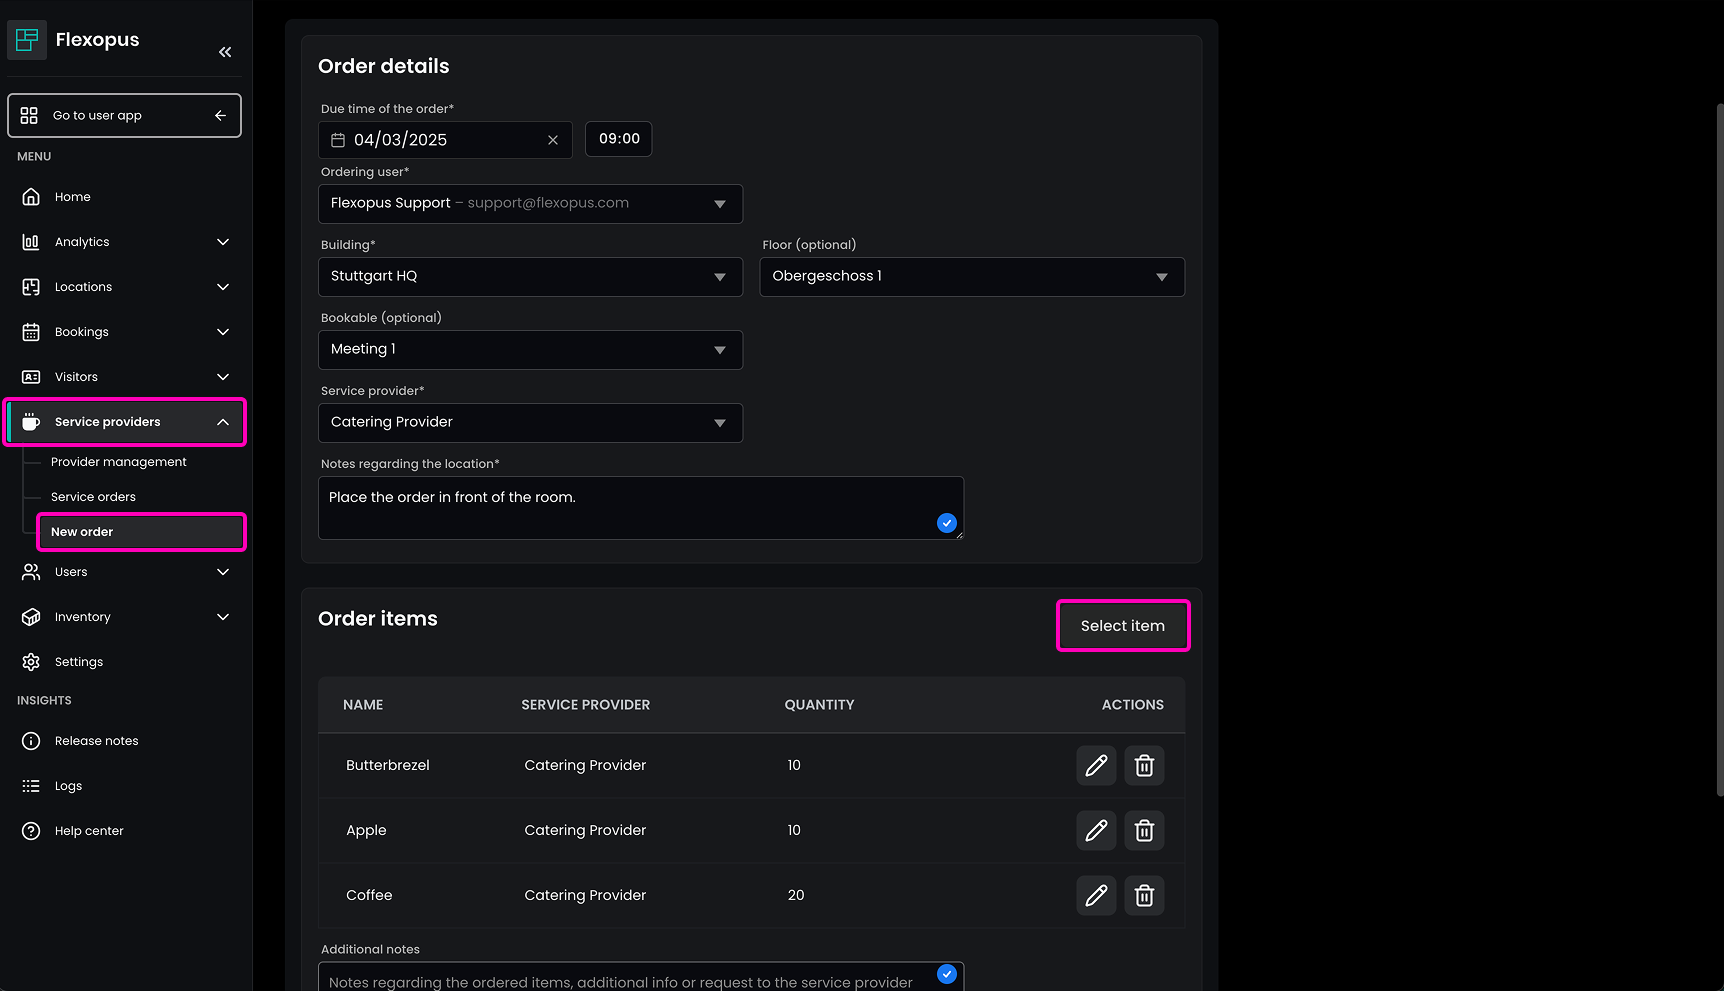
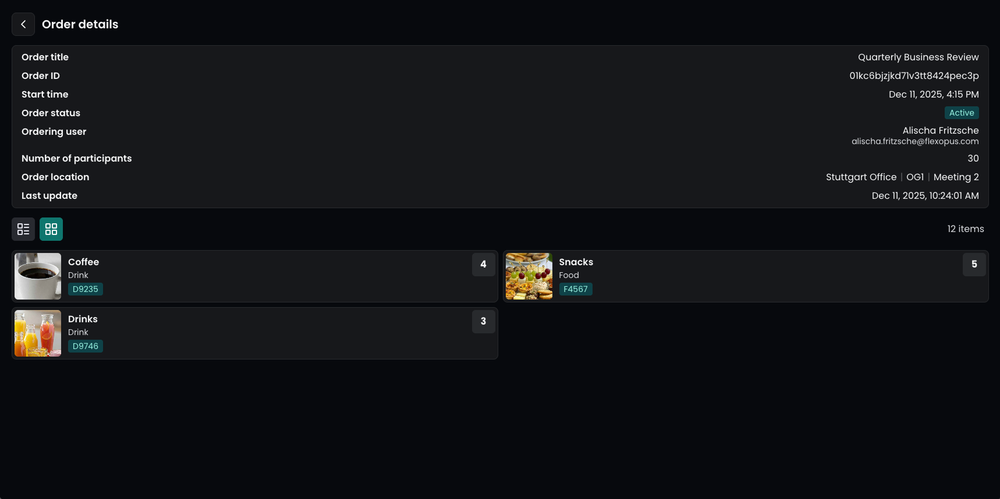
To order a service as an administrator, you first need to fill out the following fields in the Order details:
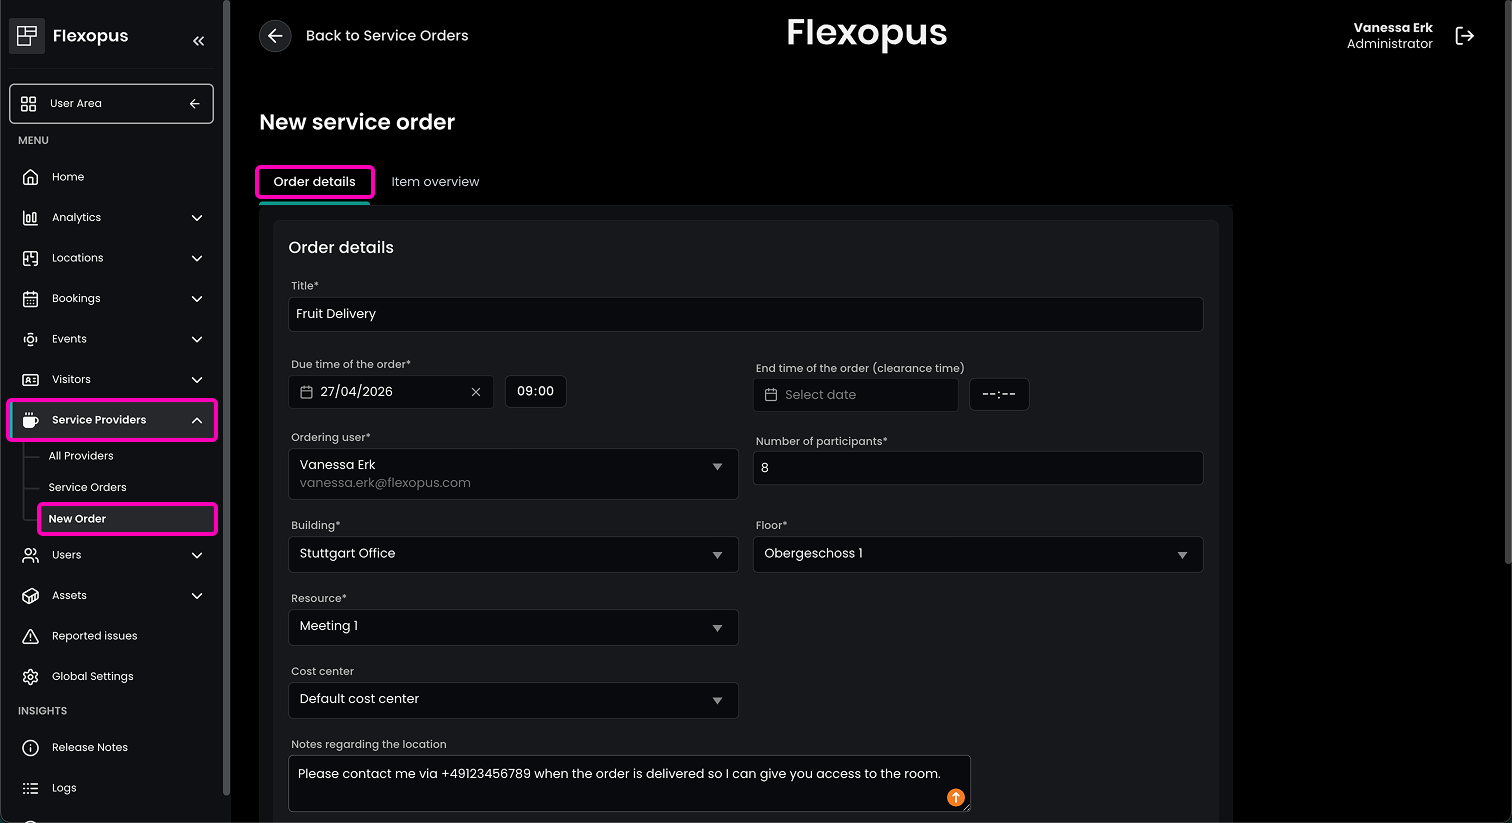
Title: A title describing the order Date and time: The date and the time, when the order is supposed to be delivered.Ordering user: The user, which is responsible for this service order. This user will be able to edit the order in his personal overview once it's created or revoke it if it's not needed.Building: Select the building for the service order. This selection will define, which service providers are available in the selected building.Floor: Select a floor for your service order. This field may be required or optional depending on whether the admin settings require a meeting room for service orders.Resource: Select a resource for your service order. This field may be required or optional depending on whether the admin settings require a meeting room for service orders.Cost center: Depending on the admin settings, service orders can be associated to cost centers. In this case you can select a cost center in the ordering process.Notes regarding the location: Add notes to provide important information regarding the location to the service provider, e.g. access limitations.
In the Item overview tab you need to fill out the following fields:
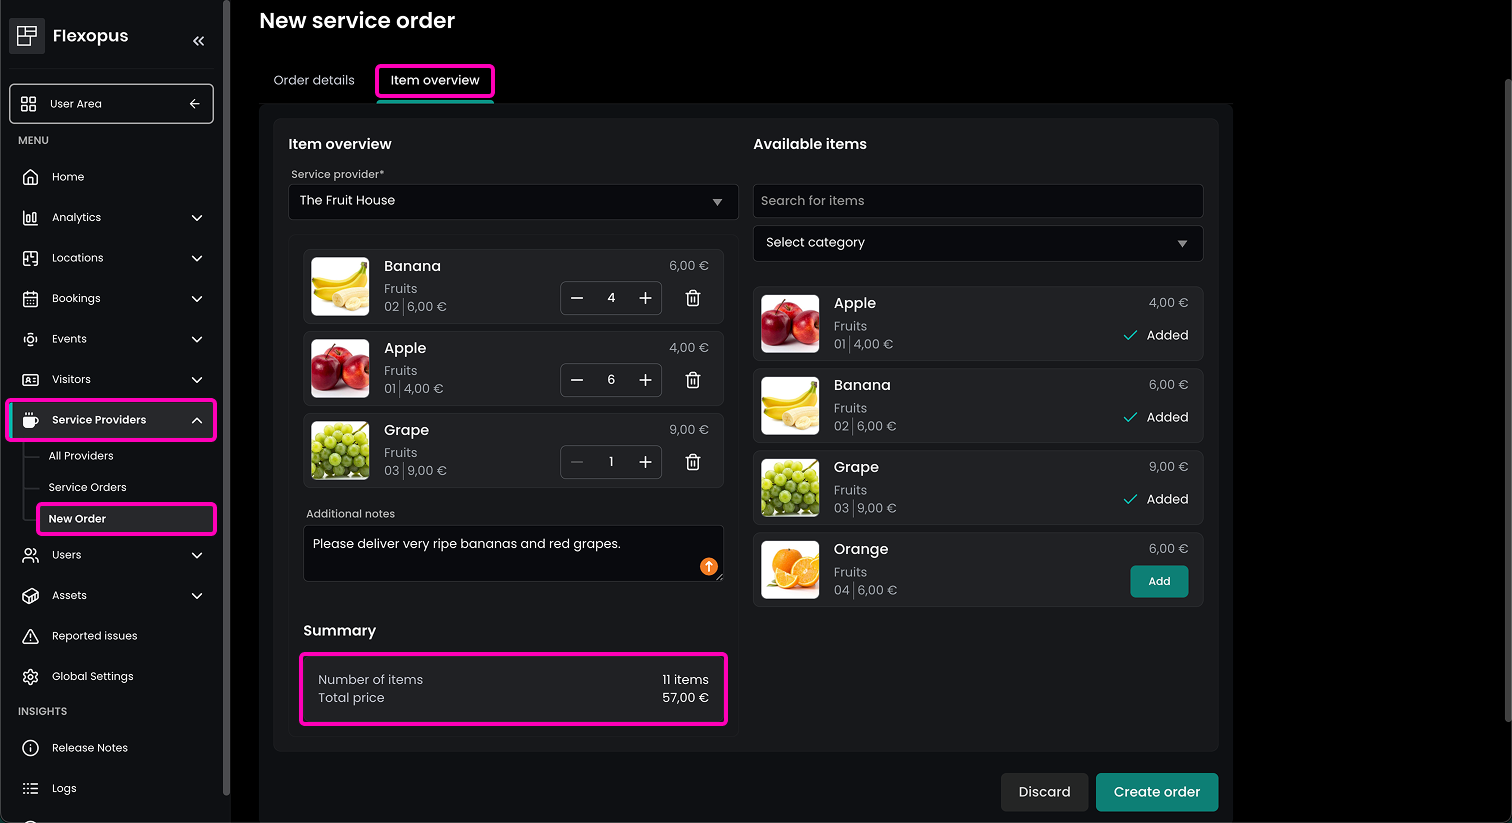
Service provider: Select which service provider you would like to order from. Based on the selected building, you will see a shortlist of the available service providers.Order items: Select which items you wish to order from the selected service provider.Additional notes (optional): You can add a note for your order items. Such as: “deliver lactose-free products”, or “please deliver only vegan food”.
In the Summary you see an overview of your ordered items and the total price.
Confirm the service provider order by clicking on Create order!
Service orders overview
Navigate as an administrator to Dashboard > Service providers > Service orders to see the service orders.
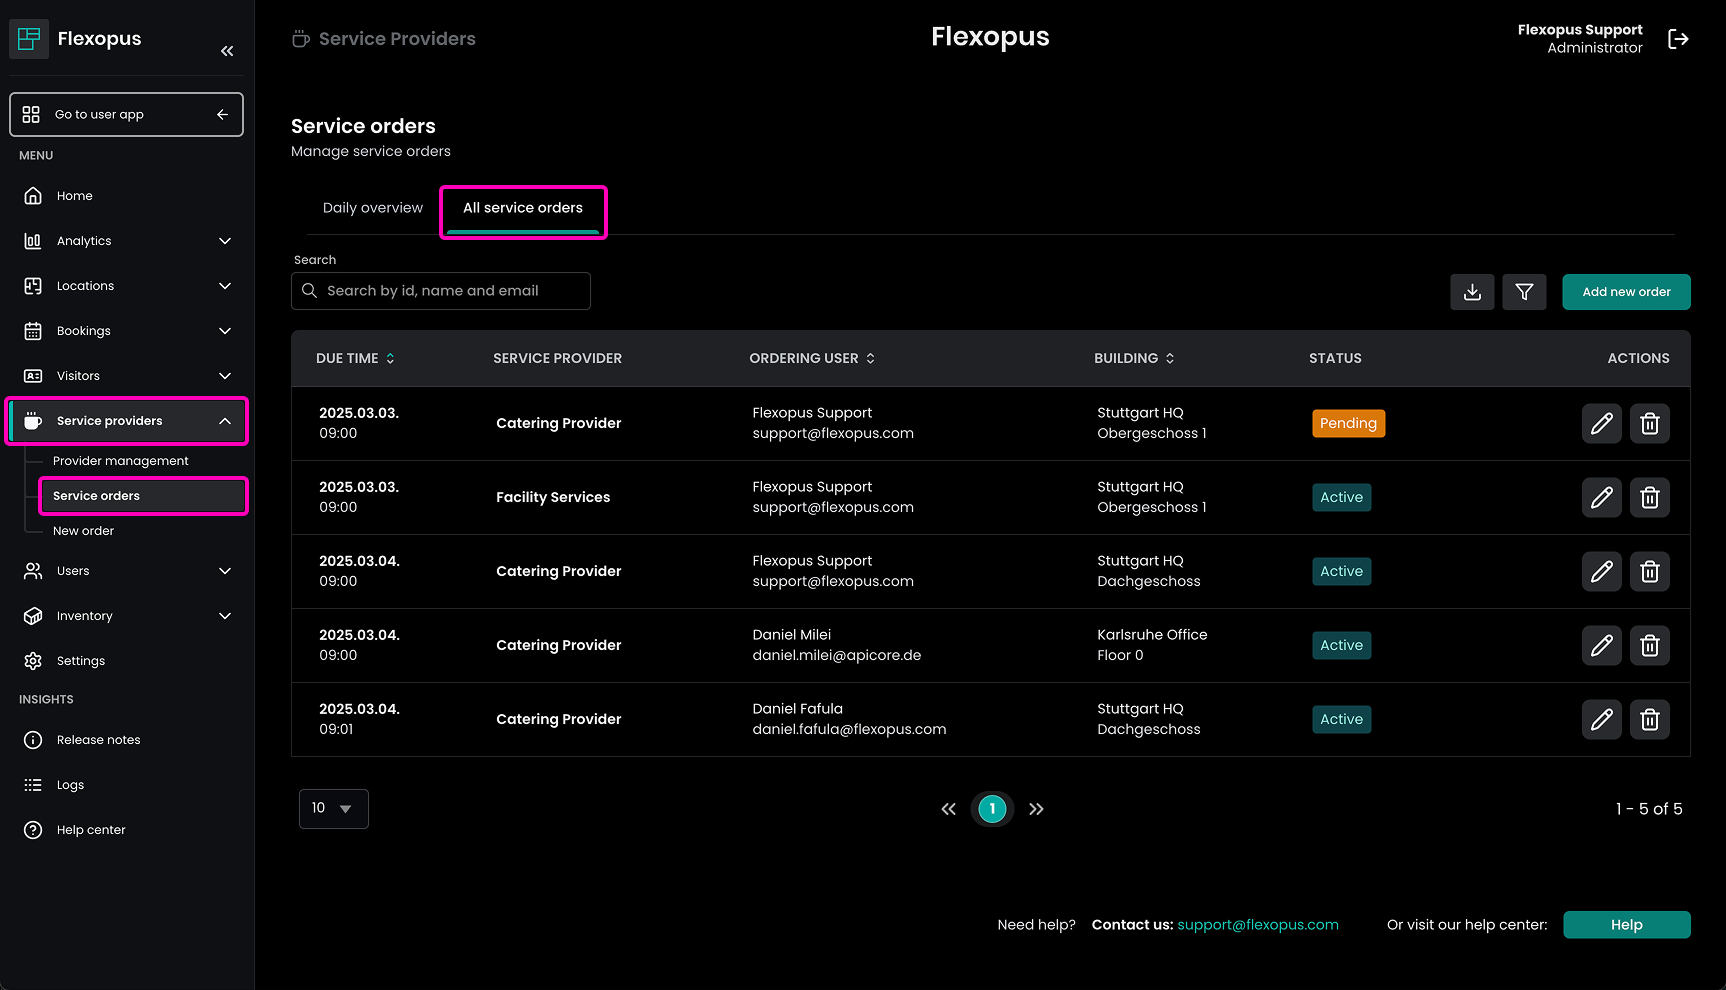
Here you can see all the service orders that were created by the users. You can see which order is pending and which order is active and approved.
You can accept a pending order by opening the order and setting the status to active.
Approval process
A service provider order has multiple statuses. The main statuses are: ACCEPTED, PENDING, REJECTED, REVOKED and PENDING REVOKE.
ACCEPTED
An order is accepted, if the order is not limited through any of the limitations listed in the limitations section. The order is created in time, the order does not exceed the price limit and the number of objects are in the limits and the user is allowed to create the service order.
PENDING
An order is pending, if the order was created or edited and a limitation applies. An administrator can ACCEPT or REJECT a pending order.
REJECTED
An accepted, or a pending order can be rejected by the administrator at any time.
REVOKED
An ACCEPTED or a PENDING order can be revoked by the user outside the grace period defined for the orders; however, if an order needs to be delivered within a few minutes and the user tries to revoke the order then it will be a PENDING REVOKE, which need to be accepted by an administrator.
An administrator can put the provider orders in any status except the revoke statuses.
Order summary / emails
Navigate as an administrator to Dashboard > Global Settings > Service providers and configure the email settings there. Here, you can configure the default service order settings for the emails.
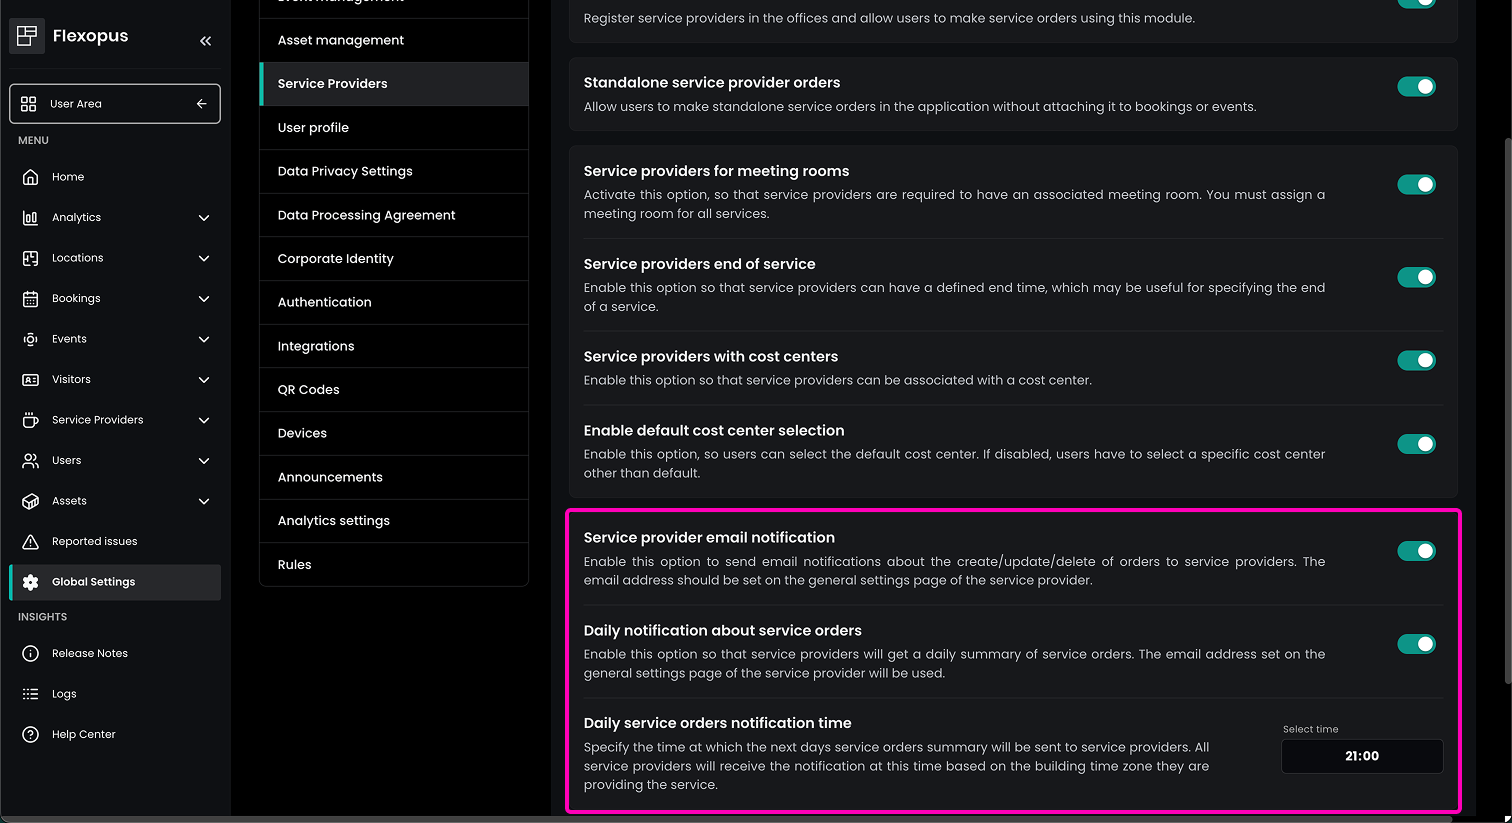
Service provider email notification
By enabling this option, the service provider gets notified about each order created, edited or deleted.
Daily service order summary
Enable this option to send an email summary one day ahead to the service provider to automate the delivery process. You can configure when the email is supposed to be sent to the service provider.
Configuration manual
To summarize the information above, follow these steps to configure the service provider module:
STEP 1 - Enable the module
Once the Catering & Service module is activated for your organization, navigate to Dashboard > Global Settings > Service Providers and enable the module by activating the toggle Enable Service Providers . This activates the new tab Service Providers on the left side in the dashboard.
Here you can also configure the module for your organization. E.g. you can specify whether service orders need to be associated to a meeting room or cost centers and enable service provider email notifications.
STEP 2 - Create a service provider
To create a new service provider, navigate to Dashboard > Service Providers > All Providers and click on the green button New service provider. Follow the descriptions in the section Service Providers and fill out the provider information and order settings.
STEP 3 - Assign building
As described in the section Associated buildings you can assign different buildings to service providers to make sure their services are only offered in the right places.
STEP 4 - Configure service items
Follow the instructions in the Provided Items section to setup and manage the offered services. Make sure to have clear descriptions and prices to make sure users know exactly what they order.
STEP 5 - Configure limitations
Think about what limitations you need to implement for specific service items or service providers in general. You can find an overview of all possible order limitations in the Order limitations section. Don't overcomplicate the process. It is also fine to not implement any limitations at all.
STEP 6 - Publish the items and the provider
Once everything is set up you need to publish the service items and the service provider. To do so navigate to the General Settings of the service item and service provider and activate the Published toggle. Don't forget to save your changes.
STEP 7 - Communicate internally
Now that your services are all set up, you can communicate internally that it is now possible to book services via Flexopus. Depending on your configuration users are now able to book standalone services via a new tile on the user side or as an attachement to a Flexopus event.
You can find more information about booking services as a user in the following article:
More information about the Event management can be found here:
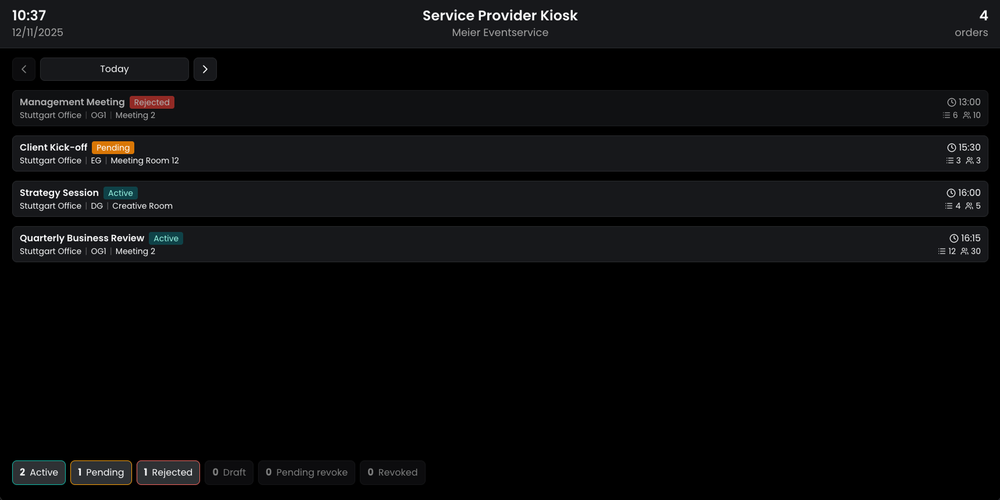
Service Provider Kiosk Display
To provide service providers a clear overview of their tasks and helping them to stay organized and up to date with all assigned orders, you can set up a Service Provider Kiosk Display to view all upcoming orders in a read-only format.
The Service Provider Kiosk can be created in the Admin Area under Global Settings → Devices using the Create device button.
After the device has been created, administrators can, in addition to standard device settings, configure connected service providers and specify — via a checkbox — whether orders from all associated buildings or only selected ones should be displayed.

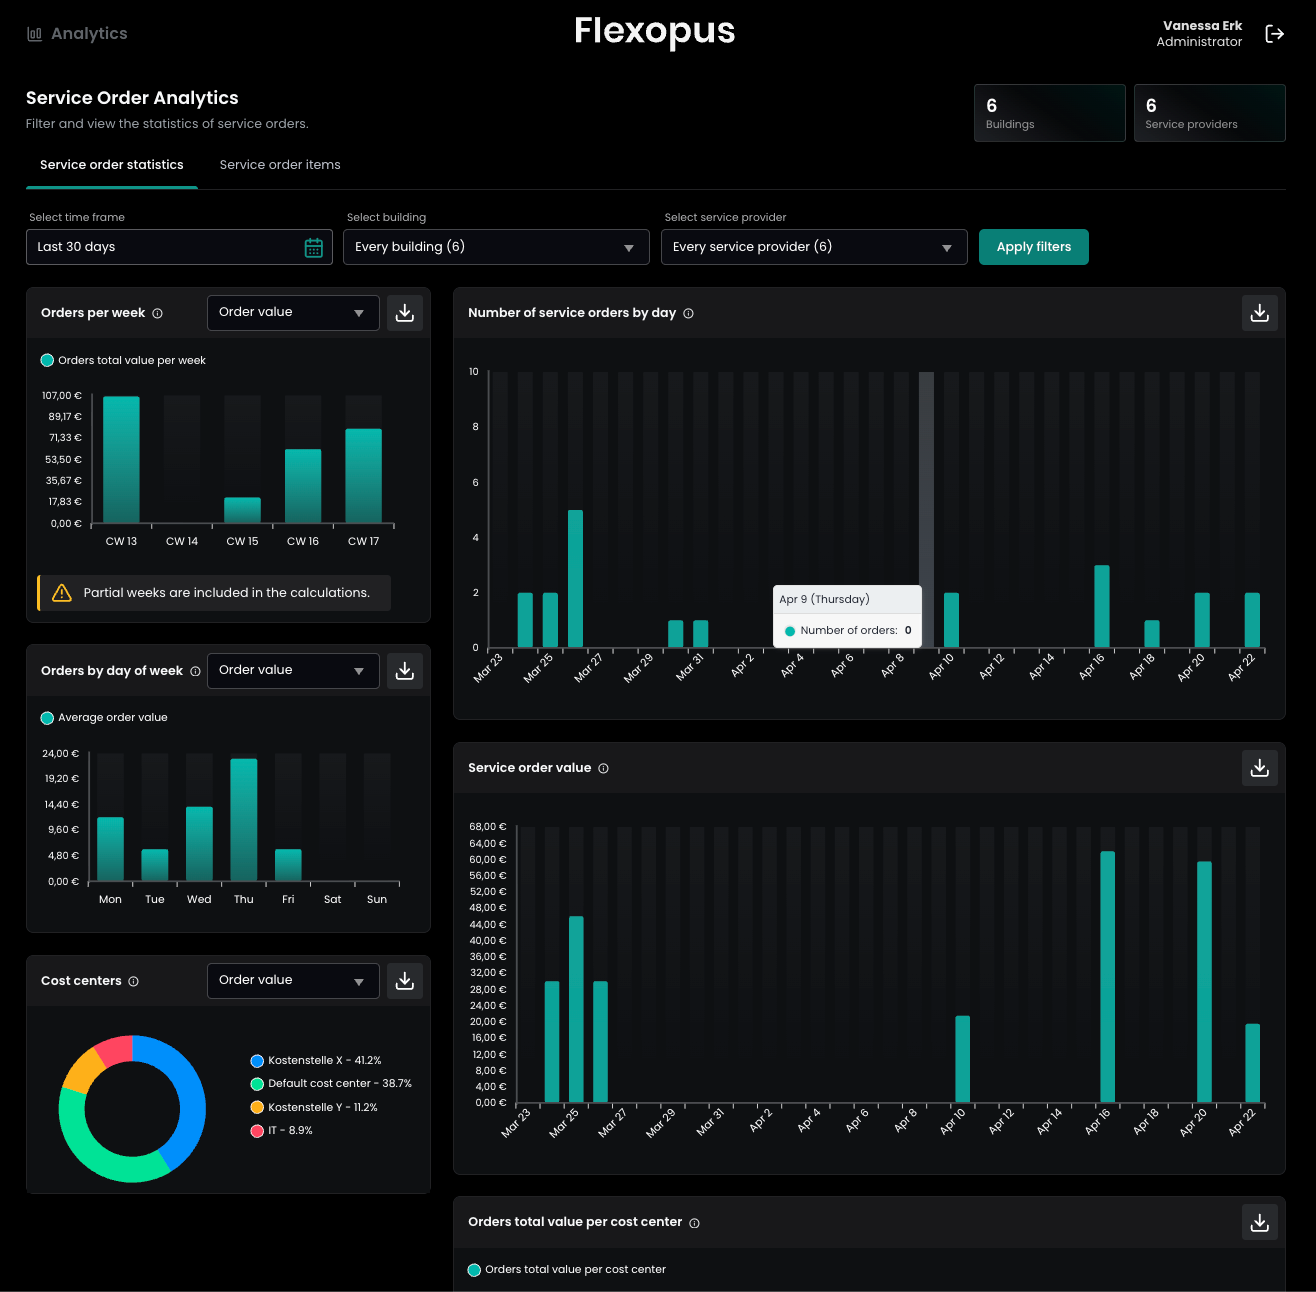
Service Order Statistics
Use the Service Order Statistics dashboard to gain deep insights into your spending and service utilization. This tool allows you to track order volumes, financial impact, and departmental allocation in one centralized view.
To view your statistics, navigate to: Analytics > Service Statistics.
For deeper analysis or internal record-keeping, you can export all data directly from the dashboard. This allows you to archive statistics or perform custom reporting in external tools.